
If you have trouble viewing this video from this Behance post,
please try again at its Vimeo post: https://vimeo.com/129325790.

"Marketing shot"
Summary
For this assignment (Adobe Gen Pro Animation course, May 2015, Class 5), we were to shoot a “short stop-motion sequence based on the theme of teaching.” We were then to assemble the footage in After Effects, following the example in our tutorial ( https://vimeo.com/125071652 ), and export a video.
I confess: This project is not about teaching. (At least not directly. It is about sharing with others, so you could say I am teaching that.) Stop-motion animation has always left me in awe, especially when I think about how much raw work goes into creating something like Wallace & Gromit. This was my first stop-motion project, and my focus was on finding any kind of inspiration, regardless of theme.
Once I got started, the whole project came together swiftly (around three hours) and was loads of fun to design, shoot, and assemble. The result was a fun blend of stuffed toys, M&Ms, and a mirror.
The skinny: A Chicago Blackhawk shoots M&Ms one at a time down a long ice rink to a dog, who happily receives them. A mouse enters the scene and tries for the whole pile, but the Blackhawk swats it away. It comes back, and the dog and mouse together get past the Blackhawk and devour the pile. They then merrily chase each other back to the end of the rink and wait for the Blackhawk to send more. He turns to the camera as if to say “O... K...,” pauses, gets a new pile of M&Ms, and shoots the entire pile to them. They eat it all and “wag” their thanks, he turns again to the camera, and the scene fades out.
Inspiration
I looked around the house, searching for a teaching-related object I could photograph a bunch of times while making it appear to move around a scene. I thought of using pencils or rulers. I thought of sticking a paper “fly” to my laptop screen and having it manipulate After Effects menus. I thought and thought, but none of these ideas satisfied; what I really wanted was something with a face.
I looked around the house, searching for a teaching-related object I could photograph a bunch of times while making it appear to move around a scene. I thought of using pencils or rulers. I thought of sticking a paper “fly” to my laptop screen and having it manipulate After Effects menus. I thought and thought, but none of these ideas satisfied; what I really wanted was something with a face.
I walked over to a collection of stuffed animals. Surprisingly, most of them had eyes and noses but no mouths. A stuffed Chicago Blackhawks toy finally stood out, probably because of its great facial expression. But what would I do with it? At the very least, since it is a hockey toy it would have to shoot a puck. My eyes then wandered to a bowl of M&Ms, and the idea struck: “Wouldn’t it be fun to have this Blackhawk shoot M&Ms to another stuffed toy?”
I searched the house for another stuffed toy with a complete face and found a pair of nearly identical huskies that differed only in their poses. These were perfect: Dogs are usually quite happy to receive treats, they express that joy through various poses, and I now had two ideal poses that I could switch between to bring the animation to life.
A stuffed mouse toy sat right beside them; I thought, “Why not?” and threw it in the mix.
One more issue remained for my “cast”: The Blackhawk needed a hockey stick. Fortunately, over the years, I have saved cake decorations, and I found among them a plastic Blackhawks hockey stick that was just the right size for my stuffed Blackhawk. However, he had no hands to hold it; I solved that issue by poking two long sewing pins through it and into his stuffing.
Setup
I wanted the Blackhawk to shoot M&Ms one at a time to the dog, who would happily receive them. I wanted the dog’s two poses to show it first anxiously waiting for the next M&M and then getting all dog-happy as it arrived. I also wanted the mouse to come in at some point and make some trouble.
I set up the scene on my bedsheet and experimented with the animation, but the wrinkled sheet didn’t look good and was difficult to work with. I wondered, “What could I use that is flat and looks more like ice?” The answer: A mirror! I found an ideal stand mirror, laid it on the bed, and set up the scene.
The mirror looked like ice, and I could easily move objects along its flat surface. However, it reflected stray elements around the room, such as wallpaper and bookcases. I needed to find a larger space, away from such elements. I also needed a “floor” for the scene that fit the theme better than carpet.
I wandered into a different bedroom and found an ideal spot: a queen-size bed that was large, centered in the room, and covered with a blanket as blue as lake ice. I again set up the scene, but found that even here the mirror reflected the walls. I began to understand why filmmaking takes so much work and costs so much money, as I realized that the only way to overcome the reflection issue was to enclose the scene in “walls” of my own making.
I found a white sheet, a large paper-ream box with lid, and a large Styrofoam cooler. I set the objects on the bed and draped the sheet over them to create a white “wall” along the length of the mirror. I also found a large blue plastic container lid and set it up as a second “wall” at the end of the mirror. This setup finally solved the reflection issue, if viewed from close up and from a high enough angle.
The poor lighting in the room created yet another issue. The scene was dark and shadowy, so I added a fluorescent stand lamp to brighten it up.
I set up the cast and practiced the animation. With each pass, new questions arose. How many frames would it take to turn the Blackhawk as he shot an M&M? How would the M&M travel in relation to the hockey stick? How would the dog react, and when would the dog switch poses? I continued to practice, working out the various answers and locking in the timing. Being a musician helped: I could easily “feel” frames per second. For example, 8fps feels like a subdivided quarter note beat, and 6fps feels like a pair of triplets. Practicing the animation became a sort of song that I learned to sing from memory.
I set up my camera (a Canon PowerShot G15) on a full-size tripod right next to the bed, so that I could photograph the scene (and only the scene) without using zoom. (I could not risk having the camera go into power-saving mode and thereby destroy a zoom setting. Getting back to the same zoom afterwards would be nearly impossible.) After many test shots, I found the ideal angle and locked the tripod. I also attached a remote-control shutter release so I would not jiggle the camera.
I placed all elements in their starting positions and prepared to roll.
Production
As I began shooting, I quickly realized that the dog was too static for one that should be full of anxious energy while waiting for treats, so I began moving it back and forth in nearly every frame, showing anticipation of what was to come.
After several successful M&M sequences, I decided to bring in the mouse. I had thought very little on what I would actually do with it; however, I had already shot a bunch of footage, so I just pushed on and made up the script as I went along. I first had it crawl up onto the “rink” and intercept the current M&M. I then thought it would be fun to have it head straight for the whole pile, have the Blackhawk swat it like a puck and send it flying, and then have it get up and try again for the pile.
In the meantime, what to do with the dog? Aha! Have it catch the mouse’s passion and head for the pile with the mouse on its tail. I made it so: They both get past the Blackhawk and devour the pile.
What next? I know! Have them chase each other back to the end of the rink and then both wait for the Blackhawk to send more M&Ms. He would then pause in apparent disbelief, as if to say, “O... K...”
Should I end it there? No! Have him get a new pile of M&Ms and then shoot the entire pile to the two animals, who both eat them up and “wag” their thanks. Have him then turn again to the camera: He has done his job, he has shared his treats, and he has justified the permanent smile on his stuffed toy face, as well as that on his official Chicago Blackhawks Indian-head logo.
All are happy, all is well, the scene can now end, and the viewer is satisfied.
Post-Production
I dumped my 124 photos of footage onto my laptop and, following the directions in the tutorial, launched After Effects, created a new composition, imported the photos as a JPEG Sequence footage asset, Interpreted the footage at a low frame rate, created a timeline layer from the footage, and resized the layer to match the canvas size.
Method Note 1: The tutorial teaches you to create a layer from the footage and then Interpret the footage at a lower frame rate. This then requires that you manually extend the clip length to match the resulting extended footage duration. A better method: If you first Interpret the footage at the lower rate and then create a layer from it, the resulting clip is automatically the correct length.
Method Note 2: The tutorial teaches you that if a layer’s resolution is larger than the canvas, you make it fit by zooming out, Shift-dragging the layer’s bounding box down until it fits the canvas, and then zooming back in. A much easier method: Select the layer, and then just select Layer / Transform / “Fit to Comp” (or “Fit to Comp Height” or “Width”) from the top menu.
The tutorial author Interprets his footage at 6fps. This rate works well enough for the tutorial’s example, but I think it looks somewhat choppy. I had taken 120+ photos of footage, so I thought that would be enough to bump my own rate up to 8fps and thereby get a smoother result. Unfortunately, playing the sequence showed that although the flow was smoother, it flew by too fast, so I ceded to the 6fps suggestion.
Even at 6fps, however, certain events still went by too fast. Translation: I had not shot enough footage. For example, as noted earlier, I wanted the Blackhawk to pause and look at the camera while considering what to do about both animals waiting for treats: When I played this section, the Blackhawk did not pause at all. In addition, the swat-the-mouse and shoot-a-pile-of-M&Ms sequences appeared to be over before they even began.
To solve these issues, I duplicated (in Windows) all of the photos that make up these events. I then deleted the saved footage layer and asset (in After Effects), reloaded the larger set of photos as a new footage asset (and re-Interpreted it at 6fps), and played back the sequence to re-check the timing of those events. If any event still ran by too fast, I duplicated more photos and repeated the footage import process until I was satisfied with the “feel” of the entire sequence. For example, the Blackhawk now pauses for 19 frames (split between three actions), giving the viewer plenty of time to focus on him and catch on to what he is thinking. I made the other two events “slow motion,” achieved by duplicating each frame only two or three times. It would have been better if I had shot more footage, but I had already taken everything down. Besides, this is a class assignment, not a commissioned project!
The last issue was to smooth out the sequence’s start and end. I dragged the first and last photos separately to the timeline, set the first clip’s Opacity to fade in with an ease, set the last clip’s Opacity to fade out with an ease, and sandwiched the footage layer clip between the two.
Done!
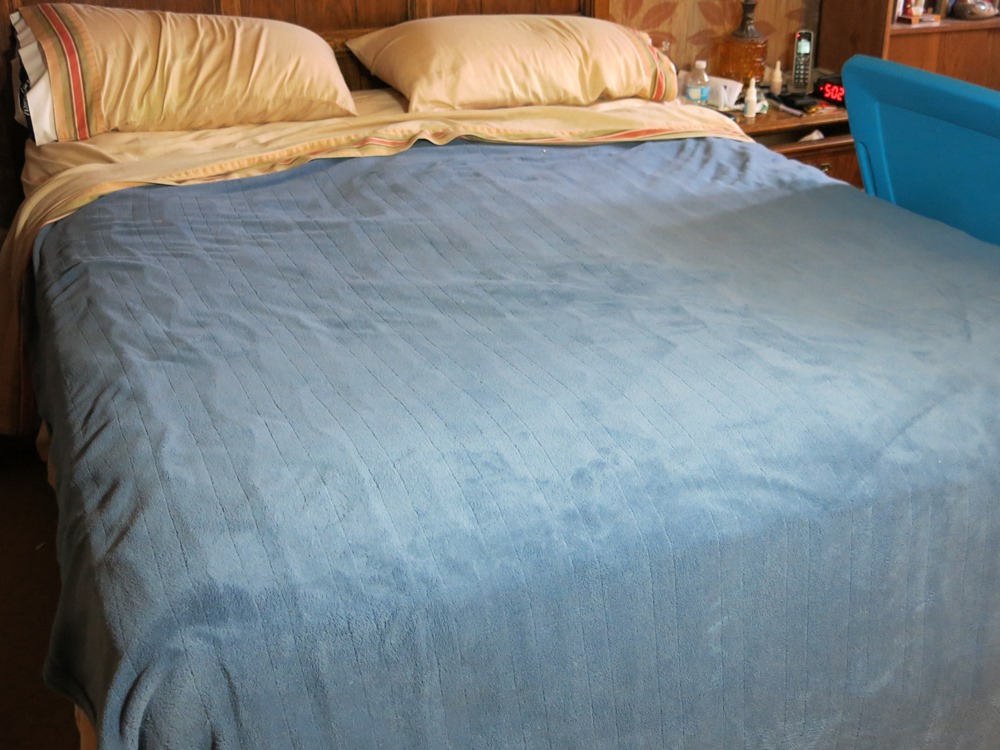
The “floor.” (An electric blanket.)

The right “wall.” (A large plastic container lid.)

The objects that hold up the sheet that creates the back “wall.”
(A paper-ream box lid, a Styrofoam cooler, and the paper-ream box.)

The pins used to hold the hockey stick in place.
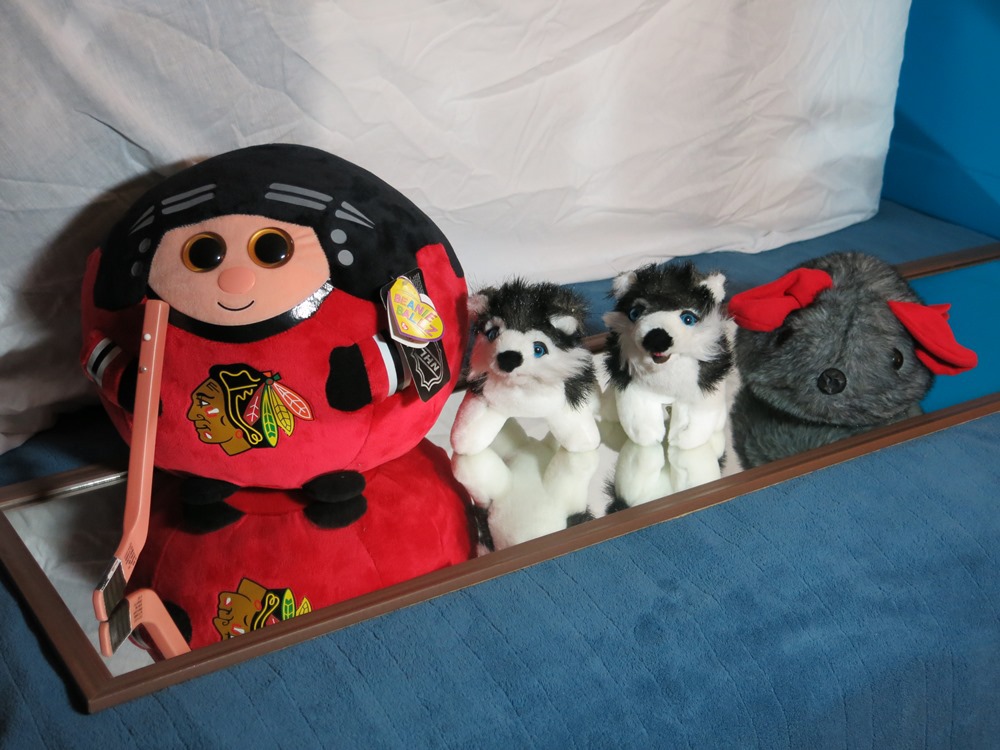
The cast.

The production setup. (Minus the camera, as I am using the camera to take this photo.)
Note how close I placed the tripod to the scene; I wanted to avoid zoom, in case the camera went into power-saving mode and turned itself off, which would have destroyed any zoom I had set and made it impossible to get a complete set of consistent footage.


