

For this assignment (Adobe Gen Pro Animation, May 2015, Class 1 assignment), we were to create an animated GIF using Photoshop’s Frame Animation capability, following the Puppet Warp example demonstrated at https://vimeo.com/125071651.
As a musician, I knew right away that I wanted to do something with an orchestra conductor, since an animated GIF lends itself well to the seemingly endless, repetitive beat patterns such a conductor must wave at the musicians. Using Puppet Warp to animate the waving arm was not enough, though: I also wanted to show the conductor’s face melting in the sea of perspiration that comes with the job.
I found an ideal, reusable image of the conductor Vladimir Jurowski. (Source: Wikipedia article of the same name. Image credit to Alexander Nikiforov, CC BY-SA 3.0.) I set up his arm to conduct a three-beat pattern, starting with a slow upbeat and then driving into a relentless fast tempo, during which his face begins to perspire and eventually becomes a puddle. The tempo backs off, the puddle dissipates, his face returns to normal, and he gives a slow ending stroke. Then it starts all over again. Due to the incremental facial changes and the various tempos, this animation is rather large, with 149 frames.
Below are a few screen shots, with explanations of how I created this project.
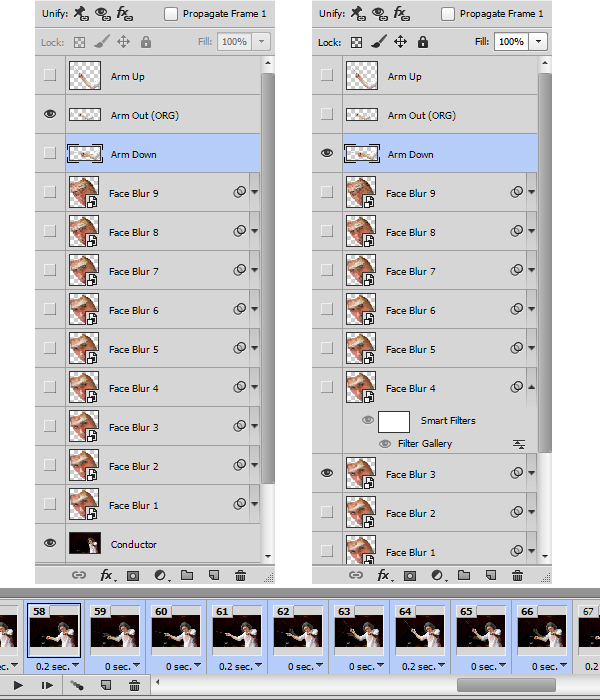
Samples of the project’s layer and timeline layouts. (Continue reading for example layer images.)
Conductor layer:
The original image (the starting image in the animated GIF), minus the conducting arm.
To simulate the conductor waving his arm, I had to get the arm out of the background so I could place it where I wanted it. To do this, I had to make the background realistically appear as though the arm were never there.
I first Spot-Healed the baton out of the patterned area (likely auditorium sonic panels) of the dark brown background. I then tried Spot-Healing the arm out of the background, but this gave unpredictable results due to the arm’s bright colors and its attachment to the body. Instead, I captured the dark brown background color using the Eyedropper and then Brushed the arm out. I then Spot-Healed the Brushed region to get a more accurate dark brown blend.
Arm Up / Out (ORG) / Down layers:
The arm and baton in three positions. The original photo shows the arm extended Out, which I use for beat two of the pattern. I added arms in Up (beat three) and Down (beat one) positions. Note that in the original photo, the Out arm really does curve in the middle of the arm and at the wrist as shown; even though it looks like I applied some sort of funny warp to it, I did not change the Out position at all.
To extract the original arm and baton, I first clicked the Magic Wand on the dark brown background. The extreme contrast between the spotlighted person and the dark background made it easy for the MW to make an accurate selection. I inverted the selection, copied it to a new layer, and manually Erased all but the arm (from the shoulder) and baton.
I then made two copies of the arm and Puppet-Warped their shapes and positions. For the Up position, I raised the arm up and both lengthened it and straightened the wrist a little. For the Down position, I lowered the arm, shortened it, and straightened it a bit; I also shortened the baton, to help it appear to point more straight on (“at” you) than to the side. Capturing these positions from actual video footage, with correct proportions and lighting, would have been more accurate, but without such footage, these images do well enough, when in motion, for an animated GIF.
Face Blur 1–9 layers:
The face, blurred little by little by increasing the Size and Magnitude settings of the Ocean Ripple filter.
I captured the face using the Polygonal Lasso tool to outline the face edges and then copied this selection to a new layer. I turned the layer into a Smart Object so I could experiment with filters non-destructively. I called on Photoshop’s Filter Gallery to deliver something that would give the illusion of perspiration, and finally settled on Distort / Ocean Ripple.
I made eight copies of this layer and ramped up their Ocean Ripple settings little by little. I started out with Size: 1, Magnitude: 1, and ended with Size: 9, Magnitude: 12. (Increasing the magnitude faster than the size helps the selection look even more watery.)
Timeline:
This project’s timeline sequences frames as described earlier: The conductor conducts a slow upbeat, a rapid three-beat pattern while his face liquefies, a slower pattern while his face returns to normal, and then an ending slow stroke. This all requires 149 frames.
In a Photoshop Frame Animation, each frame consists of a set of active layers, each with its own Opacity, Position, and Effects. In this project, only Opacity matters, as described below.
The arm starts Out, as though preparing to start the music with an upbeat. This frame waits for 0.5s, and then the animation creates a one-second upbeat by transitioning across 10 in-between (“tween”) frames (each set to 0.1s delay) to the Up arm position. Note that I allowed this slow upbeat only for dramatic effect, since the tempo of any upbeat should set the tempo for the music that follows.
To make the motion of this initial upbeat look more realistic, I had to modify the Opacity settings that the Tween command gave to those 10 frames. In Photoshop, when you Tween between two frames (to do this, highlight the two frames, click on the upper-right corner of the timeline, and choose Tween), Photoshop sets their crisscrossing Opacities in even increments. For example, if I have two frames, an Up arm and a Down arm, and I Tween two extra frames between them, Photoshop will fade in the Down arm at 67% and then 33% Opacity for those two extra frames while fading out the Up arm at 33% and 67%, thus giving the illusion of movement. Unfortunately, there are two moments in time when the max Opacity for any visible arm is 67%, which in this project allows a lot of dark brown background to show through. Changing both of the 67% values to 90% preserves the illusion without so many “ghost arm” problems. I applied such changes in this project where the tempo slows down and where there are in fact two tween frames between every normal frame; I applied similar changes to the 10 tween frames at the initial slow upbeat and at the ending slow stroke.
After the initial upbeat, the first part of the animation runs the three arm positions in repeated three-frame patterns: Down, Out, Up. Each frame has a 0.2s delay, which means the conductor conducts at 300 beats per minute, which is ridiculously fast and quite enough to make any conductor sweat puddles. As this pattern repeats, I gradually increase the Face Blur levels assigned to the frames until the conductor’s face is only a memory.
I then decrease the tempo by tweening two extra frames (both set to zero delay) between each pair of strokes, while at the same time gradually decreasing the Face Blur levels.
When the Face Blur has completely dissipated and the face has returned to normal, the conductor conducts a final slow stroke via 10 tween frames. Since the project’s repetition is set to Forever, this then leads directly back to the beginning, and it all starts again.

Ocean Ripple dialog box and actual effect on face cut-out.

Arm positions: Up, Out, Down.
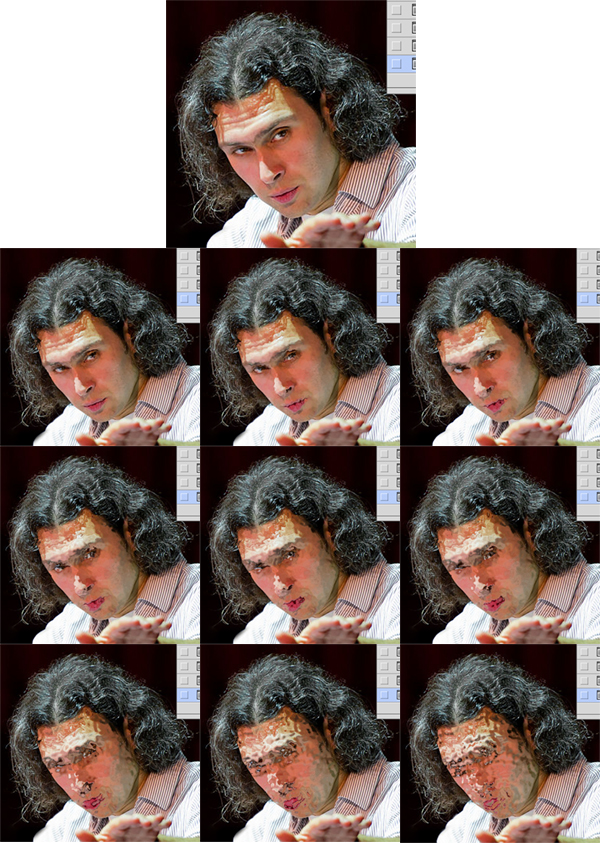
Progression of Face Blur layers. Top image is original (no filter). Rest (Face Blur 1–9) use the Ocean Ripple filter in increasing degrees of Size/Magnitude (from 1/1 to 9/12).


