


For this assignment (Adobe Gen Pro Digital Imaging, Mar 2015, Week 6), we were to create an animation in Photoshop, exploring its motion abilities using either frame or video layers. This project was my first animation ever.
To stream this project in 720p HD and/or download the original video file, go to Vimeo: https://vimeo.com/124879960.
The skinny: This project is a whimsical quasi-sing-along tribute to Mary’s Little Lamb. It opens by grandly announcing a lamb with orchestra hits while setting up a blank page of “sheet music.” A simulated toy xylophone then launches into “Mary Had a Little Lamb,” accompanied by synced music notes and lyrics, while a clipart lamb rotates and bounces around the canvas. A video clip of a bleating lamb takes over, followed by credits and a repeat of the bleating lamb audio.
Tools: As required per the assignment, I used Photoshop CC to compile, organize, and render all visual and audio elements. It amazed me that Photoshop could do all of this. To create some of the elements, though, I called on Premiere Pro CC, WavePad, and Finale 2014.
Video setup: HDV 720p @ 29.97 fps (frames per second), with a Video Timeline in the Motion workspace. Some tutorials suggest 720p with an animation frame rate of 10-12 fps: I agree with the size, as 720p is quite big enough to show all that I wish to show, but I needed a better frame rate to run all elements (especially the bouncing lamb) as smoothly as possible.
Tempo: 120 bpm (beats per minute) in Common Time (notated C, or 4/4: each measure has four beats and a quarter note gets one beat). Each beat/quarter note lasts precisely 0.5” (half a second), allowing easy video and audio sync.
Timeline: There is a 0.5” delay before the opening scene, to prepare the viewer. The opening lamb and sheet music setup scene lasts 4” (two measures). The sing-along sequence lasts 16” (eight measures). The bleating lamb clips lasts 3”, followed by 3.5” of credits. Total length is 27”.
The rest of this post describes how I created the project. The screen shots below show examples of my Photoshop Layers and Timeline panels, both condensed and expanded, for reference.


Background: To make the background look like quality sheet music paper, I opened Finale’s “Score Paper.bmp” background in Photoshop, created a new Pattern (Edit / Define Pattern) from it, and then populated it across a full-canvas layer (Edit / Fill / Pattern) in the project.

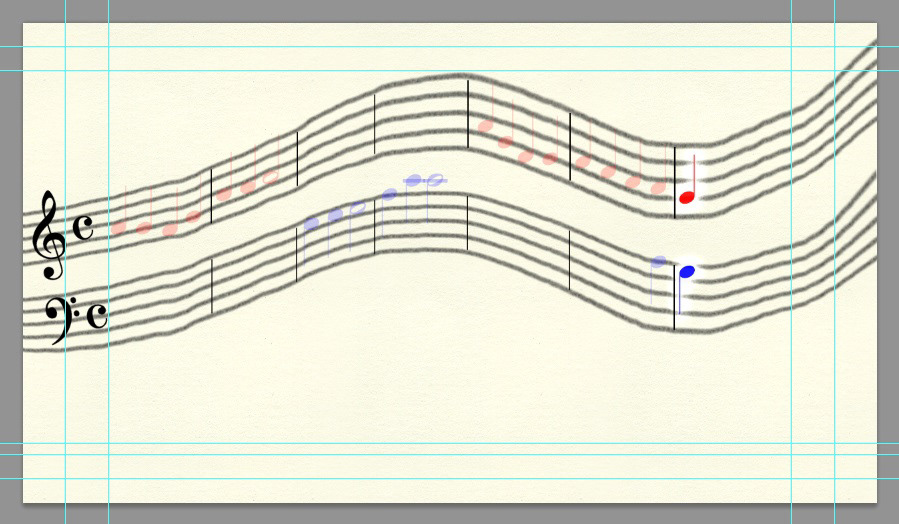
Sheet music setup: I needed music staves on which to place the notes, but they had to be wavy and hand-drawn to enhance the project’s whimsical design. With a Square Charcoal brush at 5 px, I drew a single wavy line across the canvas. Many attempts later, I was finally content with the results. I then duplicated the line four times and Shift-dragged each layer down to create a wavy five-line staff.
I copied the staff lines (saving the original set in case I needed to change their spacing) and merged them into one layer. I then copied the merged layer and moved it down, creating a two-staff system. I converted both staves to Smart Objects and then Warped them vertically, stretching them taller as they proceed to the right, to give the appearance of forward motion.
Clefs and time signatures completed the sheet music setup. Each element is a single Finale Maestro-font character, placed and rotated on its respective staff: Treble Clef, Bass Clef, and one Common Time (C) character for each.
Song choice and animation: I chose “Mary Had a Little Lamb” as the theme song, for both artistic and technical reasons.
Artistically, as I was pondering what to do for this project, the song, played by a toy xylophone, popped into my head. The other project ideas then quickly began snapping into place.
Technically, I wanted all of the notes to fit on the screen—contrary to sing-along videos that display only one phrase of notes at a time. (Due to readability, I display the lyrics one phrase at a time. See below.) I also needed a song that could run at 60 or 120 bpm, to make it easy to sync the notes and lyrics to the audio. This song fit the bill in both cases.
I determined the best note duration and transposition. As to duration, quarter notes would be cleaner and easier to follow than flagged eighth notes; in addition, Finale’s music fonts do not include beamed eighth notes, so I would have to draw such beams on extra layers. As to transposition, the key of F would both eliminate all accidentals (the song would not use the Bb in that key) and keep most of the notes within the staff, minimizing the number of notes that would need extra layers for ledger lines.
I created an arrangement balanced across both staves over time, to make the animation both more interesting to watch and listen to and more challenging to create.
I notated the music in Photoshop using quarter note, half note, whole note, bar line, and ledger line characters from Finale’s Maestro font. Just like the clefs and time signatures, all of these elements needed complete independence, so every one of them is a separate layer. To make it easier to work with so many layers, I grouped the notes and their respective ledger lines by phrase and gave the bar lines their own group.
As to animation, I wanted each note to arrive synced with its respective audio, “flash” to announce its presence, fade somewhat in preparation for the next note, and stay put on the screen for the duration. I also wanted to give color to the arrangement, with Treble notes in red and Bass notes in blue, and I wanted bar lines to arrive timed with the music.
Each note layer first appears at 100% Opacity and with a large, white Outer Glow at 100% Opacity. Within the given note duration, the Outer Glow disappears (0% Opacity) and the layer Opacity drops to 30%. This makes the note appear to “flash” to the beat on arrival. The ending whole notes both “flash” and “breathe,” via an Outer Glow that first grows and then dissipates.
These effects occur via keyframes for Opacity and Style. (See the previous screen shots for one example.)

Lyrics: For readability, I used a relatively large Finale Copyist Text Roman font and set each phrase of the song to arrive as a unit when its time comes. However, like the notes, each syllable has its own layer; this allows me to “flash” the lyrics in time with their respective note(s). In addition, I assigned each syllable a Color Overlay that begins with the color of the respective note(s) (red for Treble, blue for Bass, gradient red-to-blue when both staves sound together) and then fades to black within the note duration (via the Color Overlay’s Opacity dropping to 0%), thereby enhancing the “flash” effect.
I also added an extra Guide (the blue lines) to help line up the syllables’ baselines. For each phrase, I aligned the syllables, grouped them, centered the group, and positioned the group in the Timeline so that each group appears in sequence and does not overlap the others.


Opening lamb image: I wanted to open the video with orchestra hits announcing a full-frame lamb, which collapses to center à la the Star Wars opening title scene.
I knew the image I wanted to use. I had taken a nearly ideal photo of a “star” lamb in 2008 when I lived in Norway. The only problem was that the lamb was behind a wire fence, and this covered part of its face. I used both Healing and Spot Healing to remove that part of the fence so the lamb could “shine” for the viewer.
To extract the lamb from the original photo, I selected it using an Elliptical Marquee and a bit of Refine Edge (Feather and Shift Edge). I copied this selection from the photo, pasted it as a new layer in the video document, expanded it beyond the canvas to fill the visible frame, and applied Transform keyframes to collapse it to center over a span of 4” (the length of the opening music).


Bouncing lamb: I wanted a whimsical clipart lamb to bounce around the canvas during the theme song. I searched for CC media and found an ideal free-to-use clipart lamb from the OpenClipart web site. However, this lamb image had a “shadow” under it. To get rid of it, I had to Erase it manually, because the lamb’s thick black outline connected too well to the shadow for Quick Select to pick it out.
I then investigated how to bounce animated objects off walls. This link (http://chimera.labs.oreilly.com/books/1234000001654/ch05.html#bouncing_a_single_ball) is excellent on that topic. The skinny: “The angle of incidence is equal to the angle of reflection.” In other words, whatever angle the object hits the wall coming in is the same angle it has to leave.
I drew a travel path using a series of Lines (on shape layers), creating a trajectory and approximate angle for each intended bounce. (I disabled these during rendering.)
I moved the clipart lamb off the lower left of the canvas and set an initial Transform keyframe where the note animations would begin. I then moved the lamb across the canvas to the end of the first trajectory guide, rotated the lamb a bit, and set another keyframe at +3”. I scrubbed those 3” back and forth several times, to see what the motion of the flying, rotating lamb would look like, and found it acceptable. I took out a physical ruler*, placed it over my laptop screen, and measured the distance along this first trajectory guide and found it to be 12 cm. I now knew that the lamb could cross the canvas, or approximately 12 cm in screen real estate, in 3”. Using this information, I moved and rotated the lamb to each new bounce point, following the guides, and calculated where in the Timeline to place each keyframe for each bounce. I purposely finished the sequence with the lamb flying off the canvas to the right, which leads directly into the next clip.

Bleating lamb: I wanted to finish the video with footage of a real lamb bleating. I had none of my own, but I found a great little clip on YouTube with Attribution license. Using Premiere Pro CC, I extracted an ideal 3” subclip and inserted it after the music animations. I had to fade out the audio for the last second, however, due to people talking in the background.

Credits: The credits clip uses the same font as the lyrics. I extracted the audio from the bleating lamb clip (using Premiere Pro CC) and repeated it here.
Soundtrack: I was now ready to create and connect the soundtrack. I wanted some initial orchestra hits, but the arrangement had to be in a specific key with specific timing, so I could not just grab sound files from the Internet. I also wanted a toy xylophone for the theme song.
Finale 2014 comes with a light version of Garriton Instruments, but it does not have a great orchestra-hit sound, and it has only a real xylophone. The MIDI samples on my laptop are not great either. I therefore resorted to “assembling the orchestra” myself.
I composed a simple soundtrack in Finale and assigned Garriton Instruments to the tracks. For the theme song, I used the Xylophone, but transposed it an octave higher to simulate a toy xylophone. For the opening two-measure orchestra announcement, I used Synth Brass, Hauptwerk All Stops, Full Strings Arco, Timpani, Band Flute Section, and Bb Clarinet.
Issues: Other than having to use a ruler to measure the length of Line objects, I had to creatively deal with two other issues.
First, starting a video at 0” with an orchestra blast and a large lamb image does not work well, because the viewer (and possibly the video player software) is not prepared for such an immediate start. Lucas seemed to understand this, as each Star Wars movie starts with a caption (“A long time ago...”) before the opening blast, thereby preparing the viewer. I therefore needed to insert a short time slice (in this case, 0.5”) of no activity at the beginning of the Timeline.
Unfortunately, Adobe, after doing a bit of research, I found no way to just insert a time slice across the board. I had to move everything manually 0.5” to the right. Fortunately, I had groups, for without them, I would have had to move around 80 elements, one by one. Inserting a time slice seems to be a feature Photoshop should have had ever since it first came out with the ability to do animation.
Second, Adobe, I discovered through frustration that if you do not actually assign a Fade-in value to an audio clip—that is, if you leave the Fade-in value at 0.0 seconds—Ps defaults to a Fade-in of 1.0 seconds. I kept missing my opening blast, because it faded in, even though I had not told it to do so. In the end, I had to add a half-second of silence to the beginning of my soundtrack (using WavePad, which incidentally is far, far easier to use than Adobe Audition) and start the soundtrack at 0” rather than 0.5”. Why? Simply so I could set a Timeline audio Fade-in value (I set it at 0.2”) in order to force Ps to play the beginning of my clip at full volume when it was supposed to do so.
Attributions: Here are the attributions for the elements I used:
Background: Score Paper
Finale 2014 background file (Score Paper.bmp)
(Public Domain)
Opening Lamb
Personal photo
CC BY-SA 3.0 (Unported)
Created: 2008-0610 by Mark H. Peterson
Bouncing Lamb
https://openclipart.org/detail/171862/eid-sheep
Public Domain
Created: 2012_0823 by halattas
Bleating Lamb
https://www.youtube.com/watch?v=XtvoPyNp79o
YouTube Attribution
Created: 2010_0410 by ettlz


