
Rendering Series
Scene Optimization
Scene Optimization
Version 1.0, Updated Feb 2023 using Octane 2023.1.2 and Cinema 4D 2024.2 with help from Marcus Spranger & Roeland Schoukens @Otoy (thank you!!)
About this Guide
When most 3D artists think about how to optimize a render, the questions that usually come up are around changing kernel settings. While this is an important part of it (and there’s a whole guide for this as well), it’s even more important that the polygons, lighting, and materials are set up properly in a scene prior to even hitting the render button and adjusting the sampling.
This guide goes through many of the common things that can and should be optimized before worrying about render settings.
This guide was meant for Octane in all its incarnations, but was developed using the Cinema 4D plugin, so some of the defaults and names might be a little different in Standalone and other DCCs. The concepts are valid regardless, and can even be applied to other render engines.
PDF
This guide is also available in PDF form here.
Intro
Render settings are only half the battle when it comes to using Octane efficiently. The other big part happens prior to even hitting the Render button - Scene optimization!
Each scene is different, but there are some basic rules that apply across all of them.
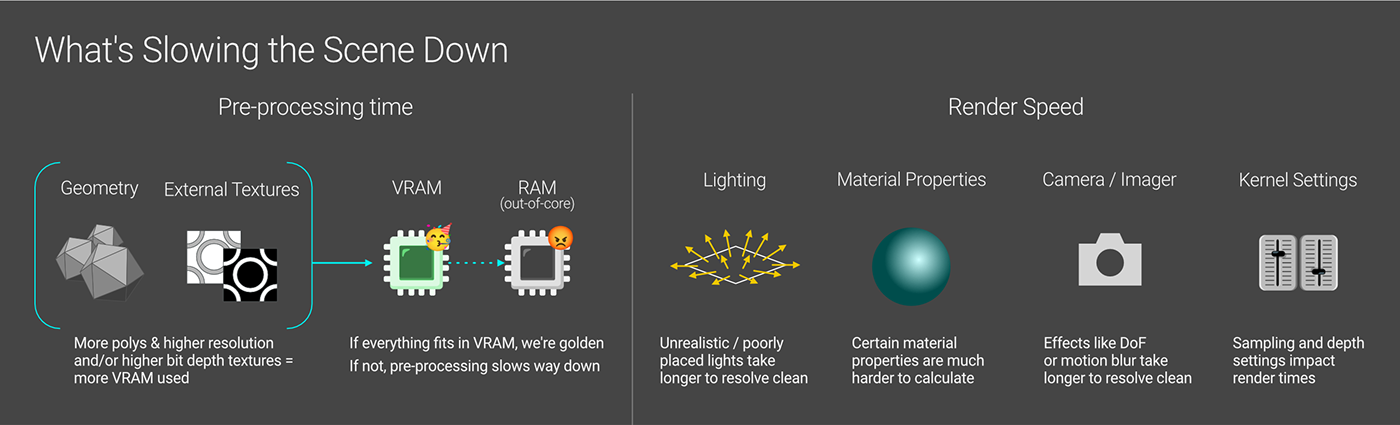
Octane works by taking geometry, adding materials, lights, and other objects like volumes and instances, and sending the whole lot off to the GPU where it loads the data into VRAM, processes it, and renders out a frame.
Memory is a very important part of this: If everything fits in VRAM, Octane runs at full speed. If not, it has to use out-of-core memory (RAM) which makes the whole process a lot slower. Even if it all fits, the more stuff (mainly textures and geo) that has to be loaded into VRAM, the more pre-processing time is needed before a render can even begin.
An added bonus to optimizing the memory is that if we have left over VRAM, we can use it to speed up the render process in the form of parallel samples (discussed more in the render settings optimization guide).
Once memory is under control, optimizing the materials, lighting, and other objects is the next step - that will help the renders themselves go faster, regardless of the settings we use.
THEN we can move on to the render settings optimization process to really dial in the final render speed.
To optimize a scene, we want to:
• Use real world scale for geometry and realistic values for lights
• Reduce the amount of VRAM used as much as possible - the biggest offenders are geometry (number of polygons) and image textures (PNG/JPG/EXR/etc).
Retopo/poly reduce where possible, and also use the fewest and smallest (lowest resolution/bit depth) image files we can get away with for our scene.
• Make sure geo is good (no reversed normals or messed up/overlapping polys).
• Learn which material effects are costly and which are cheap as far as GPU processing goes, and use the cheap ones as much as possible unless the costly ones are significantly better
• Cut down on the complexity of the lighting as much as possible and make sure emissive surfaces aren’t blocked too closely by other geo.
• Fake volumetrics if possible, or at very least consider whether they’re worth it for the scene
• Set up tone mapping early (typically ACES or AgX). This isn’t really optimization per se, but it can greatly affect the appearance of the render and avoid certain issues.
Geometry
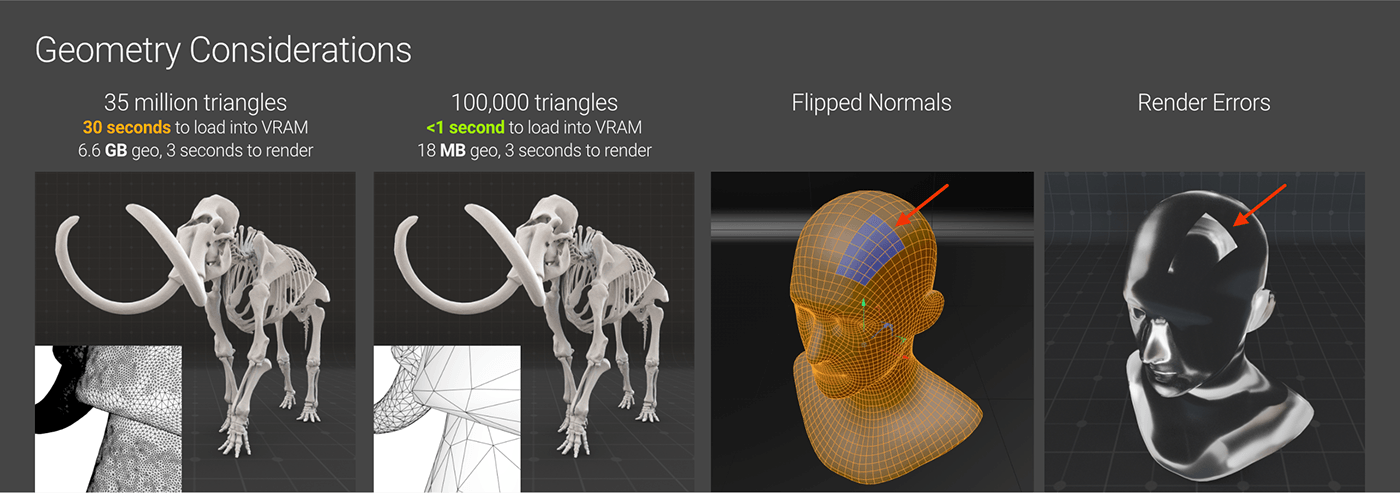
Mammoth model (both the high res and low res versions) from The Smithsonian’s 3D Digitization Project.
Remember: Always. Use. Real. World. Scale! Making a 20 meter tall person or a 5 cm building will mess up the calcs and cause us to have to adjust the lighting to unrealistic values which worsens the problem.
The geometry itself also matters quite a bit when rendering. This is true for both the number of polygons and the quality of the meshes. More polygons = more load and processing time prior to rendering and more VRAM usage, sometimes significantly like the case of 3D scans or tons of instances. Issues like flipped normals, or overlapping / malformed / nonplanar polygons can cause render errors and noise that doesn’t seem to resolve no matter how many samples are thrown at it. This guide series has more on this topic.
Lighting

The lighting setup can also greatly contribute to noise and artifacts if not set up properly. In general the two biggest things to look out for are unrealistic lights (both size and intensity), and geometry getting too close to an emissive surface and blocking the rays. Both of these will add extra noise to the scene and cause artifacts like hot pixels. These things can be cleaned up to some extent in the render settings, but at the cost of realism. It’s FAR better to fix them by using IES textures and/or spotlight distribution, or just placing lights in better locations before they become a problem.
This guide goes over lighting in depth and explains how to set up IES lights and spotlight distros.
If we’re using HDRI lights, we want the texture used to be as small as possible (4K or even 2K) unless we need sharp reflections of the texture itself or are using it as a backplate. 8K and especially 16K+ HDRIs eat a lot of VRAM and can take time to load, slowing things down.
Textures
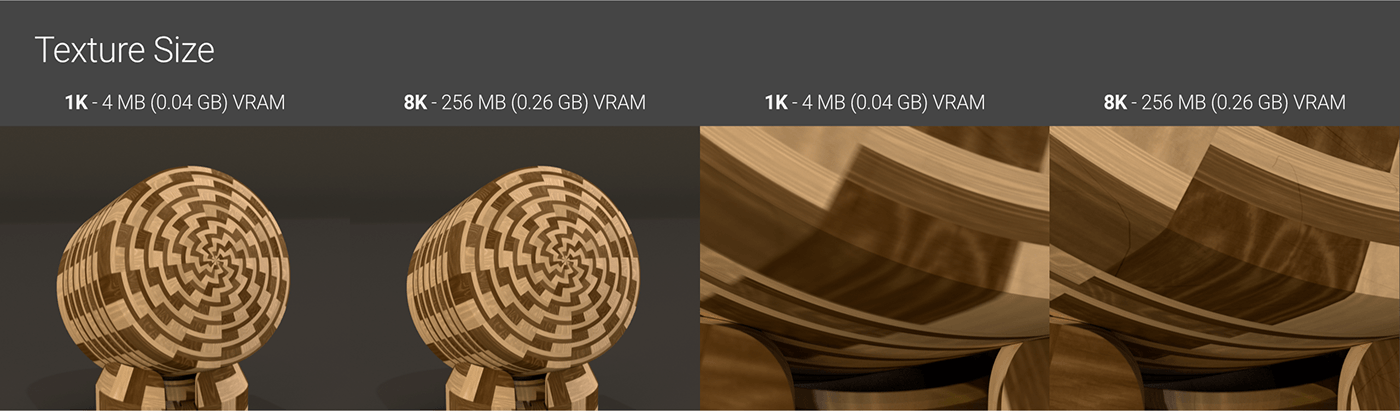
Textures use VRAM, and sometimes a whole lot of it. Loading a lot of textures and/or maxing out our VRAM will slow us down. We want to use the smallest, lowest bit depth image textures we can get away with. We also want to limit the amount of textures used, and use procedural textures whenever possible. More on that in this guide.
Materials
Material properties that are easy on the GPU

Probably the easiest thing for an engine to render is the Reflection in a metallic or glossy surface with no roughness or diffuse contribution. Those calculations happen so fast that they barely register on a modern GPU, and resolve cleanly with even 1-4 samples sometimes.
Fairly low IOR Transmission calculations (realistic glass or water without roughness or dispersion, for example) also aren’t that bad if it’s just in one single object. If the IOR gets unrealistically high, or there’s lots of overlapping refraction, it can start impacting the render times and noise. This applies to Specular and Coating as well.
Anything with Diffuse contribution (Albedo, Diffuse, Basecolor) in a material takes a bit more time to calculate than reflection or even refraction. Diffuse surfaces usually need 32 samples at a bare minimum to resolve cleanly (without denoise, of course). This applies to Sheen (low roughness) as well. This still is pretty low impact overall.
Bump and normal maps by themselves add very little impact to a render. If bump maps have a tight pattern and high bump scale, it can start adding noise and hot pixels, but lower values and smoother bump maps resolve very quickly compared to displacement.
Thin Film and Round Edges (fast mode) are virtually free. Accurate Round Edges can add a little time depending on the scene and settings.
Material properties with moderate impact on the GPU

Anisotropy - especially with tight patterns like brushed steel - can take a while to resolve.
Roughness breaks up light and scatters it out, which takes time to calculate. It’s especially hard with refraction, but there’s a noticeable impact when high amounts are applied to reflection as well. This applies to Sheen too.
Opacity can take a little bit longer to resolve cleanly, depending on the rest of the material.
Dispersion splits light into its component wavelengths as it’s traveling through an object making kind of a rainbowy effect. This is tough to calculate due to splitting light into its component wavelengths and can create noise and raise the render time pretty considerably, especially for lower Abbe values (stronger effect).
Low Detail Displacement with low resolution textures and/or low subdivision levels adds a little time to calculate, but it’s not too bad. The higher the settings, the more pre-processing and render time it takes.
Material properties that are brutal on the GPU

Caustics is the result of light bouncing off/through a reflective or refractive surface onto a diffuse one. This adds significant render time to clean up nicely. Dispersion adds even more calcs to caustics. There’s a Guide here.
Scattering - All the calculations of light bouncing around inside an object with a Random Walk or Scattering medium (especially with Specular Transmission) take a while to resolve. Guide here.
Nested Specular Properties are very hard on the GPU. This means either stacking a bunch of different reflective or refractive material properties on top of one another within one material (like specular and/or coating on top of transmission), or nesting objects in our scene with these properties (like ice cubes in water). Add dispersion or scattering and we’re in for a wait.
High Detail Displacement with tight patterns that need high subdivision values can drastically increase render times, mostly because of the massively increased polygon load on the scene. There’s a guide series on this. Unless we’re doing a super tight macro shot, we can and should fake a lot of the smaller details with bump.
Camera and Scene Considerations

Effects like Depth of Field and Motion Blur are difficult on the GPU and need a whole lot more samples to resolve cleanly.
Small, strong reflections are particularly difficult to calculate and can cause hotspots with DoF on as seen in the example above. This can happen either because of sharp geometry like the spiked ball in the example, or because of tight bump map patterns with high bump depth. Denoiser in this case actually worsens the problem. Applying just the tiniest bit of roughness (0.005 in this case) is enough to negate it and give us nice bokeh circles.
The scene size itself also affects render times and VRAM. Working in a lower resolution should speed everything up considerably (though we can’t get too small or we’ll miss important details). Using the resolution multiplier (the left dropdown when the lock icon is enabled, not the right one which is zoom) in the Live Viewer makes this really easy without having to change the actual scene size in the render settings.
Volumetric Considerations
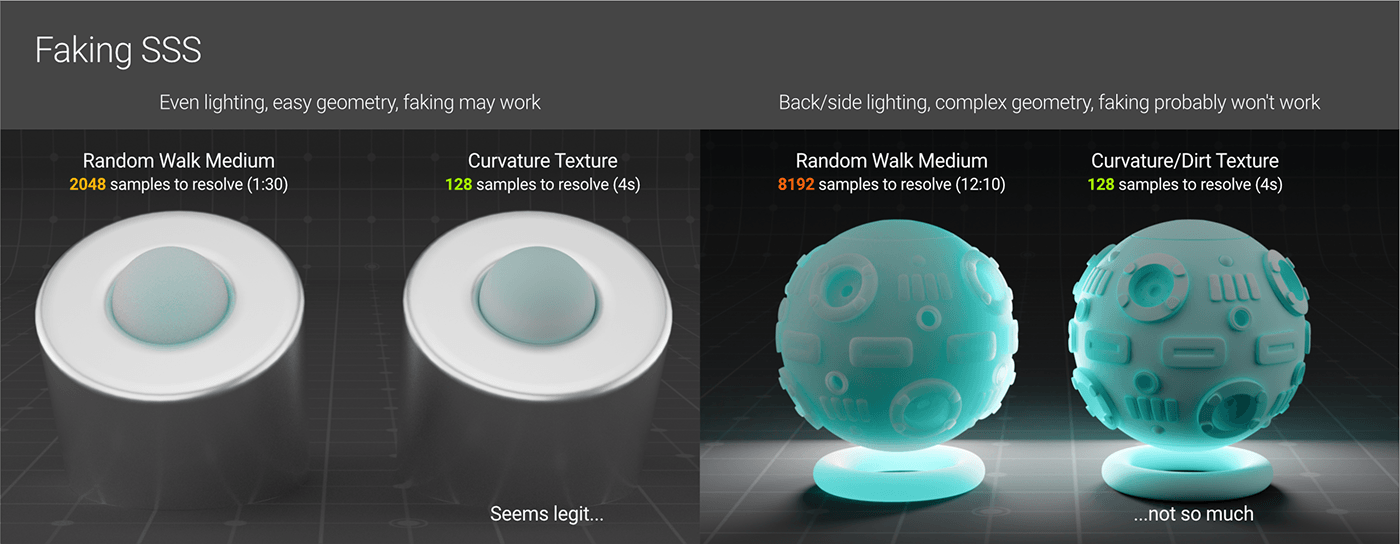
Volumes are very hard to optimize because every setting changed in the medium and lighting affects the look considerably. There are a few cheats, though. Generalized fog can be done in post, often more quickly. VDB objects might be able to use fewer voxels if they aren’t the star of the scene. Some scattering medium materials can be cheated and replaced by a colored gradient in a curvature or dirt shader node if there isn’t much back/side lighting, complex geometry, or animation. Scattering and volumes often do well with denoising.
A volumetrics guide can be found here.
Bonus
Here are the C4D and ORBX files with all of the models and materials created for the cover images of this guide and the kernel optimization guide. They’re all released as CC0 so you can use them however you’d like. The HDRI comes from Poly Haven (also CC0), and the UV map checker texture was generated using this site.
This scene uses a total of ~2GB of VRAM, has about 400k triangles, and rendered pretty cleanly with 2048 samples and AI Denoiser at 1920x900 in about 30 seconds on a mobile 4090 (OB~700). AgX tone mapping was used. ACES is similar, but a bit more contrasty (especially with the background).
Wrap Up
Yes, it’s a lot, but each thing we can do to optimize our scene before we even touch the render settings will improve our chances of getting the render out the door faster.
Author Notes
OG013 Scene Optimization Version 1.0, Updated Feb 2023 using Octane 2023.1.2 and Cinema 4D 2024.2 with help from Marcus Spranger and Roeland Schoukens @Otoy (Thank You!!)
This guide originally appeared on https://be.net/scottbenson and https://help.otoy.com/hc/en-us/articles/212549326-OctaneRender-for-CINEMA-4D-Cheatsheet
All rights reserved.
The written guide may be distributed freely and can be used for personal or professional training, but not modified or sold. The assets distributed within this guide are either generated specifically for this guide and released as cc0, or sourced from cc0 sites, so they may be used for any reason, personal or commercial.


