

Displacement in Octane for Cinema4D
Part 1: Introduction to Displacement
Part 1: Introduction to Displacement
About this guide
This guide is a starting point in learning about the types of displacement in Octane, how to set it up, and the differences between the vector and texture methods.
This is a somewhat advanced topic, and at least a brief understanding of several different disciplines of 3D are needed to get the best results. The more you learn about what those are, the better your displacement will look.
If you are already pretty familiar with displacement, but want to know why yours isn’t looking good, check out part 2 of this series: Displacement in Octane for Cinema 4D: Model and Texture Considerations
Intro
What is Displacement?
3D applications use polygons to define the geometry of the objects in a scene. The fewer polygons a model has, the more efficient it is and easier to work with, but the more difficult it becomes to get fine detail on the surface.

There are two ways to get more surface detail on a model - either by adding more polygons, or by faking it with textures to fool the eye into thinking there’s more geometry than there is.
Faking it is done via bump and normal maps. Neither adds geometry to a model. Instead they use a texture to define what light does when it hits the surface. This holds up well at a distance, or when the geometry doesn’t bend sharply enough so the eye expects details to jut out from the side of the object. This method is cheap and easy on the processor, adding very little render time to the scene. As you can see above, it looks fine in the faraway shot if the displacement is pretty subtle (0.5cm on a 200cm cube).
It falls apart when the texture wraps around a corner of the object or the camera gets too close. There’s also a maximum amount of “height” that can be faked with bump or normal maps. Once these limits have been hit, the only thing that can be done is to add more geometry. This is pretty obvious in the second set of images above (displacement was pushed to 5cm, bump is still maxed out).
Doing this via modeling or sculpting tools may not always be feasible for a variety of reasons (time and scene density often being the biggest ones).
Displacement is kind of a middle ground. It works by using the data from an image texture to push certain polygons on your mesh one way or another. This is done at the material level, (not in a separate tag or object), and happens at render time, meaning your model’s actual geometry is unaffected and the scene can be very lightweight and efficient, but have a ton of high quality detail when you hit the render button (or start the Live Viewer).
You can also very easily just modify the source image and shove a logo over or change the scale of your greebles without having to alter the geometry.
How does displacement work in Octane?
Octane currently has two types of displacement. Texture displacement was the original form, and vertex displacement was more recently introduced. They share the same displacement node, and at the core level do the same(ish) thing, but behind the scenes they’re very different.
Vertex Displacement

Of these two, vertex displacement is a lot easier to understand. It looks at how a source image texture is mapped over the geometry it’s applied to, and then uses that image to determine how much and which way to push each polygon. Any pixels lighter than 50% gray get pushed “up”, and any darker than 50% gray get pushed “down”. The more polygons the mesh has, the finer detail vertex displacement will produce.
Texture Displacement
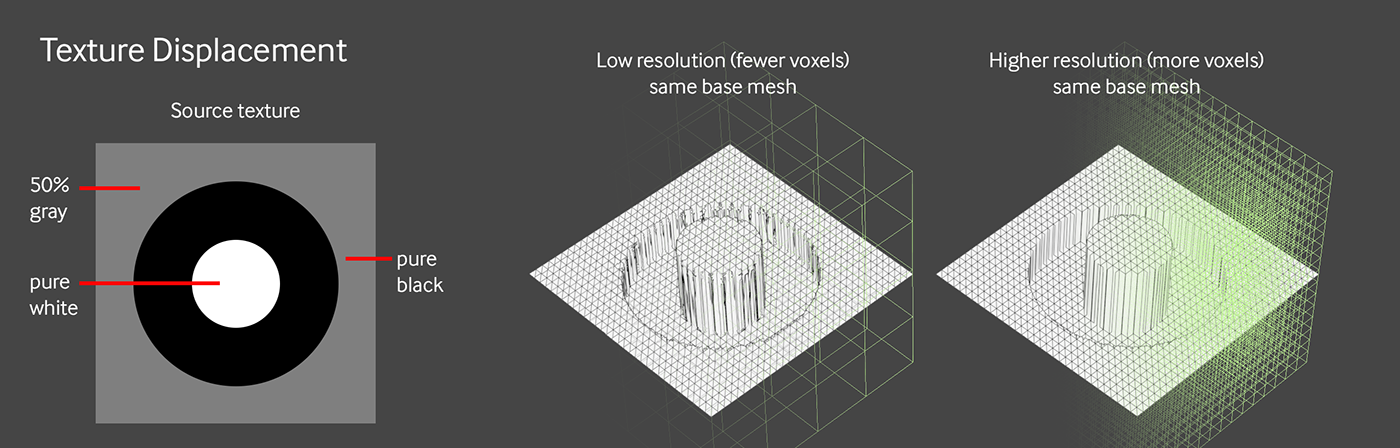
Texture displacement is more complicated. It creates a voxel grid based on the resolution you set and overlays it on top of the UV map of the mesh to determine which polygons to displace. It then uses the texture that you input to determine how far each new subdivided polygon gets pushed. This method is older and has a lot more limitations, but it still has a few tricks up its sleeve and actually may be better and faster in certain situations.
Stability
Displacement is one of the more processing-intensive things you can do in a render engine. There’s prep time involved as the (sometimes large) source image and (sometimes dense) base geometry is fed into Octane. After that, the engine then has to process the images and deal with compression. Once that’s out of the way, it often needs to further subdivide the geometry, sometimes generating tens of millions of triangles, which can take a long time. Finally, it can get to its day job and start rendering your image for you.
All of the pre-processing puts the engine in kind of a tenuous state. You really don’t want to interrupt it while it’s doing all this.
Things you can do to improve stability:
Think about your scene. Do you really need displacement, or will bump/normal do?
Free up system resources. Make sure nothing else is running in the background that will compete with Octane for your GPU or RAM (you probably should do this anyway, but it’s much more important with displacement).
Keep a close eye on the number of triangles that Octane is reporting. This is shown at the bottom of the live viewer once the render starts. Learn how many your particular computer is happy with, and where it’s going to start to slow down. This can be 1 million or 50 million depending on your machine. Once you get up toward that range, consider simplifying the scene and localizing the area that needs to be subdivided.
Start small, increment up. Don’t use an 8k texture when a 1 or 2k texture will do. Don’t just crank the subdivision level to 10 and hope for the best. Be methodical about the process and study your scene to figure out the minimum amount of impact you need to get an acceptable result.

Don’t interrupt Octane during the pre-processing phase (before it actually starts rendering). Sometimes you’ll start the live viewer and suddenly have a heart attack moment when you know you set the subdivisions to 10 and also have C4D’s SDS active at level 6. The first instinct is always to immediately hit the pause button to fix it.
DON’T.
This will almost certainly crash it. Wait until either the engine starts rendering the image. Depending on your hardware and how ridiculous your ask was, this could take some time. It may crash on its own, but more often than not it will get through it all and start pushing out pixels. Once you see your image pop up and start to render, then you can pause it, make adjustments and resend it.
Micromanage the Live Viewer. Only turn it on after you’ve made a few changes and want to see the results - try not to leave it up while you’re editing displacement settings.
Turn on Auto-save.
Save frequently anyway.
How to Use Displacement in Octane
As mentioned before, displacement lives at the material level in Octane. You can add it to an Octane material via C4D’s Material Editor interface, or Octane’s node editor.
First you need a displacement node
All of the different material types have a displacement channel. A displacement node must be connected to the displacement input in the material to get it to work.

This node can be added manually through any of the various ways of making new nodes in the node editor, or if you’re using the C4D material editor interface, you can head to the displacement channel and hit the “Add Displacement” button. This will create the displacement node and hook it up for you.
If you’re working in the node editor, you’ll notice a node on the list on the left that says “Vertex displacement” - this is actually the vertex displacement MIXER. In order to change from texture to vertex displacement, you just drag out the standard displacement node and choose Vertex from the type dropdown in that node’s properties.
Next you need a source texture
The displacement node’s texture input is what tells Octane which parts of the mesh to push in which direction, and how much (up to the maximum height set in the displacement node). This is much easier to set up in the node editor, but it can be done in C4D’s Material Editor (if you must).

For texture displacement, this needs to be an image. This means you can put a PNG, EXR, PSD, or any other image type supported by octane into an Image Texture node and feed it into the displacement node (avoid JPEG though if you can).
You can’t directly use a generator like Noise or Checker for texture displacement, but you can feed one of those nodes into a Baking texture node which will flatten it and turn it into an image which can then be put into the texture slot (more on this later).

If you’ve selected vertex displacement, then you can run pretty much anything into the texture input. No Baking Texture required. Generators like Noise and Checker can directly be fed in, OSL textures are fine - really anything that produces color data will work. Mixing and mapping nodes can be used the way you would with any channel. If you need a refresher on how those work, check out this guide.

If you’re using the C4D’s Material Editor, make sure you put an Octane Image Texture node into the texture field, and then load the image into that. Do not directly load an image texture into this field, or it will put it in a C4D Bitmap Node which you really don’t want.
Finally, set some options

Set the height
The height value determines the TOTAL amount of units (default is cm) that displacement can push polygons one way or the other. You can also think of it as the distance between the highest (represented by pure white pixels) and lowest point (represented by pure black pixels) of the displacement map. If you have a plane at world zero, and set the displacement to 10cm, any polygons mapped to an area of the texture with pure white pixels will go up 5cm, and any mapped to pure black pixels will go down 5cm, for a total of 10cm like you specified.

Set the mid level
This one is tricky because it relies on your textures being in the correct color space. We’re going to go a lot further into this in the next guide in this series, but for now, know that if your input texture is in a Linear color space, and it’s set to non-color data in the image texture node, any pixels in the texture that are 50% gray will not be displaced when the mid level is set to 0.5.
The mid level slider goes from 0 to 1. 0.5 is ideally where it should be (again, if the texture is set up correctly), but you can raise it or lower it by up to half the height value of the displacement. In the example above, the height is set to 20cm. If the mid level is set to 0.5, the polygons mapped to 50% gray will stay put, the pure white ones will go up 10cm, and the pure black ones will go down 10cm. If the mid level is set to 0, everything moves up 10cm. Now the polygons mapped to 50% gray will sit at +10cm, the ones mapped to black will be at 0, and the ones mapped to white will be at +20cm. The opposite is true if the mid-level is set to 1. Now the ones mapped to 50% gray will sit at -10cm, the black ones will be at -20 and the white ones will be at 0.
Mid level can correct cases where edges are mismatched. This is a common issue that is a bit of a compound problem. Sometimes the issue is that the color space of the texture doesn’t match the color space in the ImageTexture node. Sometimes it’s that the UV islands are overlapping parts of the displacement map with different color values, and sometimes it’s that the map itself is screwy and some arbitrary gray value was meant to be mapped to polygons that don’t displace. In many cases, you can adjust the midpoint value until the edges align if you can’t address the root problem..

Set the amount of detail
If you’re using vertex displacement, the amount of detail is controlled by actual geometry subdivisions. You’ll need to decide where you want to do the subdividing (in the material, in the Octane Object tag, or in C4D). The higher your subdivisions, the better the displacement will look (to a point), but the more taxing it is on the GPU.
If you’re using texture displacement, there’s a resolution dropdown which you should get as close to your source resolution as possible. It’s possible to set this higher and it will try to upsample the texture, but it won’t do nearly as good a job as just finding a higher resolution texture. Keep in mind that you still may have to subdivide the geometry via an Octane Object tag or C4D anyway to avoid texture displacement errors (more on this in the next guide).
Set other options
There are a few other options unique to each type of displacement that you can set depending on what you’re doing.

For texture displacement, the filter is pretty crucial - it smooths out the jagged geometry this type of displacement creates. This is different than blurring the texture itself - it actually applies the smoothing to the voxel grid, which can counteract the “water stain” look that often comes with this type of displacement.
One of the nice things about this is that you can sometimes get away with lower levels of detail and just filter it more if your shot isn’t too close up. There’s a balance you’ll have to strike between how high of a level of detail you’re using and how much filtering you’re doing in order to get the best render times and best looking results at whatever distance the camera is from the model.

landscape texture by arc4g
For vertex displacement, you can try the auto bump map feature which uses your input texture as a bump map as well as a displacement map. Depending on your texture, this is pretty great. It won’t do much with a smooth gradient or graphic geometric texture like a checkerboard (and may even introduce some errors), but a terrain or skin texture with a lot of fine microdetail will net you some big improvements and may hide artifacts if you don’t/can’t/won’t set the subdivisions higher.
Texture vs. Vertex Displacement
Here are some key differences between the two displacement systems:
Texture displacement
This was the original displacement type in Octane. It splits up a surface based on a resolution dropdown in the displacement node itself.
Texture displacement relies heavily on good UVs for your geometry. If the UVs are overlapping or squirrely or the seams are in the wrong place, you’re going to have a Very Bad Time™.
Texture displacement ONLY works natively with MeshUV projection. You can still use other projections to varying degrees of success via Cinema 4D’s material tag, but you can’t set the projection for each texture in the node graph (using the Projection node). It doesn’t work at all with triplanar projection.
Texture displacement has its own subdivision method that you must use. It does work in conjunction with other subdivision methods, but you have to set a resolution and have it create a voxel grid.
Texture displacement ONLY works with bitmap image textures. You can’t directly use generators or OSL textures as your source. You can use a Baking Texture node to convert generators into image data on the fly. Be sure to set the settings correctly. (covered in more detail in the next guide.
Texture displacement doesn’t support motion blur. This kind of limits the animation effects you can achieve with it.
Texture displacement has to repeat - border modes in the image aren’t supported, so you have to be clever about choosing polygon selections to apply displacement textures to, or messing with UV islands and other tricks if you want to isolate it to just one small area of your model.
Texture displacement lets you cheat. The one really big advantage that texture displacement has (as of this writing) is the ability to use filters to smooth the displacement out. This is something vertex displacement does not have, and therefore very often you need to go to much higher subdivision levels in your mesh to get it to look as good. Depending on how close you’re getting to the model or what the shot needs, this means texture displacement can actually be a lot faster since less subdivision is needed, and therefore you don’t have to beat as hard on the GPU.
Vertex displacement
This was recently introduced into Octane and it gets around several of the issues of Texture displacement.

Vertex displacement does not extrude. Texture displacement creates a voxel grid, and extrudes geometry up. Vertex displacement only uses the geometry at its disposal and doesn’t create anything new, so often more polygons are required to get vertical moves from looking tapered.
Vertex displacement relies much more heavily on polygon density than texture displacement. There’s no filtering in this type of displacement, so often you’ll have to go up another subdivision level or two in order to smooth out pixelated edges when you’re up close.
You still need good UVs if you’re using UV mapping (MeshUV) for projection. You get more leeway than you do with texture displacement, but really bad UVs will definitely cause all kinds of problems.
Vertex displacement directly supports generators and OSL textures for the source. No more baking, just plug and play.
You can use triplanar projection!
You can mix and match projections per texture. This is useful when doing triplanar projection, but it also just generally gives you more flexibility and control when setting up complex maps.
You can also mix multiple vertex displacement nodes with the Vertex displacement mixer node.
The border mode limitation is gone! You can set the border mode of your image texture to black and it won’t repeat.
Motion blur is supported! no more hacks in post, it just works now :)
Vertex displacement has an auto bump feature - this lets you use the height map as a bump map as well, so even if your mesh isn’t super dense, the displacement can still look really good. This won’t help with smooth geometric shapes, but it’s great for small pockmarks or scratches that you’d normally need a ridiculously dense mesh to see.
Vertex displacement takes advantage of RTX since it works with triangles (one of the things RTX is good at speeding up), so it can be a lot faster in some cases with a card that supports it.
Finally, vertex displacement supports Vector maps. This uses RGB values like a normal map to push polygons along all three axes, not just up or down. This can produce overhangs and other details that are impossible to achieve with texture displacement.
Wrap Up
So now you technically know how to use displacement, but that doesn’t mean it’s going to always turn out the way you want. All kinds of things can go wrong, and there are a lot of factors involved with the model and source texture that have to line up to make this work. When you hit this point, check out the next guide in this series: Displacement in Octane for Cinema 4D: Model and Texture Considerations


