
Anatomy of a Title Card
Note: this is a follow-up for a campaign that we outlined here.


The title card is a simple, vital element of nearly every "testimonial" style advertisement.
For a single video it's fairly easy to build out in After Effects, just a few text layers and some sort of lower third graphic. When it comes to localizing a project for multiple languages, however, things can get tricky.
For a single video it's fairly easy to build out in After Effects, just a few text layers and some sort of lower third graphic. When it comes to localizing a project for multiple languages, however, things can get tricky.
The Problem:
The original video comes in a 16x9 and a 4x5, each with a 15s and a 6s version. The 4x5 version has a transparent box behind the text for visibility.
That's 4 separate compositions that might need to be updated down the road when somebody realizes they spelled the person's name wrong.
4 comps isn't that bad.
However, there's 2 campaigns we need to localize into, with distinct sets of languages:
Campaign 1: EN > Chinese (Taiwan), Polish, Romanian, German
Campaign 2: EN > German, Spanish (ES), French (FR), Italian

Just like that we're at 32 videos.
Yes, if you hate yourself you can still manually adjust every composition when somebody informs you Rachel is actually spelled "Rachael". But you might start to get annoyed when it turns out to be a false flag and you need to change it all back (this is a hypothetical here but it's certainly happened before).
The Solution:
We need a singular composition that can house all possible names, titles and graphic variants in every language. It should be modular for updates and allow for additional languages down the road.
Luckily, with a little bit of Javascript and the After Effects "Essential Graphics" function, we can future proof this title card at the outset of the project.
We start by recreating the entire card, including the transparent box behind it. Luckily for us, the 15s/6s cards transition in at the same rate.
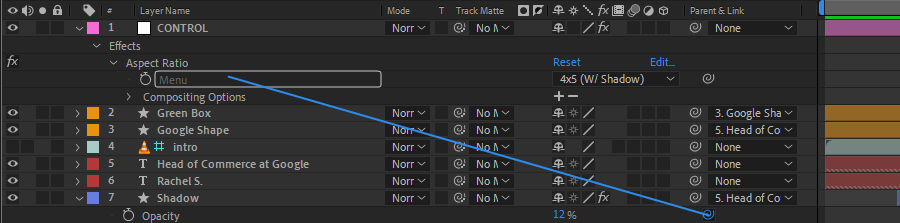
We'll create a null layer in the composition and add a "Dropdown Menu Control" from our effects palate.

Name the null layer "CONTROL" and name the dropdown effect "Aspect Ratio" for clarity.
Click the edit button and add 16x9 and 4x5 options.
Click the edit button and add 16x9 and 4x5 options.
Now for the scripting part:
Find your box layer. In our case we've settled on an opacity of 12% to match the initial videos that were sent over, so we alt-click the opacity stopwatch to pull up the expression field. Use the expression pick whip to automatically write out the correct Javascript to link your expression.
We'll contain that in a variable, "dropdownSelection".
We'll also initialize another variable, "boxOpacity", at zero.
Then we set up an if/else statement so the opacity is zero unless the "4x5" option is selected in the dropdown menu.
Last but not least, we return the "boxOpacity" variable- the opacity expression field is looking for a single number.
The code should now look like this:
var dropdownSelection = thisComp.layer("CONTROL").effect("Aspect Ratio")(
"Menu"
);
var boxOpacity = 0;
"Menu"
);
var boxOpacity = 0;
if (dropdownSelection == 1) {
boxOpacity = 0;
} else {
boxOpacity = 12;
}
boxOpacity = 0;
} else {
boxOpacity = 12;
}
boxOpacity;
And if we switch between our 16x9 and 4x5 options in the dropdown menu we should see the box toggle on and off.
Here's where the real magic of After Effects comes in.
Here's where the real magic of After Effects comes in.
Go to your essential graphics panel, (you might need to open the panel from Window > Essential Graphics).
Make sure the title composition is selected in the panel. Then drag and drop the dropdown menu from your control layer into the Graphics Essentials Panel.
Now if we drag and drop that title precomp into another composition, we can toggle the opacity from there!

Using a similar process with that same Essential Graphics panel we can add the name of the interviewer, their job title, the video language and the length.
The final result:
Now this card is much easier to handle, it's modular and it can scale with any new project requirements.


