INTRODUCTION:
Lips come in all shapes, sizes and colours. In my opinion, the fundamental skills to learn as an artist is perspective, lighting and shading... almost anything can look good with great lighting and shading ;)
Perspective is not really an issue in this portrait, so it comes down to lighting and shading.
I normally do most of my painting on a single layer, but these lips were a little more of a challenge. Don’t get discouraged in the initial stages when it looks rough, it only matters what it looks like when you’ve finished :)
There is no ‘right’ or ‘wrong’ way to go about it. Have a look at other artists techniques and adopt one or adapt to suit yourself, it all comes with practice.
I pretty much use a single brush in Photoshop, just the soft round brush, but vary the size and pressure using a Wacom.

Start off with basic sketch, then change the layer blending mode to ‘Multiply’. Create a new layer as your painting layer under the sketch layer. I paint the skin around the lips to a reasonable level.

I keep working on the surrounding face which is easier than if the lips were finished. This means I can use a larger brush for softer, more blended colours and not worry about overspill.

I keep in mind that the lips don’t have a harsh line around them, they need to blend into the surrounding skin (unless you want strong lipstick edging), so I try and keep a soft edge.

Base is down and I’m reasonably happy with the lighting. You can turn the sketch layer on and off as needed for guidance.

Once I have the base down, start lightly adding the wrinkles and folds. Remember where the light is coming from.

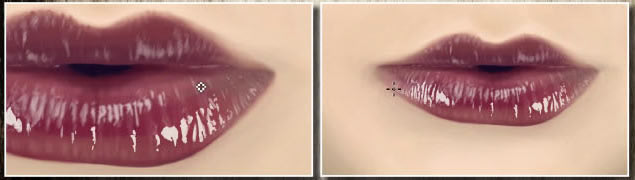
I created another layer for the highlights. Looks rough at this stage but don’t worry ;) Changed the highlight layer opacity to about 10%

These lips have several levels of highlights. Created another layer for the stronger highlights,
changed the opacity and so on.
changed the opacity and so on.

Remember, just as if you were on a large canvas, if you view anything from farther away, you don’t see imperfections. So, you can zoom up and be quite rough, then zoom out and see how it looks.

A lot of highlights :p Still, starting to look pretty good after about an hour ;)
Soften up the edges of the lips with just lightly (low opacity) brushing the surrounding skin colour.

Finished Lips

Finished Painting


