
Emerging Practice
5th June, 2020, 3:00pm
The Idea
I wish to create an interactive experience with Unreal Engine. The environment will be set in the present day, but with a number of futuristic gadgets to use.
Milestone 1: Create an interactive environment using existing environment modules
- Use environment packs to set up an environment
- Remove existing lights, shaders, effects and materials
- Apply my own lights, shaders, effects and materials
- Export a Windows executable, and Mac (optional)
My first step is to see how to export to a windows executable because I am currently using the MacOS platform.
In later assessments, I will explore the use of Quixel Megascans and may create my own assets.
5th June, 2020, 7:00pm
Successfully packaged for Windows and Mac (initial test project)
I successfully packaged a basic scene with some assets I downloaded in the Epic Marketplace. I am able to do this by using the Windows operating system to create a Windows Executable, and the Mac operating system to create a Mac executable. There is no option to export a Windows executable from MacOS, nor vice versa.
The demo map of a small town that I downloaded is shown below (I did not create this, I just downloaded it).

The next step would be to import a mesh from the 'town' asset library into my basic scene, and explore what the asset is capable of in terms of customisation.
6th June, 2020, 1:00pm
Minor Customisation of Textures
The asset packs (PolygonTown and PolygonCity) contains multiple texture files in order to provide alternative colours to the meshes. For example, a sports car can be blue, red, white or yellow. This can be achieved by changing the texture map to a different one. Each texture map contains all the texture for the entire scene of objects.


I was able to export the textures from the 'uasset' file format to a targa (TGA) format. The list of texture files for the PolygonTown pack is shown below:

There are a total of 12 textures in the PolygonTown pack. This is also the case for the PolygonCity pack (12 textures). I exported them to TGA so that I can modify the texture files.
As a small modification I made, I changed the US flag to a Hong Kong flag. This required making changes to all 12 textures in the PolygonTown pack, at the exact same location on the file. I did this by recording a Photoshop Action and playing it back for each file, for consistent results. The Actions are shown below:

The minor modification I made (as a test before going on to make bigger changes) is shown below. (The modified image is shown on the left, while the original image is shown on the right- the bottom right corner shows the difference whereby the flag is changed)


The result in the scene:

The next steps will be to make further modifications to the textures.
6th June, 2020, 2:40pm
Door Mechanics
I created this door mechanics last week, whereby you can see the other side of the place you will teleport to when you walk through the door (otherwise known as a seamless portal). I followed a tutorial to do this using the visual programming available in Unreal. I added a mechanism for opening and closing a door myself (the tutorial only has a door frame, not a door), and as you walk near the door it triggers an instructional message telling you that pressing a key ("E") will open or close the door.

I would like to incorporate this into my project somehow. Perhaps I will create two or more sections on the map that can only be accessible via this portal system. I will need to further refine the mechanics behind this door to support accessing multiple locations. Since I have the PolygonTown pack and PolygonCity pack I think I will be able to create a residential area and a city area.
7th June, 2020, 6:00pm
Portal Door and a Basic Home Setting
I created a basic home setting using the assets available, and added some lighting to it.


I also added more functionality to the door. There are now currently three locations that the player can travel to using the portal (home, town, and city). As the player goes near the door, instructions appear on the pillar next to the door asking the player to press one of three keys (1, 2, or 3). In the picture below, the player is already at home, so if the player presses the '1' key to select Home, a red cross symbol (x) will be displayed. Pressing '2' or '3' (valid locations for the portal) will display a green smiley face (:-)) on top of the pillar.

The next step will be to create a town and a city. I anticipate they will be placed on the same map, which would take up more memory, but allows the portal to work with the different places.
9th June, 2020, 2:00pm
Low-Poly Town
I created this simple low-poly town that contains most of the building types in the PolygonTown pack. Later on I might add some additional details there. I am now working on creating a city using the PolygonCity pack.

9th June, 2020, 6:00pm
Low-Poly City
Below shows the low-poly city I made. It is now possible for the portal to go to three locations: home, town and city.

The next step is, as Ivan suggests, to look at lighting and effects. The challenge here would be to create emissive materials for the existing assets, since I am not able to access the original FBX file on the meshes, but exploring this option will soon reveal whether this idea is possible or not. Having said that, the city assets have the option to switch on 'night mode', which involves using emissive materials already set up as an option. Effects are more likely possible, but will involve a greater learning curve. In either case, I will try to explore both. I will add more detail to the city later, but for now it is large enough to be explored as an interactive experience.
10th June, 2020, 4:00pm
Update on lighting and effects
I created a night-time scene for the town and the city. This was achieved by turning down the directional light to 1.0 lux, changing the sun position to -1.0, and turning up the brightness of the stars. The lighting on the buildings and other assets were achieved simply by selecting the alternative 'emissive' material on each of the assets.

I also explored effects using the Niagara system. I created some basic rain effects (including rain and rain splash) to achieve the following look. I had to limit the area that the rain covers to a small section due to performance considerations.

Finally, I added some green odour (in the form of particles) to the back of the garbage truck, as a simple implementation of effects.

The next step will be to refine lighting and add further effects to the environment.
12th June, 2020, 4:00pm
Transforming default taxi design (US based) into Hong Kong taxi designs
I started exploring changing the textures and materials for the taxi. I have already shown my experiment with changing from the US flag to the Hong Kong flag (6th June, 2020 post), and now I will try to convert the US taxi design into Hong Kong taxi designs.
For reference, the Hong Kong taxis looks like this in real life:


The green ones represent New Territories taxis while the red ones are for the main city (Kowloon and Hong Kong island) taxis. Therefore, as representation within the world I am creating, the 'Town' taxis will be green, and the 'City' taxis will be red. The original, US design is shown below:

In order to create the Hong Kong taxis I needed to change the texture in the number plate, the side logo, and the top 'taxi' text. I used Photoshop to achieve this effect. The end result is shown below:


The limitations are that the top half of the chassis (white in real life) and the bumper (black in real life) cannot be changed. This is because the UVs are pre-set such that the entire chassis has the same colour. When I create my own assets I will be able to customise the look a lot more than what I can do currently with the asset packs.
I have also included below a video of the rain effect I created (previously I only showed a still image).

Limitations include having to create 'exceptions' for cel-shading where the materials have emissive properties (such as street lamps and lighted-up buildings); and the seamless portal implemented earlier does not show the cel-shaded or outline effect when looking through the portal.
The concepts to create the cel-shading is somewhat technical, and the black outlines even more so (it uses Laplacian Edge Detection), so it was good to have the tutorials to explain the process of creating the effects.
The thickness of the outlines can be tweaked, and the cel-shading colour gradient (cel-shading removes the realistic gradient of colours and replaces it with stepped colours) can also be changed, later down the track if needs be.
15th June, 2020, 12:00pm
Comparison between Unreal and other tools I used, and difficulties I encountered so far
I have previously experience in coding, though not much in game development. Knowing how to code provides advantage when working with the visual programming Blueprints system that Unreal uses, but because I haven't done much game development there are many concepts that I have to learn. It helps to have learnt a little bit of Maya, and compositing, so that I can follow the tutorials related to post-processing.
I have also experimented in Godot (an open source game engine), but since a lot of the commonalities are under the hood (for example, collision handling, input handling), there are more differences than similarities in my experience using the two engines.
It definitely helped to know a bit of matrices and vector maths (which I learnt from my engineering degree) so that one can implement the algorithms required to make certain visual aspects of the game work. For example, for the toon outlining, the Laplacian edge detection uses matrices and convolution (a mathematical operation).
In terms of difficulties, I have found it hard to adjust the effects (or to know if it's possible to do so) outside the parameters of the tutorials I followed. For example, the portal currently does not show through the post-processing effects (toon shading and toon outline) on the other side. Whilst minor, the tweaking of this requires deeper knowledge of Unreal.
Another thing is that I do not necessarily know how to expedite a certain process when something breaks. For example, when I apply the cel-shading, the emissive materials disappears, because the post-processing replaced the existing emissive properties with the emissive properties of the cel-shading. As a workaround, I had to apply 'custom depths' to the objects that previously contained emissive properties. Without this deeper and more fundamental knowledge of Unreal and shaders I am unable to create a more elegant solution to this problem.
My experience so far in this project is that while I really wanted to focus on the aesthetic side of the project, there are still many technical aspects I need to figure out to get the project working as I want it to work. Using existing asset packs also limited my ability to customise the textures as the UV mapping are already in place (and also unknown to me) so I can only replace what I see to be obvious placements of the images (for example, replacing the US flag with a Hong Kong flag).
19th June, 2020, 3:00pm
Kuwahara Filter, more Niagara effects, and adding simple asset
I added a Kuwahara filter to the project as an alternative to the cel shader look, which makes the visuals appear to have a painted effect. Here is what it looks like:

This filter is quite unique, but required some HLSL (high level shading language) coding. Still, since I was just following a tutorial, it was achievable with relative ease. I implemented this filter as a way to understand how I might implement other filters on my own in the future. One difficulty was when Unreal engine got updated to the newest version, it no longer supported the creation of 'Shaders' folder in the project file structure by default. I had to follow advice from a forum to reapply this folder accessibility within my project.
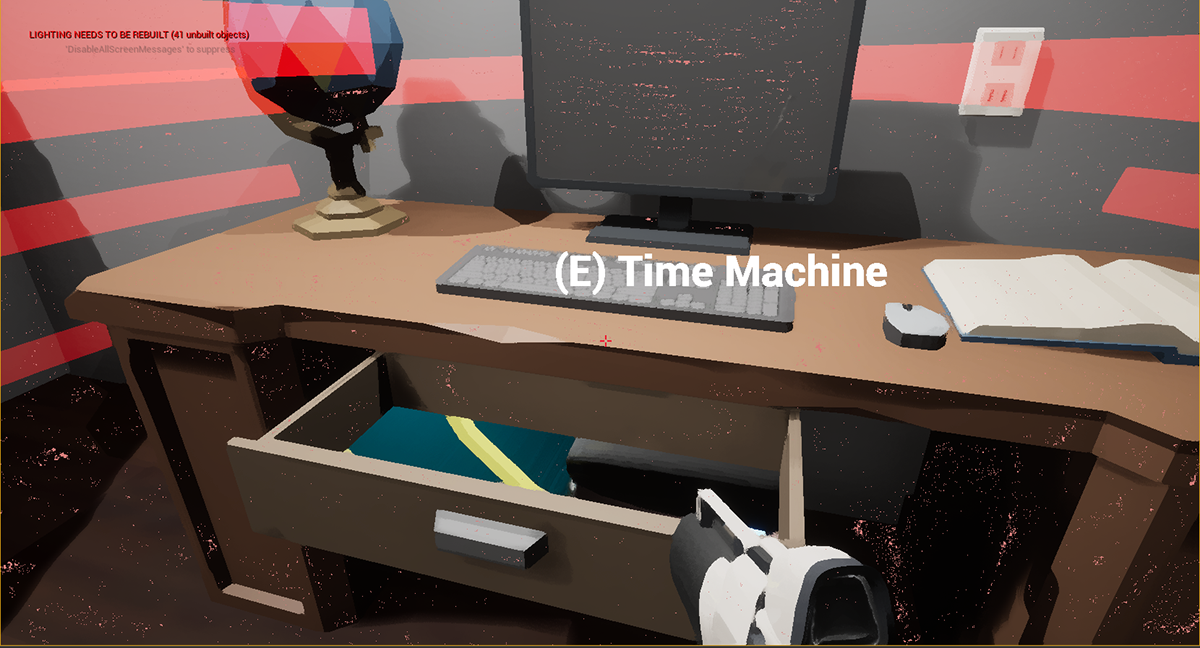
I also tried to reimplement the seamless portal (but without the teleportation) without revisiting the tutorial, as a learning challenge. I was finally able to get it to work, placing a 'portal' between a drawer and a time tunnel. Furthermore I added a red ribbon effect, using Niagara, in the vicinity of the drawer to indicate that there is something worth visiting there.

As can be seen in the image below, there is now a portal to the time tunnel from the drawer (time machine included), though I have not opened access to the time machine just yet.
I also started playing with creating my own assets, which will form a part of milestone 2. This was done in Maya and imported into Unreal engine. (TM-01 stands for time machine number 1). It was a challenge getting the scaling right at the outset within Maya, so the scaling was performed after it was imported into Unreal.

Something I learnt was that I was wrong about the cel shader not working for emissive materials (and having to create an exception) because the post-processing material used emissive colours which replaced original emissive materials. That was not the problem at all, as I discovered when implementing the Kuwahara filter and successfully retaining the emissive properties of the street lights even without creating an exception. I will look into this a bit more and see if I can figure out what the problem might be with the cel-shader.
22nd June, 2020, 12:30pm
Test Compile, changing the projectile to a cloud, and adding Mixamo animations to characters
I am glad to have tested compiling of the program to an executable, because even though I tested it at the beginning of the milestone a lot has changed and it took a lot of hoop-jumping to finally to get it to compile. There were many obstacles for both compiling for Mac and Windows. For example, for Mac I made a small error in the C++ code, though the debugging messages were so cryptic it was hard to locate the error. I also pressed the 'Clean' button on Xcode, which turned out to be a bad idea because it removed not only the binaries for my project, but also for the Unreal Engine as well. I had to reinstall Unreal Engine, which would have been fine except it then said I did not have enough space on my hard drive even when there was a lot of free space there. As it turned out, after much 'googling', it was because of my Apple Time Machine backup giving local snapshots which had to be deleted. For windows, I had difficulty opening up the project, which involved me installing Visual Studio 2019 trying to look for error messages. As it turned out all I had to do was to remove the C++ source files and place them back in. In sum, the solutions were so far from what I could have imagined to be that it took a lot time to figure out.
I also added a few more new features to the interactive experience. I changed the projectile from a yellow ball that bounces around to a cloud that explodes upon impact with another object in the scene.
I also added Mixamo animations to the characters so now there are people walking around the town. To achieve this I had to create a spline that goes around the entire walking area, use Mixamo by uploading an FBX file that fits in with the characters in the asset pack (it was provided by Synty Studios, the maker of the asset packs), downloading the Mixamo-generated FBX character animations, and do some retargeting from the imported animation to the skeleton of the townspeople. From there I added a 'reverse' functionality so that they can either be walking clockwise, or anticlockwise.
23rd June, 2020, 4:30pm
Progress with the Time Machine
Even though the time machine is still incomplete, I want to share some progress because I do not know whether I have time to complete the entire feature before end of Milestone 1. What I implemented is the ability to go into the time machine, get it to start moving, and exit back home. It currently does not travel to the map representing a different time. To achieve this, I rotated the time machine object around a torus-shaped tunnel, so it can go on forever if it wants to. The pivot (to use 3D animation language) for the time machine is in the centre of the torus. Below is a video demonstrating the implementation:
25th June, 2020, 8:30pm
Adding colour grading and fog
I was unable to add the atmospheric fog to the level I created, because it kept crashing when I do it, however I was able to add the colour grading. This was done by downloading the neutral colour lookup table, taking a snapshot of a scene in Unreal, then applying the colour grading in Photoshop and taking the resulting colour lookup table into Unreal as a file. I think this is a better method than adjusting the sliders within Unreal because there are less parameters that Unreal has to process, and also it is easier to apply the colour grading using the Photoshop tools. In the images below, the left image is before grading and the right image is after grading. I found the original scene a little dark so I adjusted the lightness, among other settings in levels and saturation.


26th June, 2020, 11:00am
Final Thoughts for Milestone 1
By way of summary, this is a list of things I did for Milestone 1:
1. Downloaded Asset Packs from the Unreal Marketplace
2. Changed the flag and taxis from US style to Hong Kong style (as best as I could)
3. Created a seamless (meaning you can see through to the other side) portal that can go to three places (home, town and city)
4. Created my own town and city using the asset packs
5. Added rain (rain drops and rain splash) to the town scene
6. Added green odour for garbage truck in the town scene
7. Implemented different shaders by following tutorials (Cel-shading, toon outline, Kuwahara filtering)
8. Added a ribbon effect around the drawer in the study that represents the time machine
9. Added some HUD elements as instructions for interacting with the portal and time machine
10. Changed projectile from yellow ball to air puffs.
11. Created and imported a time machine object into the scene, and provided access to it and its operation (it moves when activated)
12. Added Mixamo animations to the characters in the asset pack, and have the characters walk around a set path in the town
13. Added colour grading using Photoshop to create a colour lookup table
14. Compiled executables for Windows and Mac
The biggest thing I learnt was how to use the Unreal engine, and the myriad of obstacles involved in creating something from the engine. However, there were other soft skills that I was able to learn as well, such as time management, and building things incrementally. I also learnt first to rely on tutorials, then to my own abilities. For example, whereas I followed the tutorial to create a seamless portal, to create the drawer that leads to the time machine I tried to replicate the process but without using the tutorial explicitly. This helped to reinforce understanding of how it all works. Another example would be shaders: I followed tutorials so it was easy to implement, but if I were to derive a programming solution from an actual paper (I went through a few techniques such as cross-hatching and charcoal imitation), it would be a much harder process. To be honest I don't know if I would be able to implement the academic papers even in future milestones, as it would be quite challenging and technical.
As for advice to people doing similar projects, I would say not to underestimate the difficulties you will encounter, and to use Google search as a valuable tool. Something as apparently simple as reinstalling the Unreal engine could take a long time to figure out because there can be compatibility issues with other software (in this case the hard disk space checker with Unreal did not work well with the Apple Time Machine backup snapshots). The incremental style of working is also good, just plan your work and keep plugging away at it one at a time. But be sure to step back and see the whole picture once in a while.
Here are links to my Futuristic Fantasy interactive experience for Milestone 1 (accessible only by people from our organisation):
2nd July, 2020, 11:00am
Milestone 2
I will be changing my direction in Milestone 2, compared to the first milestone. Instead of continuing with the interactive experience, I will be using Unreal Engine to create an animated cartoon short. I will use existing models from my other subjects, as well as Quixel Megascans models to complete the task. What I hope to learn is to have a working knowledge of the workflow necessary to use Unreal to create a short film, while gaining more experience in animation.
General steps to complete Milestone 2:
1) Figure out the technical aspect of getting the entire workflow operational, including rigging the characters using Unreal
2) Storyboard
3) Set up environment using Quixel Megascans
4) Animate characters
5) Render
6) Post-production (Compositing)
2nd July, 2020, 9:30pm
Rigging the Characters
While I haven't figured out the story yet, I have rigged up two characters that I would most likely end up using. In the images below, the left image is a character from another subject (Animation Production), while the right image is a modified model from Epic Games Marketplace, called the Wraith. I modified the Wraith model so that it does not have any weapons.


Throughout the process of rigging these characters, I have found that the new Unreal Control Rig (which only came out last month!) uses quaternions for rotations. There was one element which required some additional manipulation (the cogs that drive the ear rotations) and I found that to be quite challenging. It's just a small component (hardly noticeable), and it's kind of working, so I might leave it for now even though it's an artificial workaround to the problems I've been having with it. Technically if the rig is perfect then there shouldn't be any artificial tweaking required, so I guess I still have a lot to learn in terms of rigging. The next step will be to test the rigs to see if they function properly.
I have also found that the textures I used for the robot on the left image takes up a lot of computing power because it's high resolution, so I will be removing the nice textures when animating to avoid slowdowns of the computer.
4th July, 2020, 11:30am
Storyboard
I have created a storyboard to work with for the animation I will create with Unreal.
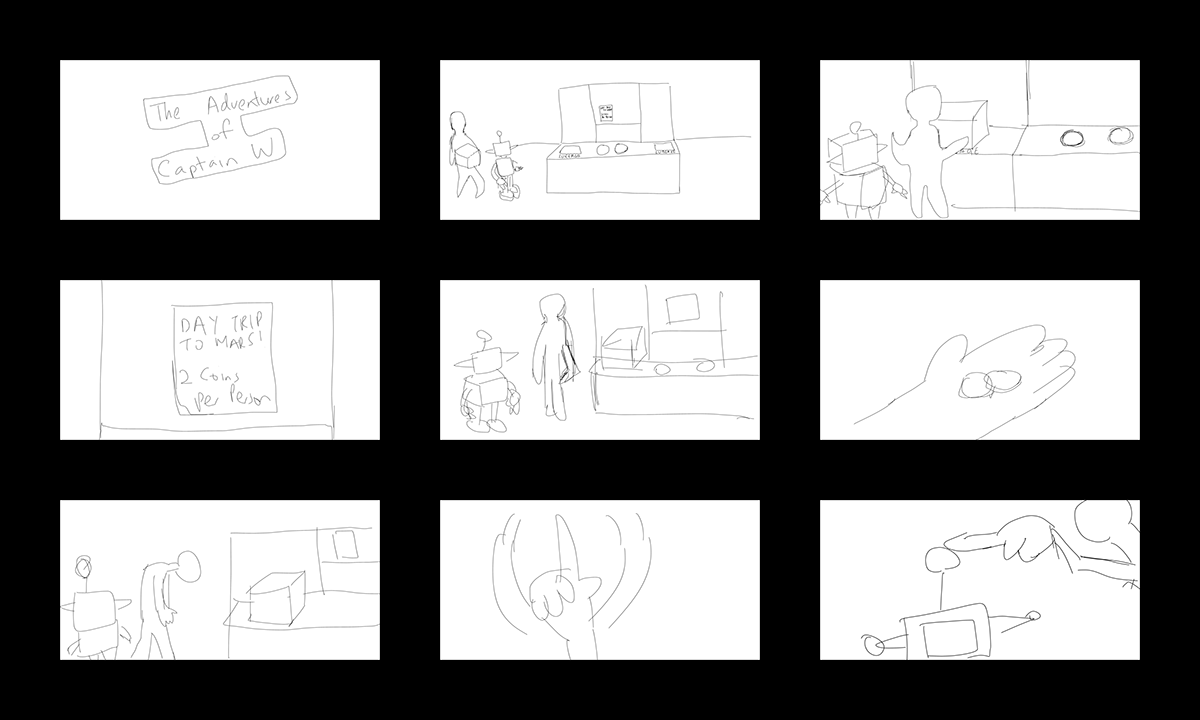
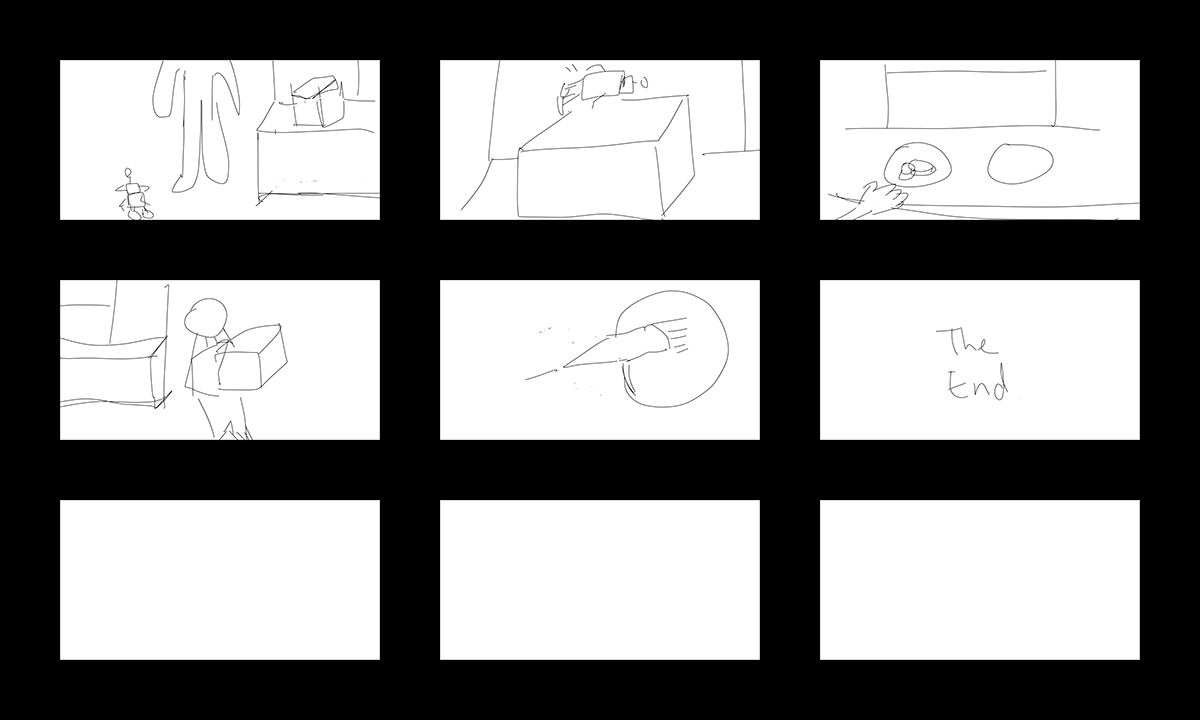
Synopsis:
Captain W and his sidekick CR are headed to Mars for a day trip. W sees that the trip costs 2 coins per person, but he only has exactly 2 coins, while they are two people. An idea strikes W, that if he shrinks CR to a small size it can become a part of the luggage. He does exactly this and heads off to Mars while only paying for one person!
The next step will be to create some assets that are required. For the environment I will be using an existing one from an asset pack, called SciFi Hallway from Epic Games.
5th July, 2020, 10:30pm
Title intro and Previs
I made a quick intro for the title, as well as a quick previs based on the storyboard I created. During the creation of the previs, I encountered some crashing, due to the control rig tool being quite new and therefore it might have a number of bugs. I had to reimport to a new project to get it to work again. I suspect the actual animation will take much longer to do than the simple previs I have here.
7th July, 2020, 6:00pm
Created some assets
While I will mostly be using the assets I downloaded from Epic Games, I have created my own assets to supplement the animation. They are as follows: Items Box, Going to Mars Poster, Sci-fi coin, a rocket, and planet Earth.


8th July, 2020, 3:00pm
Captain W Animation First Draft
Since I already started animating Captain W, I thought I would finish it using the manual method. Also the robot requires manual animating because it has quite a unique rig. So it looks like I probably will not use mocap to animate my characters. To clarify, I did place the joints and skinned the robot using Maya (Captain W was pre-skinned), I simply had to set up the control rigs for the two characters (which could not be imported from Maya because they use separate systems). For virtual production, I tried using my iPad to control the cameras but it would not work properly, but I will give it a try again some time later. I'm also not sure if my computer can handle playing the animation back in realtime as I am unable to use the GPU to run Unreal Editor on Mac (might be specifically a Mac issue as I saw on some forums that other people had similar issues). Here is the first draft of Captain W's animation:
My experience so far with Unreal to animate is that it has some similarities with Maya, for example it has a graph editor, but in some cases it is really quite behind Maya in terms of as an animation package. The selection of the controls sometimes fails and you have to manually change the numbers (translate, rotate) to move. There's no local rotation in the viewport as far as I can tell so once again manual changes to roll, pitch and yaw are required. I guess it just takes longer to achieve the same effect.
10th July, 2020, 8:30pm
Second Draft (more added elements)
I added some more elements to the scene, such as the robot animation and fixed some parts of the captain's animation. I also changed the materials on the counter, and added the 8k textures (Quixel Megascans) to the robot. I have found that once you start animating it's not possible to change the rig in the Level Sequencer. The rig is updated but the part of the program where you add keyframes is not updated so I am unable to move the eyes of the robot even though I have the rig set up for the eye movements.
There's still a lot more tweaking I can do, such as changing the camera movement, making the animation more precise when the captain is holding the robot and putting him in the box. More robot animations will be required as it is currently quite static. I will also need to test out the virtual camera again and add sound (dialogue, music and sfx) to the scene to make the clip more complete.
13th July, 2020, 11:00am
Third Draft
I addressed some of the issues I mentioned from the last post. So now the animation is more refined than previously. I still have to play with the virtual camera though, something I've put off until last because I wasn't able to get it working previously. That will be the next step. Then I'll be adding sound to the scene.
13th July, 2020, 9:00pm
Virtual Camera using iPad
I managed to get the virtual camera working. It's quite laggy so I couldn't do much with it. And also because my room was quite small I had limited movement. Nevertheless, I recorded the entire animation sequence using the iPad, and now I can use some of it to generate that 'hand-held feel'. The 'Unreal Remote 2' UI was also captured on the video, not sure if I know how to get rid of that in the app, so I might have to just use this and trim the video. Here is the full video of me using the iPad as the virtual camera:
19th July, 2020, 3:00pm
Lighting
I made some changes to the lighting, by making it more cinematic (key, fill, back lights). Previously it was a bit overexposed, especially on the Captain character. The challenge I had with that was not knowing whether to move the lights as the character walked, or made the lights stationary to make the lighting look more realistic. There might be a method to this but I'm not too familiar with the solution. I also lost all the iPad virtual camera movement because when I switched back from 'virtual camera mode' to 'none' in the 'GameMode Override' setting, in order to render scenes without the iPad controls showing, it must have erased the camera data from the iPad virtual camera. As such, I did not change the lighting in the parts of the video (shown below) that involved shooting with the iPad. I also played with atmospheric fog, but it didn't seem to make too much of a difference (maybe because it's in an enclosed area, or maybe I am just not able to tell).
25th July, 2020, 10:30am
End of Milestone 2 Reflections
It was good to gain some experience doing Unreal Engine to make an animated short. Outside of this subject I may not have the motivation learn it and explore in such a way that makes it useful for me in the future.
The tools available to create an animated sequence within Unreal is still very new, so there's a lot of features missing compared to Maya, and there are bugs that cause unexpected behaviour and sometimes (actually a lot of times) causes the program to crash.
Despite this, Unreal Engine is powerful. It is capable of virtual production, and we see that even Weta Digital is embracing Unreal Engine in their virtual production. The real-time aspect makes it different from the traditional animation package such as Maya, making it really powerful to create films on the fly. Clearly, in this milestone I have only scratched the surface of what Unreal is capable of in virtual production, but using the iPad as the virtual camera is a start.
29th July, 2020, 10:00am
Milestone 3
For this Milestone I will be polishing up the animation to a production level. This will involve:
- Adding ambient characters in the background
- Fixing lighting issues
- Showing a wide establishing shot of the scene at the beginning
- Adding sound (dialogue, music, sfx)
- Redoing the virtual camera using iPad
- Rendering final images
4th August, 2020, 1:30pm
Video without Audio
I created the animation making changes that were previously outlined, except the audio, which I will do next. I created an establishing shot, redid the virtual camera, fixed lighting issues, and created ambient characters.
The virtual camera was tricky to use, once again. It took a few go's for it to behave, and even when it was stable enough to use it was still tricky to navigate. Anyway, I was able to get it done.
The lighting issue was also tricky to fix. At first I thought it had to do with some lights that I couldn't locate. But as it turns out it had to do with the auto-exposure settings. Once I turned auto-exposure off, as well as eye adaptation, the scene had better exposure.
I used Mixamo for the ambient characters, using both the characters and the animations from the service.
Here is the video without audio:
5th August, 2020, 12:00pm
Audio
I have the audio recorded, and here I have separated it into three tracks: dialogue, sfx and music+atmos. The individual tracks are included here. The Music+Atmos track is as follows:
The SFX track is as follows:
The dialogue track is as follows:
When you combine all of those together, it makes more sense and becomes more interesting. Here is the combined sound file:
I used 'Freesound' and 'Youtube Music Library' for the SFX and music. I recorded my own dialogue.
15th August, 2020, 9:00pm
Full animation (with sound)
16th August, 2020, 10:30pm
Fixed Exposure (too bright)
Having received some useful feedback, I adjusted the brightness/visibility of the scene. Overall it was too bright and so in particular the Mars poster was not clearly legible. It was a simple tweak using Premiere Pro. I guess the rendering made it overexposed because in the viewport in Unreal Engine, the exposure was fine (see below for what it looks like in the viewport). Anyway I should have checked to see if the viewport matched with the rendering, so it was an oversight on my part.

Anyway, this is the animation with exposure adjusted:
18th August, 2020, 5:00pm
Reflections on Milestone 3
In this milestone I fixed a number of issues that I had with Milestone 2 and added sound (SFX, dialogue, music).Therefore, this was more of a tweaking exercise rather than having to create too many things from scratch. I did have to use the iPad to record as a virtual camera all over again though, as I could not find the previous camera data. The use of iPad revealed that this feature in Unreal Engine is still quite new, prone to the feature not working as expected. It took a few go's to get it working, but when it did, it worked quite smoothly. So this was a good introduction to virtual production, which can be used to simulate real camera movement, rather than having the animation result in very static shots.
The sound production was fine, though there's a lot within sound that I have not explored, though since my major is animation, perhaps this is not something I will go into in the near future. I used Logic Pro X to record the sound, and did it linearly as opposed to having it event-driven (for example, have the sound play when the box is placed onto the counter via programming). I found the event-driven approach just not worth it, as the manual timing of the sound allowed greater control. Perhaps if there is a future project that involves many complex events involving collisions I may implement a programmatic approach to this. The difficulty would perhaps lie in collision detection of the polygons, since these are not rigid bodies.
My voice acting leaves a lot to be desired, in my dialogue recording. In order to simulate the Captain's mouth mask, I covered my mouth during the recording and so viewers of the animated piece might notice that the sound is a bit muffled. That is deliberate, to simulate the situation closer to what you see.
18th August, 2020, 5:30pm
Overall Reflections of the Subject
I am now at the conclusion of this subject, 'Emerging Practices in 3D Design and Animation', and I have two pieces of work: one, an partially completed interactive experience that involves sci-fi gadgets; and two, an animated sequence partially using virtual production techniques. Both artefacts use Unreal Engine as the main tool. Personally, I have gained a lot of knowledge using Unreal Engine, and perhaps the greatest lesson is to learn that there is a lot more to be learned if I want to become an expert in this game engine. It is also a powerful tool, able to make 'games' (interactive applications), and films.
The reason why I changed direction for my artefact, instead of persisting with the interactive experience, as per Milestone 1, is that I wanted to broaden my knowledge of Unreal and focus more on animation production, which is my major of study. The interactive app of Milestone 1 would prove useful should I end up in a game development company, but for Milestones 2 and 3, the animated piece created gave me experience in animation production and virtual production, the latter of which is an emerging field.
Virtual production is becoming more and more relevant, and as a silver lining to the COVID-19 crisis currently going on, this technique is being deployed as a way to maintain social distance while being able to carry on film production. "The Mandalorian" is the famous example of ILM's use of virtual production (and LED screen technology) to create their content.
With Unreal Engine 5 just around the corner, using Unreal Engine as a tool for production (be it for games, film, animation, or other applications) is spawning new opportunities for content producers. Traditionally using DCC tools as Maya to create animation, the use of Unreal Engine to create real-time rendering of content serves as a reminder of the need to adapt to the dynamic nature of film production: what works before may not be so relevant in the future, and tools are becoming more powerful and changing in ways that we cannot predict. The end goal of allowing producers to make quality content is now challenged with a new and complementary goal, to democratise content production to the masses. Before, only a select few can make movies; now, anyone with basic equipment (computer, software, the latter of which now has some open-source options) can create them.
Unreal Engine is free, and so is the Quixel suite (I have used Quixel Megascans for some content, including the metallic textures, which is free though only for use with Unreal). This is further testament to the democratisation of tools, which I wholeheartedly support. Other tools (that are not free) that I used include Mixamo, where I have used this for the interactive application to create the characters walking about, as well as for the short where I inserted the ambient characters.
Overall, I believe that the results generated by my participation in this subject could be counted as emerging practice. It both pushed the edge of my own personal knowledge, and used cutting edge tools for making something. I have used many assets that are pre-built (though I also created some myself, including the time machine in Milestone 1), in order to save time, and this also shows how many useful assets are available for free, that anyone can use to create their content. Therefore, besides using the cutting edge technology I have also participated in the tool-democratisation movement (or open source).


