Graduation Project
Documentation and walk through
Documentation and walk through
Computer Engineering Department
Shoubra faculty of Engineering Benha University
Under supervision of Prof.Shady El mashad
July 2019
July 2019
I love story telling and want to share this one to demonstrate
how this project is made and share some technical detail.
how this project is made and share some technical detail.
I see the most important part of any project is how it was made !
as it can teach us something new, tell us more about the maker of that project so we can have a look on how he thinks which of course can broaden our horizon.
This project is classified as : Technical Art
I. Idea & Motivation :
I started learning about game development two years ago
then I was curious and wanted to know how game assets are made
and started learning about game art and 3d modeling
"started with blender then switched to Autodesk Maya as it is more professional !"
then I watched GDC 2018 videos and it was wow !
I watched that video of Andy Serkis and MAN I wanted to make something like that !
I believe that motion capture can make animation be more realistic as
from a technical view : they can capture these micro expressions we make unconsciously
from an artistic view : it transfers acting skills to another domain !
from a technical view : they can capture these micro expressions we make unconsciously
from an artistic view : it transfers acting skills to another domain !
Nowadays there are lots of programs and plugins made for this purpose
but I wanted to make it in the most simple form so that I can have a closer look to how it really works !
but I wanted to make it in the most simple form so that I can have a closer look to how it really works !
II. Building needed skills
At first I had no idea how I am going to make this project
I was already taking a Maya Diploma at Russian cultural center in Cairo
and for sure I knew I would need some python skills so that I studied this python course on Udemy
you can check my course work here on github
It boosted my programming skills "also my self-confidence as I was not the best programmer among my friends at collage although I am studying computer engineering!"

Python Mega Course !

Final Project of Chris's Course is writing a script that automatically built this car using simple Shapes
I spent 3 months studying these courses
and in conjunction with their end I found great resources and references to help me making the project as desired !
and in conjunction with their end I found great resources and references to help me making the project as desired !
III. Appreciation to these two !
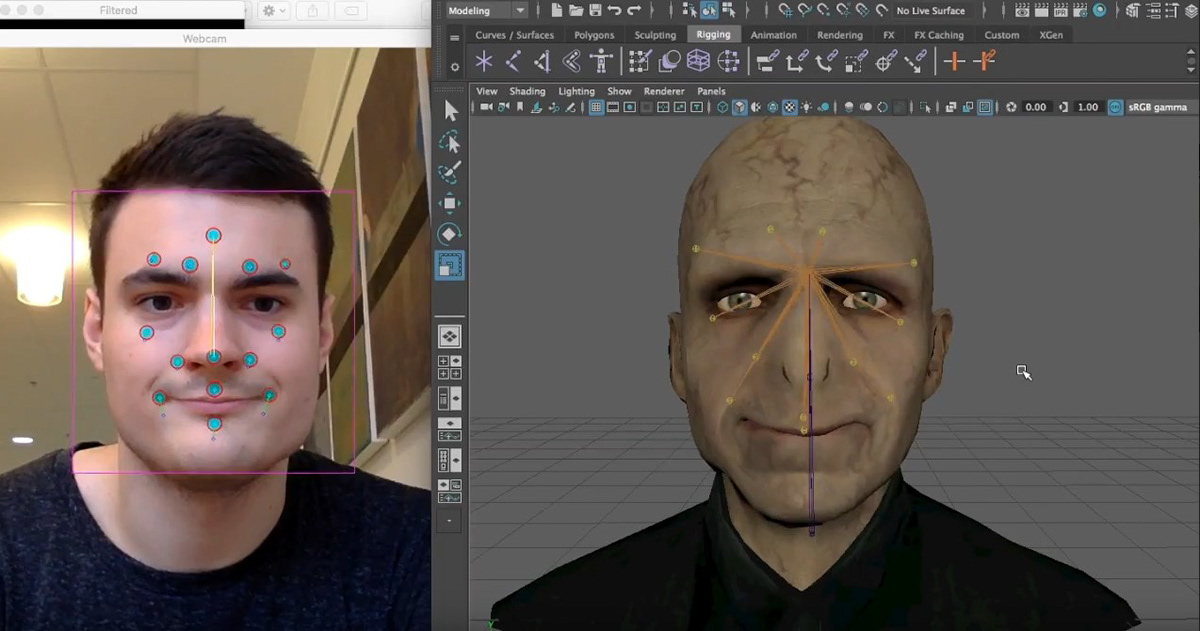
I found these two videos on Youtube one of them helped me visualize the algorithm and the other was a good inspiration and code guide !
First Video : Maya Face Tracking
However he is using C++ and MEL in his project but it was a great reference and was very inspirational !
It was developed by Oscar Westberg [project Github]
It was developed by Oscar Westberg [project Github]
It was a school project he made in 2015
Second Video : Homemade Face Tracking in AE & C4D
It explains the algorithm used in its simple basic format !Really love it !
IV. Project Over view and data flow

V. Development Process
I tried to divide the project into chew-able bits
so the whole process is broken into a series of tasks each one depends on the previous ..
so the whole process is broken into a series of tasks each one depends on the previous ..
Basic Setup :
On my machine I have Python 3.6.8 as it has a stable Open CV version 4.1.1
1.1. Python versions :
Maya has it's own built in python platform Python 2.7.11On my machine I have Python 3.6.8 as it has a stable Open CV version 4.1.1


1.2. Python Libraries used in project :
socket
json
json
select
threading
maya.cmds "only in maya python platform !"
cv2
numpy
matplotlib "used only in testing color segmentation task"
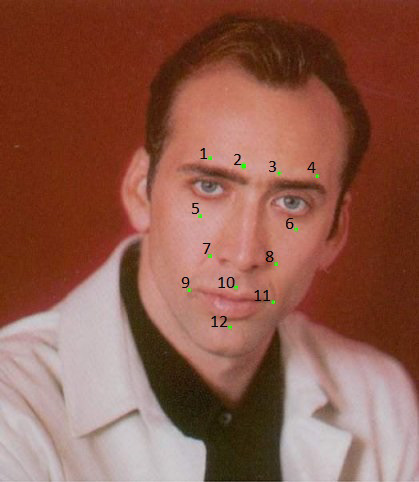
2. I am using the simple 12 marks system "the same as Maya C++ Video"
Simple tracker to track : eye brows, cheeks & mouth
Simple tracker to track : eye brows, cheeks & mouth
3. I wanted to make my own 3d model but I didn't have much time and I was a team of
one man :'(
Rigging needs a lot of patience ,practice and time
My Model with some Rig Test ! , I only rigged its mouth & neck :(
one man :'(
Rigging needs a lot of patience ,practice and time
My Model with some Rig Test ! , I only rigged its mouth & neck :(


3d model from Maya Video
Tasks :
Task A : Communication Channel
Because of having two different python platforms "Maya and my machine"
a communication channel is in need !
To do so I have two main problems :
1. Standard Message Format
a communication channel is in need !
To do so I have two main problems :
1. Standard Message Format
2. Method to transfer data
Solutions :
1. JSON is a well organized format to exchange data between servers online
1. JSON is a well organized format to exchange data between servers online
In my case I would need to send 12 marks tracking data so JSON would be very
helpful !
helpful !
2. TCP Sockets can be used as a communication channel between two computers
or even two scripts on the same machine, also they are very reliable and easy to use
or even two scripts on the same machine, also they are very reliable and easy to use
In this example I am sending data to another python script and getting an affirmation that they have been received safely !
The affirmation is that "1" that has been received from the server .
The affirmation is that "1" that has been received from the server .

Task B : Mark Extraction
This task is very essential as it's the first step in the final program as it extracts the
marks from the photo !
This task is very essential as it's the first step in the final program as it extracts the
marks from the photo !
There are two possible solutions :
1.Threshold
1.Threshold
2.Segmentation
1.Threshold : In which any pixel value below the threshold is given a zero & any above
is given 1 or 255 & it depends on the application! "
is given 1 or 255 & it depends on the application! "
It is achieved by
Method A : Splitting Channels
1.Separate RGB Channels to 3 channels R,G & B
2.Apply distinct threshold for each channel.
3.you can combine these 3 channels into 1 RGB Channel again !
or you can add them to each other and make a 1 Gray Channel image.
3.you can combine these 3 channels into 1 RGB Channel again !
or you can add them to each other and make a 1 Gray Channel image.
Method B : Converting into 1 Channel
1.Turn RGB image into Gray image
2.Apply 1 threshold "as gray image is one channel image !"
In this Example : I have applied different techniques of threshold to explore and
choose the best for my application
choose the best for my application
About each image :
1.Colored original Candy Image
1.Colored original Candy Image
2.Results of threshold of Red Channel
3.Results of threshold of Green Channel
4.Results of threshold of Blue Channel
5.Combining the previous three results into RGB Image
6.Combining the previous three results into Gray image
7.Results of threshold of the Converted image "Method B"


I really Liked the results of Global Threshold which is the simplest one!
2.Segmentation : Based on Comparing Image HSV Values "i.e. Hue Saturation Value"
to min HSV and max HSV.
to min HSV and max HSV.
It has nice rough results !


Task C : Blob Detection
Second essential operation is blob detection "i.e. Regions or group of pixels with
the same colors "
In this example black blobs are detected and put green circles on them !
the same colors "
In this example black blobs are detected and put green circles on them !


This example is made using Photoshop as a visualization of how my script would see the marks ..
My plan is : separating marks from image and replacing them with white blobs and black background.
My plan is : separating marks from image and replacing them with white blobs and black background.


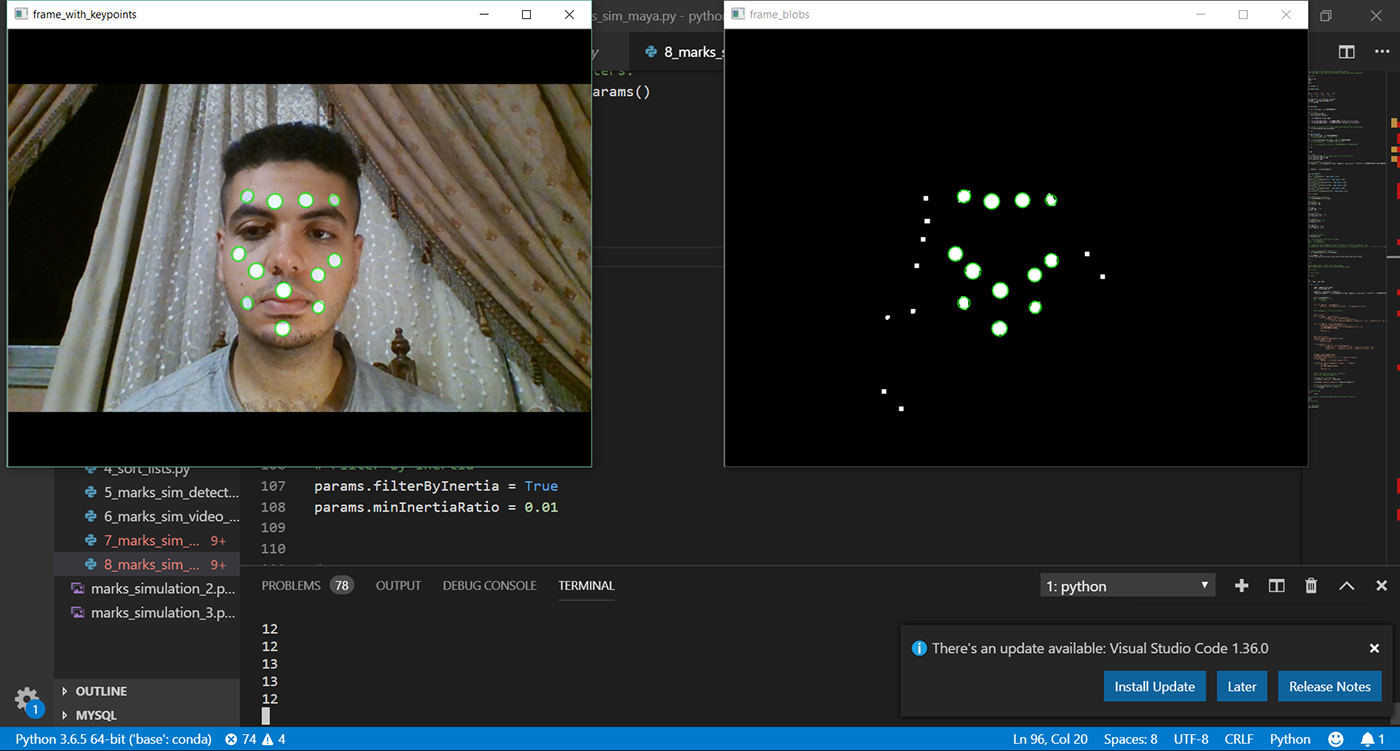
Task D : One Mark Detection
made it as an exercise to combine Task b and task d
also this how all of the 12 marks would look like later ..
Algorithm :
1.Read Camera video frame by frame and for each frame
2.Apply Color Segmentation to "to get rough results of range of whites"
made it as an exercise to combine Task b and task d
also this how all of the 12 marks would look like later ..
Algorithm :
1.Read Camera video frame by frame and for each frame
2.Apply Color Segmentation to "to get rough results of range of whites"
3.Apply Color Threshold "Method B - Global Threshold" to fine tune results
4.Blob Detection and put red circles on it .
And it passed the test successfully despite my bad lighting and bad camera setup
"My phone's Camera and ordinary room neon lighting, I wanted to buy some
camera module but I faced bad situation with Egyptian customs and had to return
the package" !
"My phone's Camera and ordinary room neon lighting, I wanted to buy some
camera module but I faced bad situation with Egyptian customs and had to return
the package" !
Task E : Marks Simulation
Due to my poor setup & available tools , I needed a perfect case with easy and
consistent fake data generator.
It will help me implement the algorithm independent on my setup.
consistent fake data generator.
It will help me implement the algorithm independent on my setup.
Steps :
1.I used the mentioned 3d model
2.Placed 12 spheres in the same place of the 12 marks from reference
3.Added 2d Shader to the 12 spheres
2.Placed 12 spheres in the same place of the 12 marks from reference
3.Added 2d Shader to the 12 spheres
4.Animated them "Used some emotion references so that animations be as realistic
as I could"
as I could"
5.Render Spheres only + black background
In this example :
First image : you can see the 3d model and the 12 spheres with gray material
Second image : 3d model and the 12 spheres with 2d white shader


Front view of 3d model before and after white marks .
last one is the final render view
last one is the final render view


In this video I made 2 renders, first with ordinary blue material and the other with the 2d white shader.
Task F : Tracking Simulation & Apply Motion
I divided it to two smaller tasks
1.Detect and Sort Marks
2.Track Motion, send and apply motion data
Detect and Sort :
I used Blob Detection like in Tasks C & D
Also I used the same sorting technique like the mentioned Maya C++ project
It based on XY position as :
1.Sort on Y Axis "then dividing them to regions"
1.Sort on Y Axis "then dividing them to regions"
2.Sort "First Region Blobs 1 to 4" on X Axis
3.Sort "Second Region Blobs 5 & 6" on X Axis
4.Sort "Third Region Blobs 7 & 8" on X Axis
5.Sort "Fourth Region Blobs 9 to 12" on X Axis
6.Sort "Fifth Region Blobs 10 to 12" on Y Axis


If these regions overlapped, that sorting technique would be not valid , which made
me a little afraid !
me a little afraid !
But, Fortunately no overlapping happened in this test and next tests because of the
human face anatomy nature !
While face is stretching, those regions proportions are preserved !
human face anatomy nature !
While face is stretching, those regions proportions are preserved !
Next :
Track motion and apply motion data :
My Simple Technique is sending the difference between the current blob XY
position and the last one, and applied this difference directly to the 3d model
rig.
My Simple Technique is sending the difference between the current blob XY
position and the last one, and applied this difference directly to the 3d model
rig.


Also, For a better Visualization, I drew a motion tracking line using the last 20
position records for each blob and changed line thickness over these last 20
records using a simple math function [ (i/5) + 4 ] , "i" is the record number 1 to 20
This made line look more comfortable to look at !
position records for each blob and changed line thickness over these last 20
records using a simple math function [ (i/5) + 4 ] , "i" is the record number 1 to 20
This made line look more comfortable to look at !

Sub Algorithm :
1.Read Camera video frame by frame and for each frame
2.Blob Detection and put green circles on them
3.Sort Blobs and number each one
4.Draw motion Tracking line
5.Send Motion Data
6.Type Current Frame Number on screen
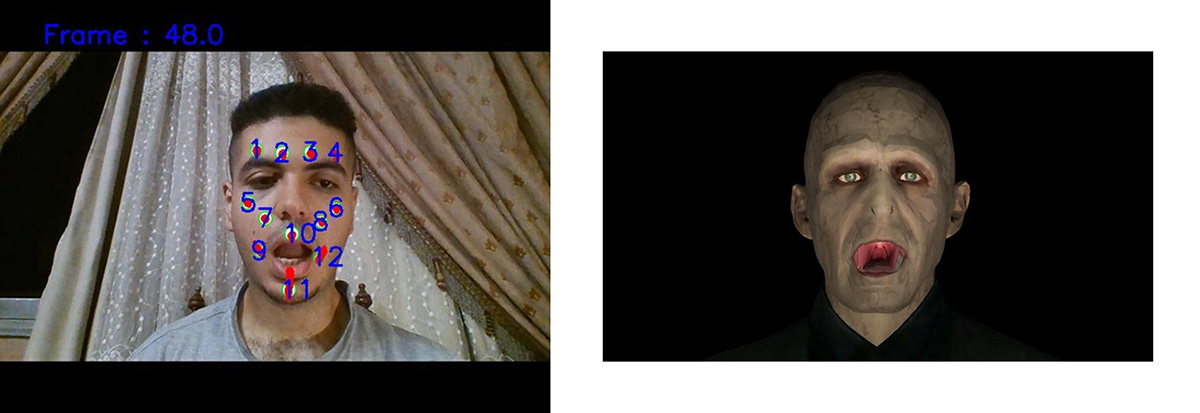
Task G : Simple Facial Motion Capture
After implementing a simple algorithm on simulation
Let's see what will happen for a real case !
Let's see what will happen for a real case !
In this image I am testing if script detects the 12 marks properly or not !
and it looks pretty cool !
and it looks pretty cool !
Full Algorithm :
1.Read Camera video frame by frame and for each frame
1.Read Camera video frame by frame and for each frame
2.Apply Color Segmentation to "to get rough results of range of whites"
3.Apply Color Threshold "Method B - Global Threshold" to fine tune results
4.Blob Detection and put green circles on them
5.Skip current Frame if blobs less or more than 12
6.Sort Blobs and number each one
7.Draw motion Tracking line
8.Send Motion Data
9.Type Current Frame Number on screen
Now it's Time for a test !
You can see clearly it's not that good !
The most thing that blew up the video is
"Step number 5 of the full algorithm"
I thought dropping one or two frames won't be a problem
The most thing that blew up the video is
"Step number 5 of the full algorithm"
I thought dropping one or two frames won't be a problem
but my setup was not that good and script dropped a lot of frames :(
I tried filtering the last results
and it was interesting !
and it was interesting !


I didn't upgrade or fixing any thing in this project
as the objective was : Understanding the process !
and I am very satisfied with these results !
as the objective was : Understanding the process !
and I am very satisfied with these results !
Appendix :
------------------------------------------------------------------------------------------------------------------------
I learnt a lot in the process of making this project
and gained some skills in :
1.Python
and gained some skills in :
1.Python
2.Maya Python Scripting
Last but not least :
I hope you enjoyed this Documentation ^^
and I would like to share this moment of me and my professors after graduation project evaluation
I am on the right with a red tie ^^
and Prof. Shady is the one with a blue shirt ..
and I would like to share this moment of me and my professors after graduation project evaluation
I am on the right with a red tie ^^
and Prof. Shady is the one with a blue shirt ..
Thanks for reading ^^

