


Blend Plugin for Figma
Client: No one
Project: Literally no... Sorry, my head consists of memes. Blend Plugin
Goal: Develop a plugin for Figma to learn and have fun
Time: 1 month
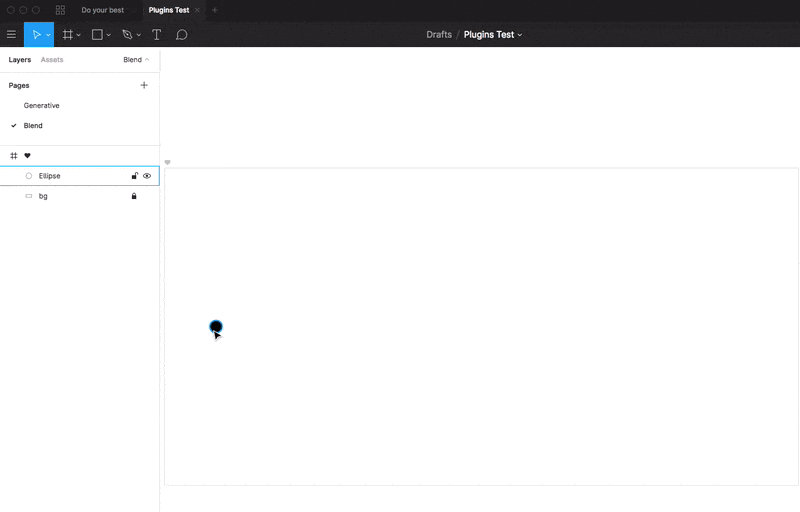
My exploration of Figma plugins began with some generative art. I quickly learned how to draw random circles, then brought some order into this chaos.
When I got the hang of the API, I already knew what I wanted to build. I always loved Blend in Illustrator and thought it would be great to have it in Figma too.
Math
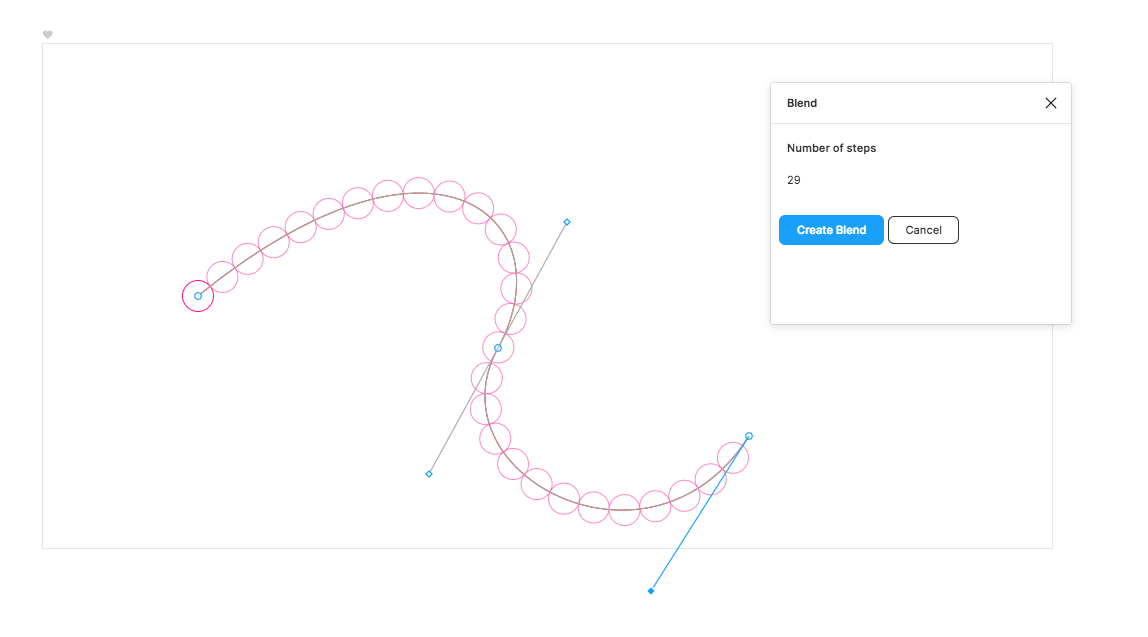
To copy an object along the path, you need to find points on this path at equal distances from each other. It's quite easy to divide a straight line into equal segments: you just need to divide the sides of its enclosing rectangle by the number of points, and then simply multiply this vector by step number.
Problem: The approach would obviously be different for curves, and at first I used the same method which is used to draw the curve to calculate the points on it. However, it doesn't yield equal distances — on the demo below distances between points get smaller in places where curve is bent more.
The math behind what I thought was simple copying of the object turned out to be much more challenging than expected. A Primer on Bezier Curves helped me understand a lot of math behind Bezier curves. I learned that you cannot simply calculate points on the curve at equal distances — you have to approximate them. At first I tried to use JS library made by the author of the Primer but it was a bit slow so I decided to write my own algorithm.
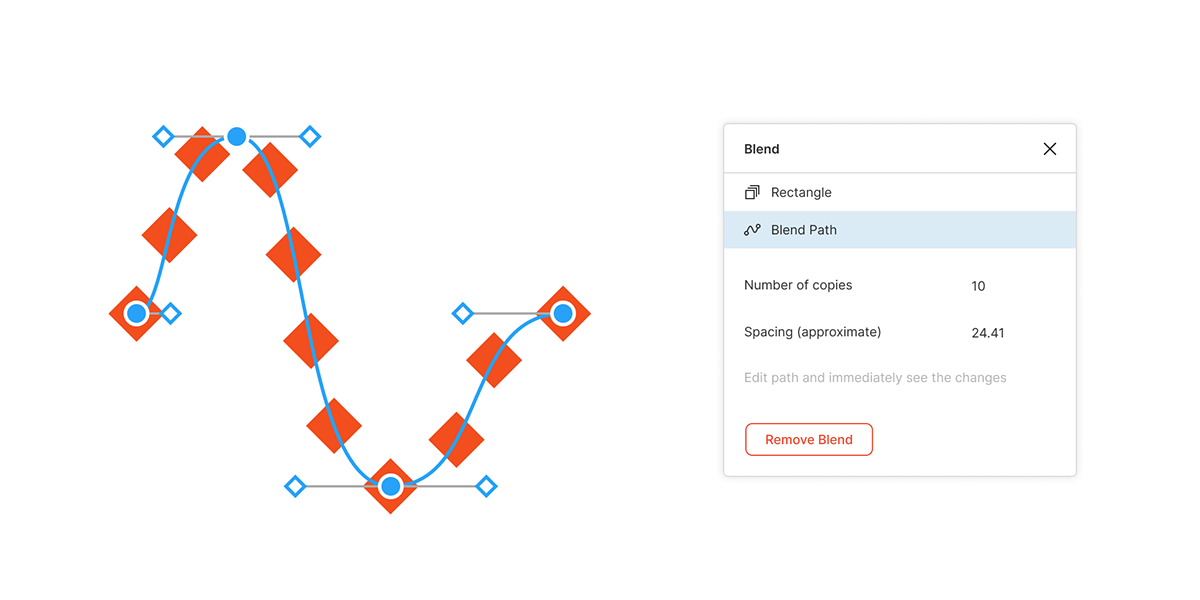
Solution: After several days of scratching my head, I figured that it's possible to take the points on the curve, then find linear distances between them and try to iteratively find points which are closer to what we are looking for. Here is a visualization of this algorithm:

Below is a little demo of how the new algorithm performs! The distances between circles look perfectly same. As you can see the UI is a bit dull now, the next step would be making it more functional.
User interface
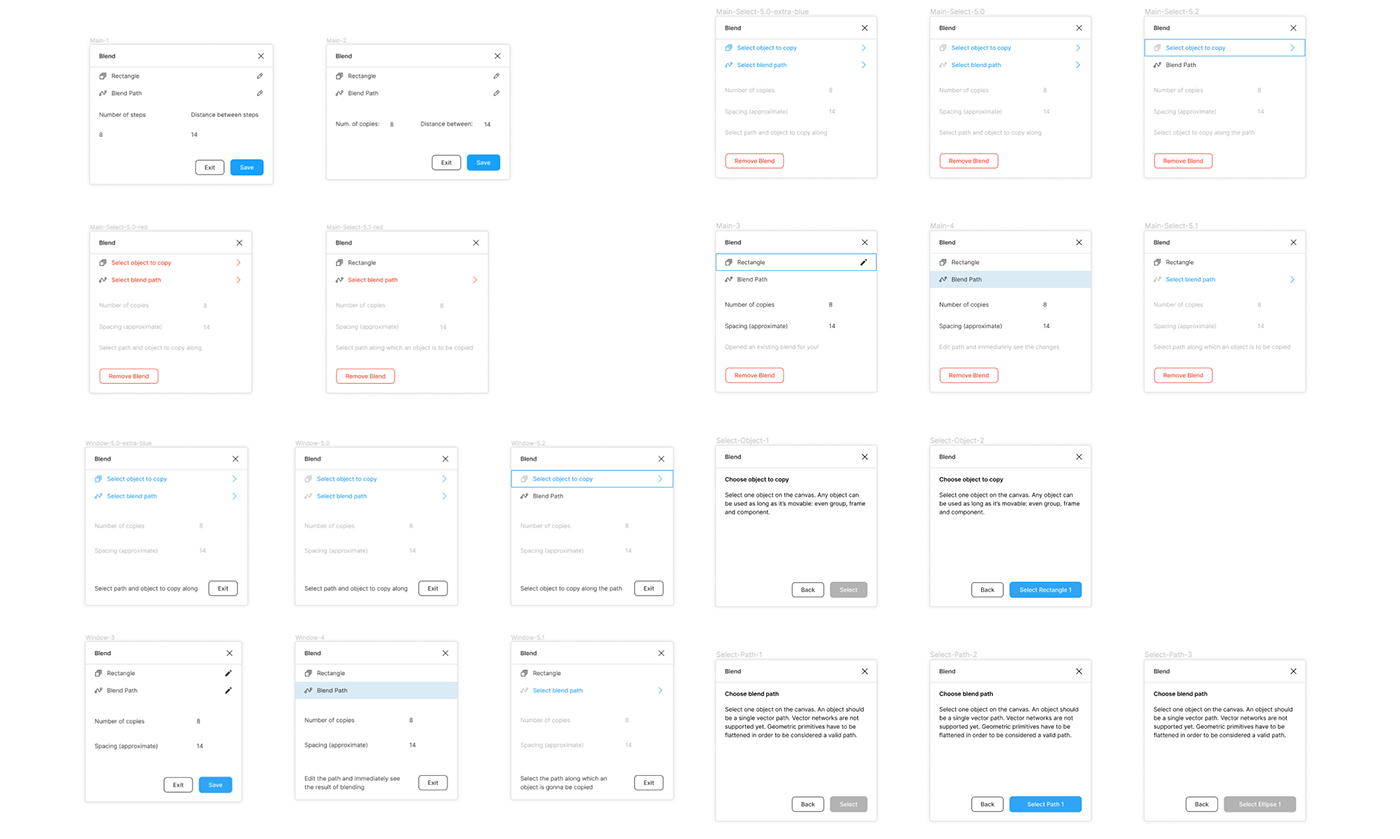
Problem: Another challenge was ahead of me. Although I already knew what features to implement in the UI, I haven't really thought of how the user is going to use the plugin. Specifically the process of selection of objects to use as blend node and path. At first I thought I would do it automatically with a “smart” algorithm, but it would be difficult to implement. Also it would yield many errors if user doesn't select something right, and I will have to create extra UI elements to help them reselect or add specific nodes to selection... A lot of unnecessary work.
Solution: Keep it simple! When user opens the plugin, they will either have or not have necessary objects selected in Figma. And the plugin needs them to select just two objects (or one — existing Blend Group object to edit it). The UI was designed in such a way that the user will see what is selected as blend object and blend path, and will be able to select/reselect them independently. I decided that two element that control objects should look and behave similarly to Layers Panel. They will show when an object is selected and also would conveniently allow you to select objects by clicking the “layer”.
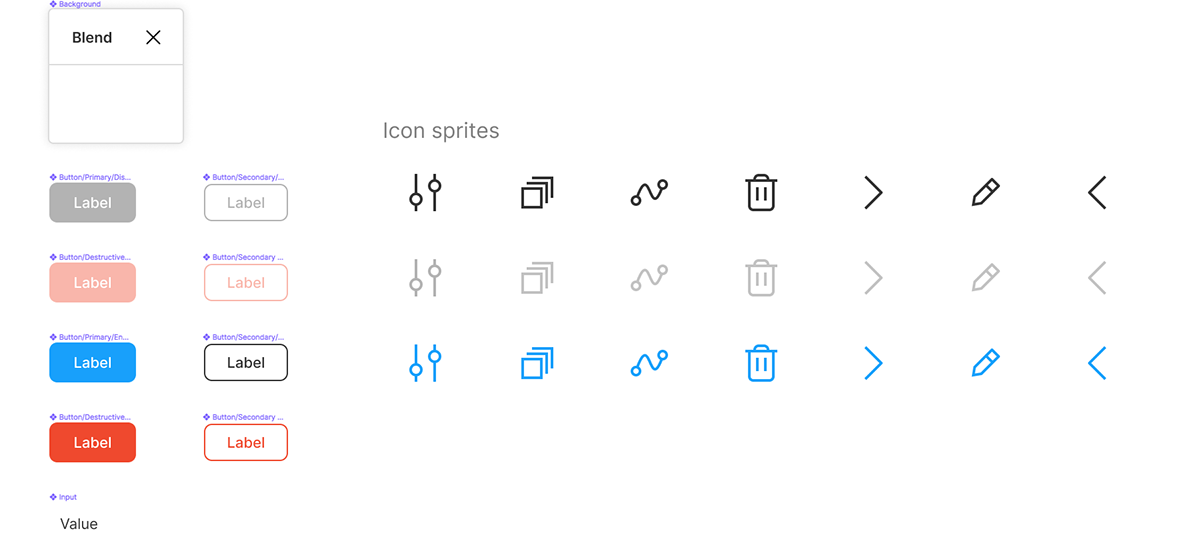
[mini] Design system
Problem: make plugin feel native in the Figma environment.
Solution: design Figma UI in Figma — so meta!
I had to recreate some basic elements from Figma's design system from scratch to make the plugin experience consistent with Figma interface. So I made the components of buttons, plugin window, layers, etc. But the most interesting part was making custom pixel-perfect icons which would look native. I like the edit icon (pencil) the most — and which is your favorite?
Coding the UI
Problem: recreating UI visually was quite simple to do with CSS, but the logic behind it took me quite some time to figure out. I got stuck when there were too many interconnected methods, not fully understanding my own code that I just wrote. I needed help.
Solution: recently I discovered the concept of statecharts and understood it with the help of a community-made website about statecharts and Sketch.systems. It was time to “sketch a system”! Several sketches later, I got a hang of how the whole system should work and ended up with two different (but similar) sketches.


Figma plugin hub entry
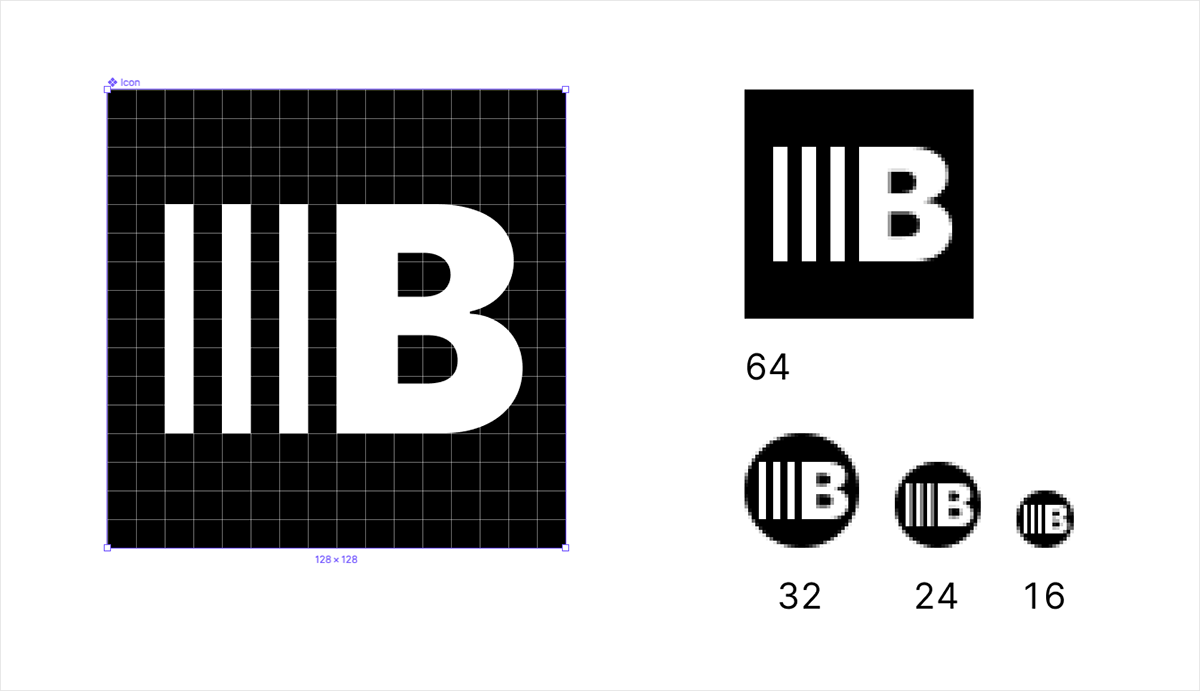
With everything done and dusted, it was time to submit the plugin to the Figma plugin store. I needed text, icon and a preview. Large bold letter B should definitely take some attention, so I wrote it in Inter and started playing with ways to show the copying process. The simplest approach, as always, turned out the best, especially given that it's pixel perfect at 16px. Fortunately B has one straight edge so there were absolutely no problems with drawing several rectangles following the grid.
I've tried to create different pieces of art with the plugin to create a cover image, but nothing turned out good enough. I decided to just show its functionality as it is. I conveniently had the mockups of the UI already so exporting them in high resolution was no science. I had to recreate Figma UI of editing the vector node though, taking screenshots and trying to replicate the same in vector shapes.
Viral demo
Problem: Attract attention to my plugin and build hype about Figma plugins in general. The idea was to create some art using my plugin, record the process and post it as speed-art. But it turned into something more...
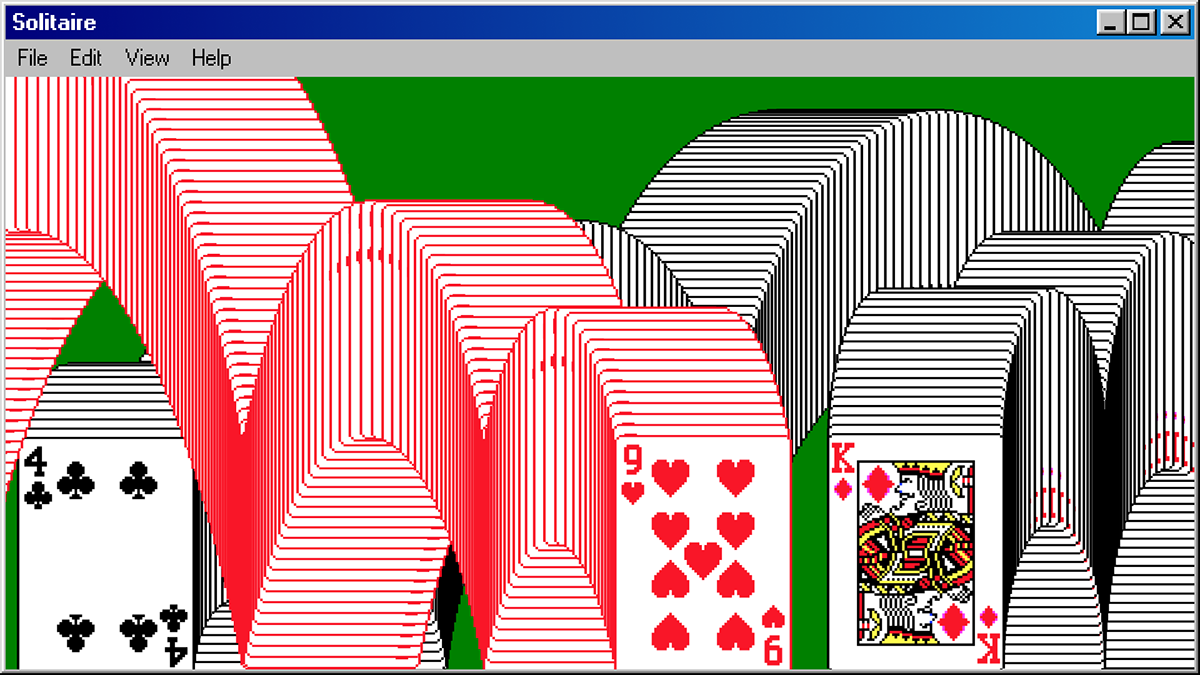
One of the first ideas that came to my mind was to recreate the famous endgame animation from Solitaire on old Windows. I found some screenshots, created another mini design system in Figma — now of Windows 98, and used Blend plugin to make the cards “jump”. It wasn't very attractive though and I didn't really know what to say about it. To be honest, I was more fascinated by the Windows 98 design system than this picture.
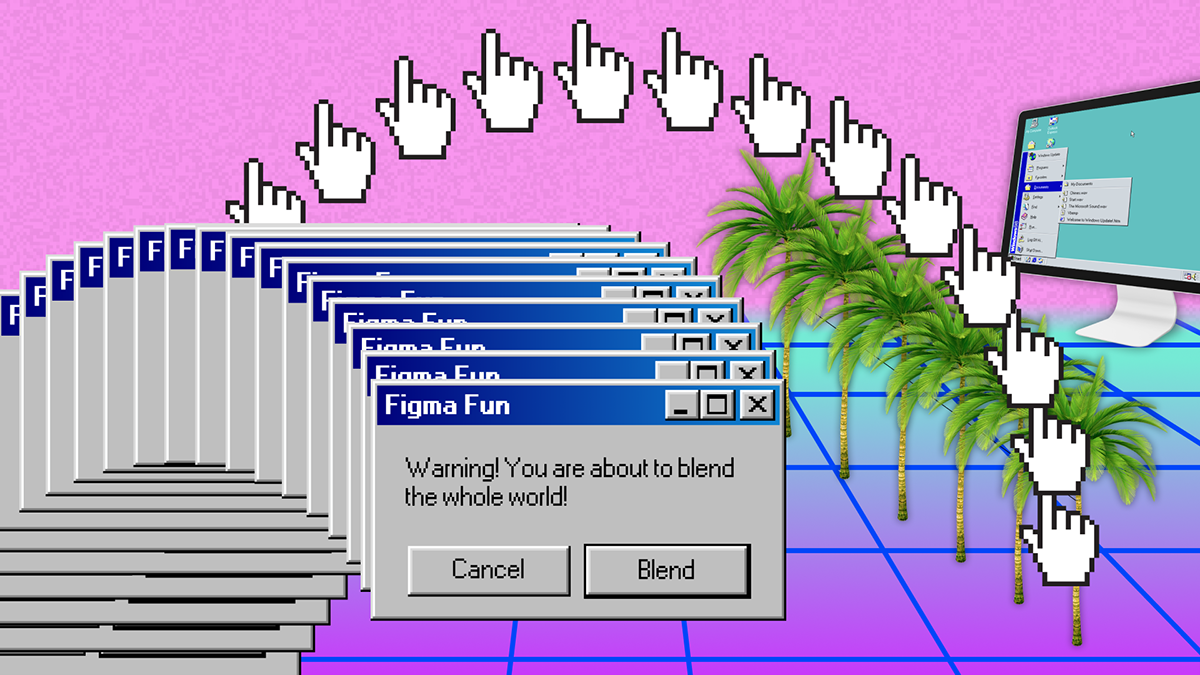
Solution: So I needed something else... I typed Windows 98 into Google and one of the first autocomplete suggestions was “... aesthetic”. I looked at some pictures of old computer aesthetic and it hit me — webpunk is definitely a way to go! A couple of hours of browsing Pinterest and I got the idea of what I'm going to create.
I found and created necessary assets (like that Windows 98 Mac in the corner) and made a picture. Then, as planned, I recorded the process and opened Premiere to cut it. And I got more ideas!
Firstly, I wanted to make music myself with Google Music Maker — and only in 15 minutes I composed a totally random song that somehow didn't sound like a disaster. I also added low synth sound so it would sound a bit more “digital”.
Secondly, the ending. At first I thought I would just add a blue screen of death like on Windows, so I found a decent screenshot of it and used and online OCR service to help me turn it into text. I designed the screen in Figma and was ready to put it in video. But then a slightly more interesting way to end it came to my mind...
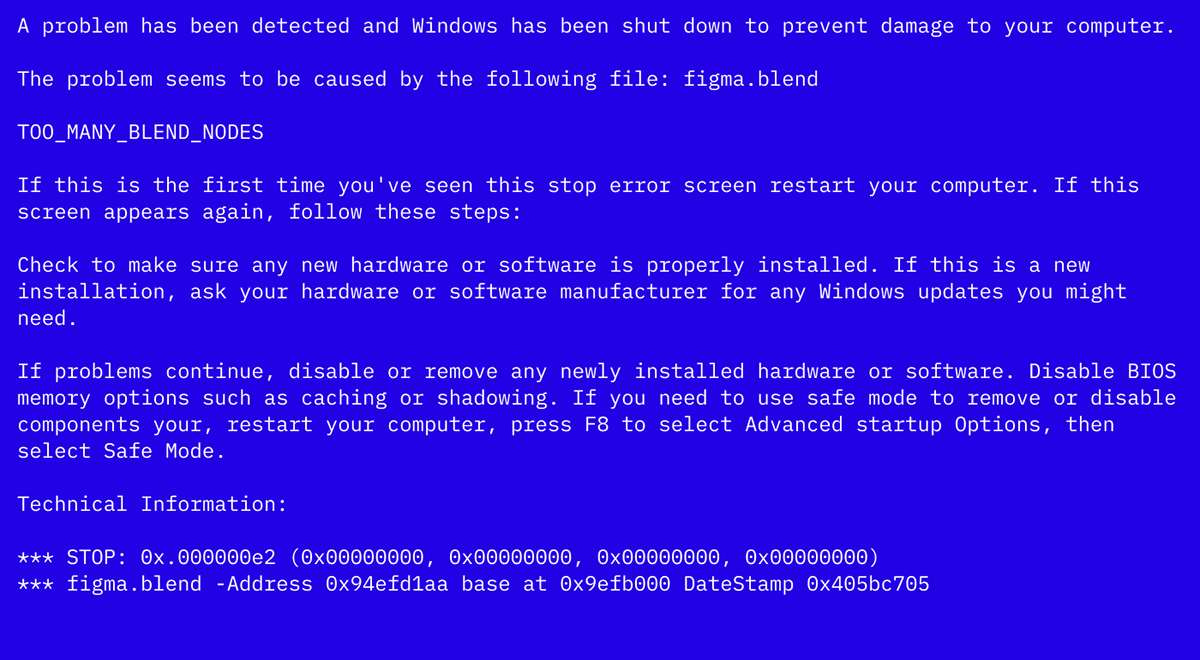
I quickly designed the Figma crash message, fortunately I already had a design system for that. Found Windows error and beep sounds. Opened everything in AE, created a composition of appearing error message and the sound. Randomly copied error messages around the screen, added the blue screen of death and linked the final composition with Premiere.
After finishing everything and exporting the video, the creation was finally ready to be shown to the world. And here it is, my most popular tweet yet (yeah, I know, just 150 likes, lame):
What's important is not the number of likes, but the fact that people had fun watching this and gave a lot of positive feedback. The goal was accomplished — now some potential users know about my plugin and people are hyped about Figma plugins!
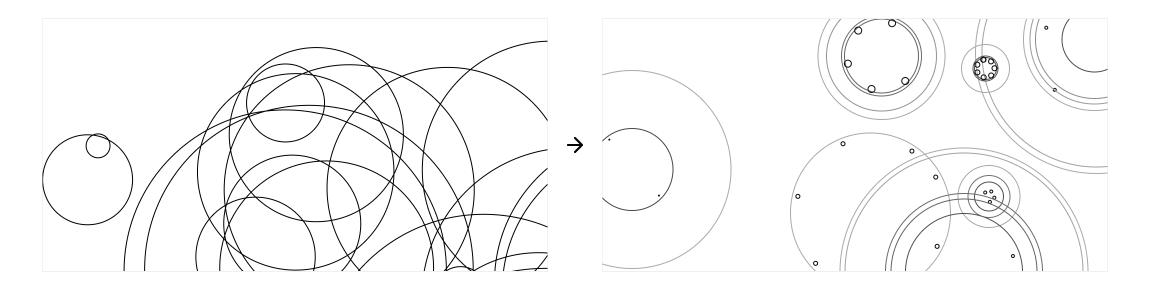
Bonus: Blend posters
A couple days after finishing the project, I was watching PewDiePie Minecraft video and noticed a very cool background in one clip. It appears to be a pattern which is a part of his visual identity. I immediately thought that I want to create something like this with the help of Blend — so I did!


End?
Ooofff, this took so much time, this is such a long post! Is it the end?
No, it's just a beginning. Now I want other people to learn to create plugins, so I'm working on something to teach them how to do it... Follow me on Twitter @zyumbik for updates. Thanks for reading till the end! ;)


