Making of CGI: Brandster media.
Part II. Interior.
Hello everybody again, Mikhail Sizov is in touch with you. There was an analysis of the birth and creating to the Making of "CGI: Brandster media". Part I. Exterior here we are going to talk about the interior design and decorative sets.

When I looked through and analyzed whole working process on exterior and its result, I made some conclusions: so much efforts, time, and power had been invested, and the result was only 5 pictures, its not either good or bad, I need to make jump into features. Further creations of strategic plans started that moment. I got the idea of creating the interior for the office of this agency. And searching of pictures, references and different styles that could have been used in further work started again.
First let me say, that dealing with the interior was extremely hard, there were a lot of ideas in my head, and every time something new and good stuff was born.
Having looked through references, different interior styles, I focused on "Loft" style as nowadays this style is one of the modern and popular styles of interior design (to my opinion) also it suited to the general idea of the project more than everything. Based on this thing I had sketched "the first" idea (just pay attention to the word "the first" so as it’s the last and final idea, there will be a few such ideas in the whole process), as always the sketch was in my head, cause I was determined to succeed and that basically everything is going to be tip-top.
Lets go back to the main idea, industrial or commercial building, there is the sing on it, so there should be the agency itself somewhere inside of the building.
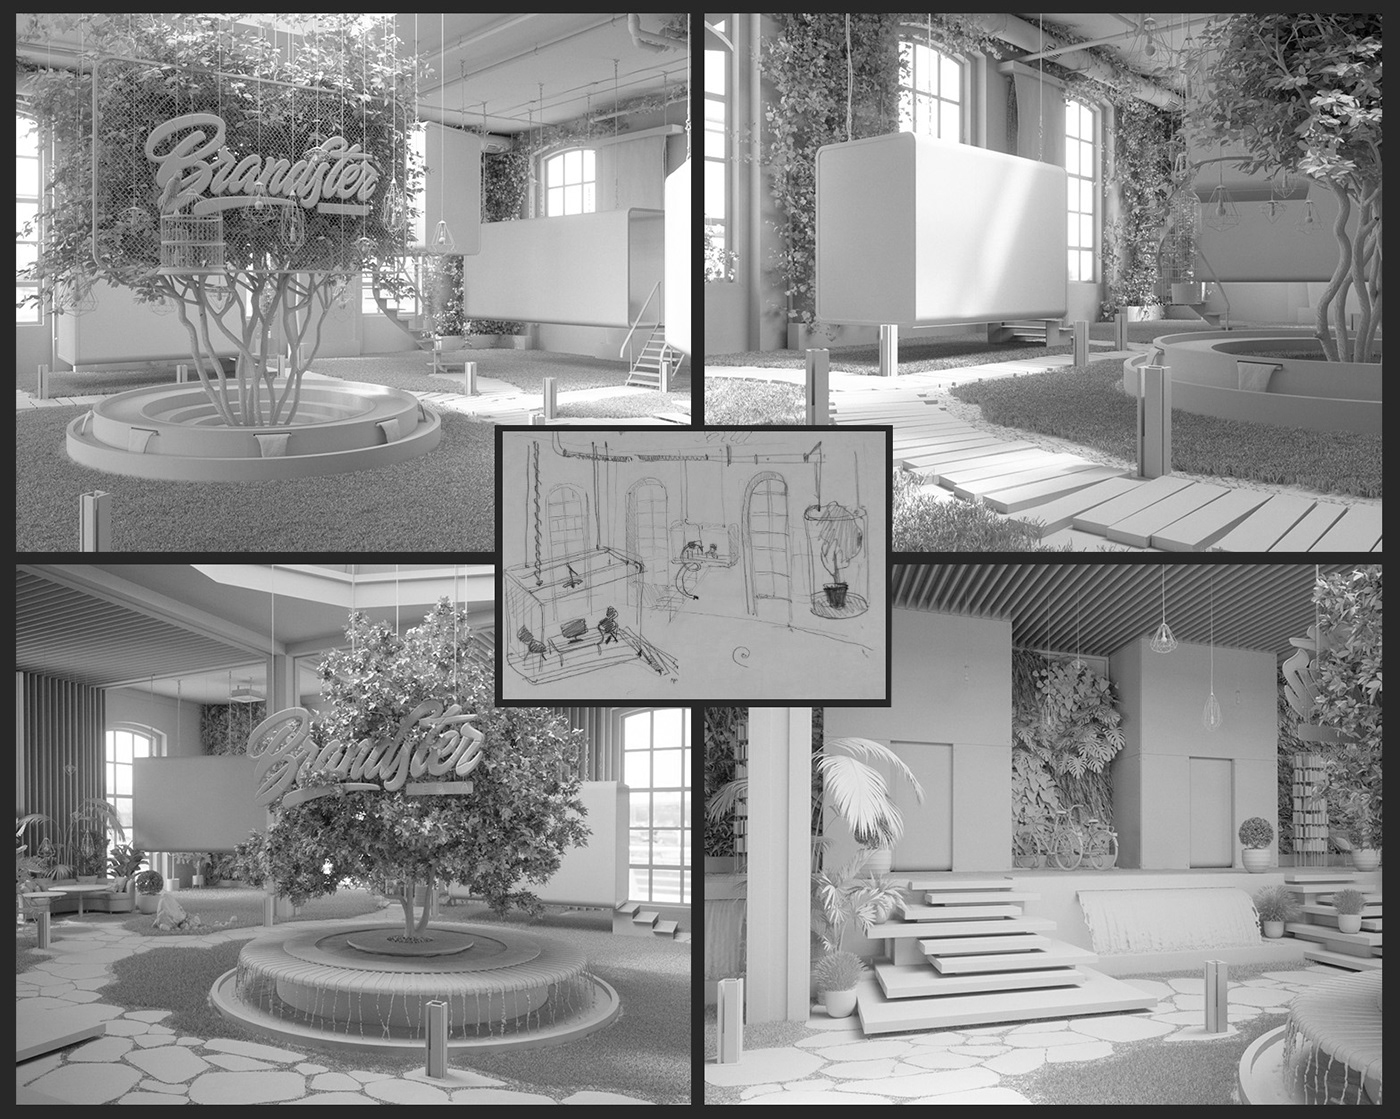
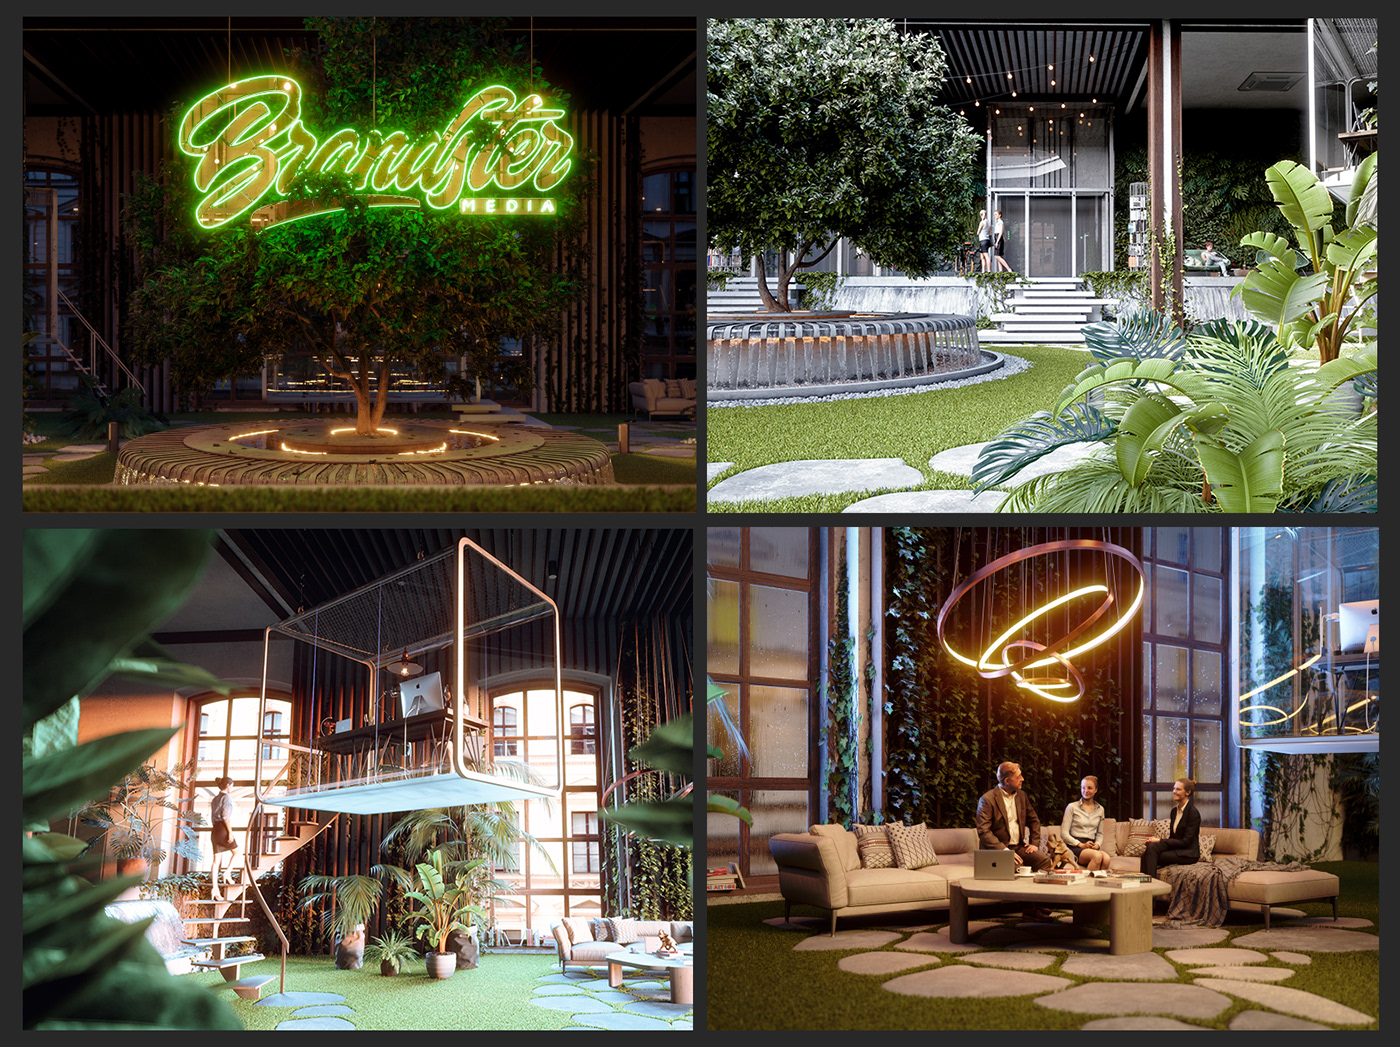
The brief description of the demo interior idea: the office is inside the old commercial building, concrete walls, ventilation pipes on the ceiling, huge window, the tree is in the middle as a symbol of the agency plus the sing with the logo which is fastened to the metal construction (it will appear but change in shape in further projects). The working space for staff is placed around the tree, little own kitchen (whatever you want can be cooked there if you want to have a snack or to drink something, for instance a cup of coffee). There is a reading and playing zone there as well (in order to chill after work or during the break) changing room plus the room for the head of the company together with the board room for meetings with customers.
Having figured out the concept and holding the idea in my head I hit the road CG keeping the same direction, full of enthusiasm and flashing eyes, I attacked again, having opened 3ds Max I said "Go ahead" out loud. So what do you think the result was? - You are right plan "A" didn’t work. Something went wrong.
The concept design of interior. Plan "A"
Whatever, keep your back straight and head up, go ahead and stick to plan "A". As people say, each fail has its own success. Thanks to the plan "A" fail, I was able to move this concept further. Damn, flashing eyes and hand, which want to create and do something. I started searching of planning decisions, namely, the outline of the building, object arrangement, zone location and placement. I had taken a pause and scribbled (that’s how I call my doodles) something during the coffee exactly here plus I was making some notes.

I was super obsessed with this project, and even when I was going to sleep, I took my notebook again, put it near the bed, so that in the moment of clarity of a new idea, I was able to capture it in the paper.
Well, approached to plan "B". To cut it short it’s a rectangular space with a separated by zones. This building is bigger than previous one, with the same design concept, but only in additional, wider and modified look. Everything seemed to be interesting, originally, and I was completely into this concept. When everything had been done and the material had been collected, I started working on it. Everything seems like nothing, but I had made a big mistake and for what I paid a price with money and wasted efforts. I was extremely confident about myself, once again, that exactly this one is going to be the "booming project", I had started with collecting everything in whole and doing demo renders, I ended up with the fiasco. I was boiling deep down, I got my head down, my back banded, the work that was done was enormous (taking into account that it is my 5th strategy play for reaching set aims) and I was tired indeed. That moment I wanted nothing… every time when I was so close to my goal, something didn’t work for it.
The only thought that didn’t leave me, was full deleting of project and forgetting about as about a terrible dream. As I was out of anger, I got everything together (into a folder) I was ravenous to delete everything but something inside me was telling "leave and don’t touch it, push it to the corner out of sight, don’t sin". After all, I had archived the project, and sent to the file room to another portable hard drive as far as I could to take forget it like a horrible dream. It is too hard to work on the same concept for a long time, especially if there are lots of changes and reworks as well. It’s really pleasant to do your work in one breath, (following my little experience) also with minimum deviations.
The concept design of interior. Plan "B"
After that moment, there was a one-month break in working on this project.
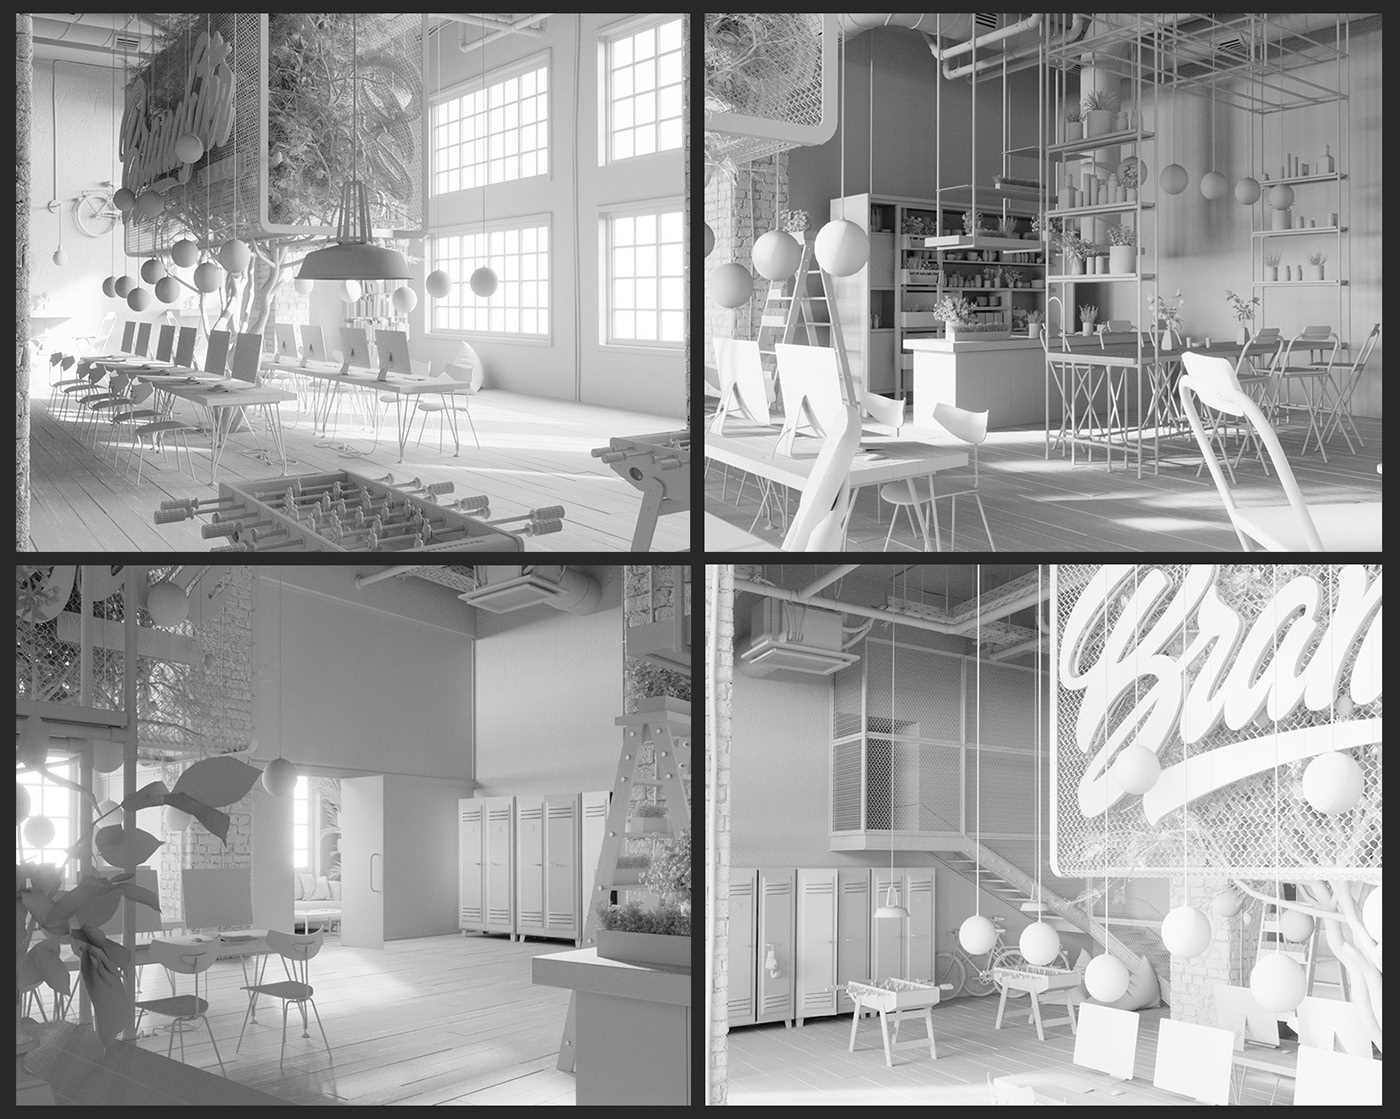
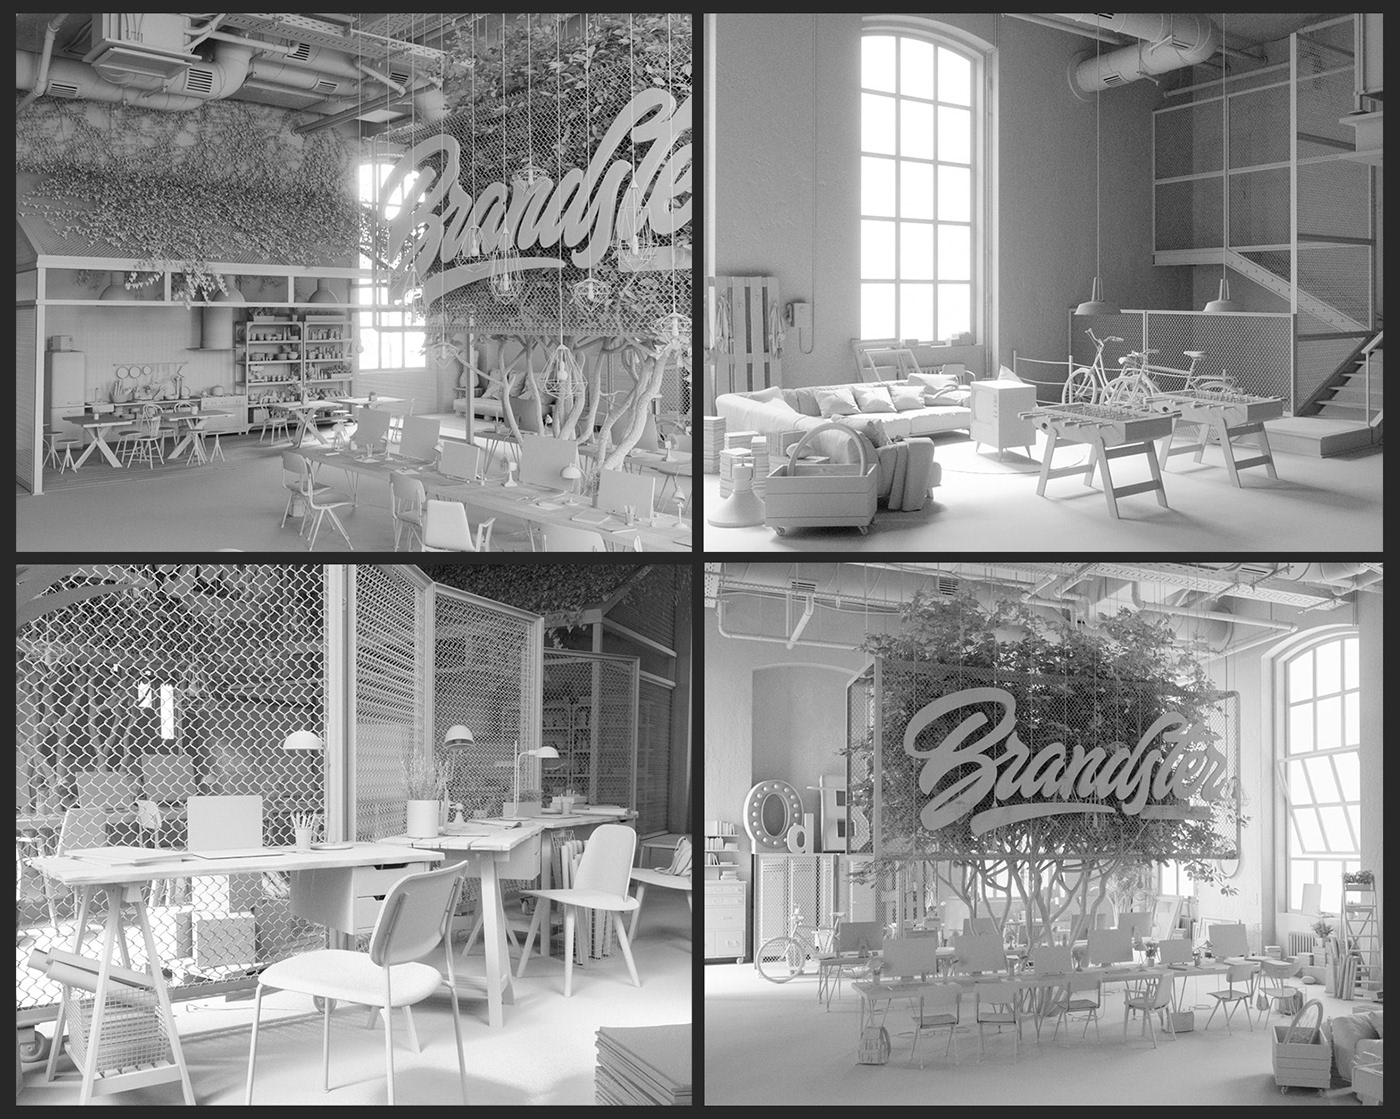
Having waken up early in the weekend morning once, having a lie in, taking my time, touching nobody, thinking about nothing, staring at the ceiling, I looked at the ceiling chandelier for the long time, in which I explored the new idea for my project! I had visually circled the shape of the chandelier along the corner, I found out the rectangular counters, I mean soaring (hanging) rectangular in the air which was the final idea for the whole project. That idea was born like a shot, probably because of the reason that for some period didn’t devote enough time to and my brain reloaded. That was plan "C" :)
Having taken my notebook, which I used to leave near my bed, I had sketched the spotted idea fluently, captured it, I started embodying it on the day. This time, so that not to waste time, I sketched out the idea in 3ds max primitively, which helped me to see the mid-term result immediately. I designed the building, ladders, fountain, of course the tree with logo, and other different components. It worked out cool, plus I had the aim of creating kind of oasis, lots of greens, water, and hanging up greens in cages, plus flying birds (to cut it short heaven on earth). "ECO" style was to replaces "LOFT" here. I edited it in grey render - and it worked out cool. That’s when, I had started to work, and here originally instead of the road from stones I got boards, lots of different ladders, previously. I came up with the idea of creating woven grapes by the hanging sides, but finally I replaces it for ivy, I added one level under lifting and I got rid of birdhouse. That was a final design concept, and I only upgraded it all the time. Working on this idea, I felt like I got the second breathing opened, I was motivated and super-psyched again. I thought about Rocky and his motivate speech, in which he said "It doesn’t matter, how hard you bit, the only thing that matters is how you keep the stroke, how you move ahead, if you go-then go, if you don’t take a detour because of fear, only in that way you are going to win". I had got my spear in hands (PC mouse) and got into a fight. :)
Drafts plus 3D sketches
Plan "C" . Pendant boxes in working process
I’m not going to describe all design concept, the respond and the sense of each part, though I’m going to tell about working and creating steps, and instruments using.
3D modeling.
As I had said before, I really like it, and Its indulging process for me. During work I stick to the principle common-privet-common.
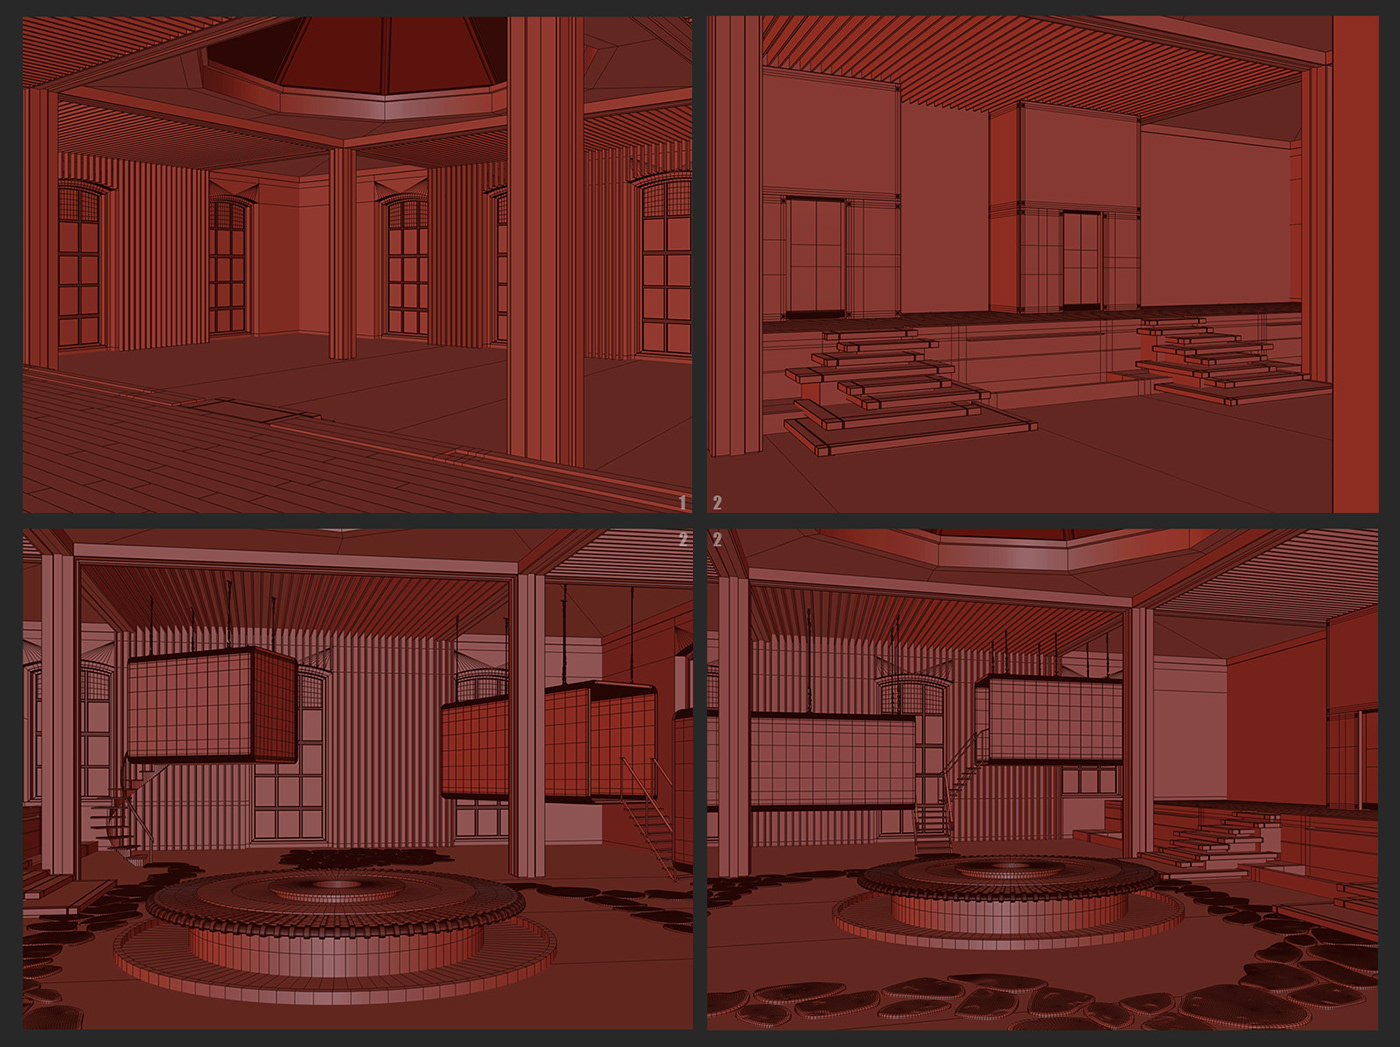
1. Previously I had created the main base of building.
2. Then I started modeling of big forms such as ladders, niche for entrance door, fountain grounds, pendant boxes, roads.
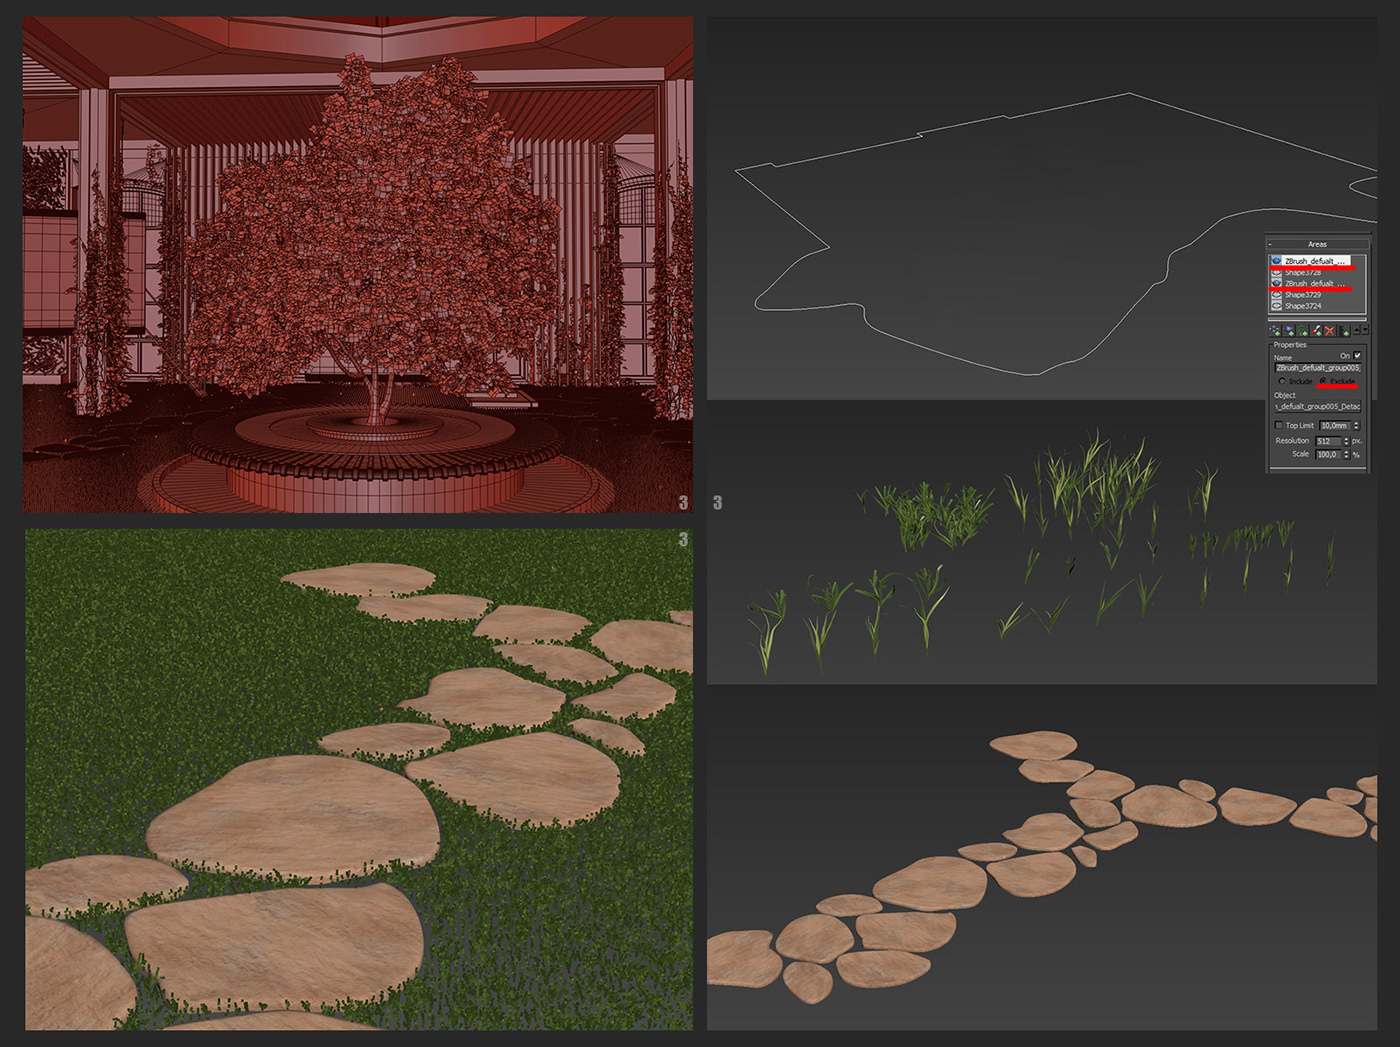
3. After main shapes had been done, started greening and stone placing. For stones/greening, I used such programs as: IVI GENERATOR and FOREST PACK. IVI GENERATOR soft is quite simple; with the help of which I created, I made ivy on the columns of walls. Both simple and the same time great program for growing such kinds of waving plants. I used FOREST PACK for planting lawn and stones around the fountain- creating varies plants on the walls. I drew textures in Photoshop for wall plants, I applied that textures in FOREST PACK, and I made greens planting by the ID color, which helped to achieve artistic expressiveness.
The way for doing the lawn grass:
1. Drew splain.
2. Planted the blanks into that splain.
3. In the AREA parameter (FOREST PACK(е)) I added stone roads and did exclude. The central lemon tree I downloaded from stocks, after that I changed it a bit and remade the trunk, as well as I looked for the leaves texture with better quality and applied ones to my work, the models of greens were used from varies collections.

4. The biggest difficulty, which I faced with, was the creating of the water. I had to remade it for a few times in order to achieve the result I wanted to. I had come across the 3d model in my library for the huge waterfall, and started changing one to the needed result. Things were more complicated with the central fountain. Finally I took that way: with the help of Phoenix FD I did a few variations with the water flocing, after what I placed it randomly across the fountain-added details (foam, splashes, additional water mesh). When everything was done, I attached everything together in one object, splashes and foam I had taken from another 3d model. I hadn’t face Phoenix FD program by that time, so I decided to do only cloning of particular water elements.

Now total mass is ready, I came to details, with the less massive forms.
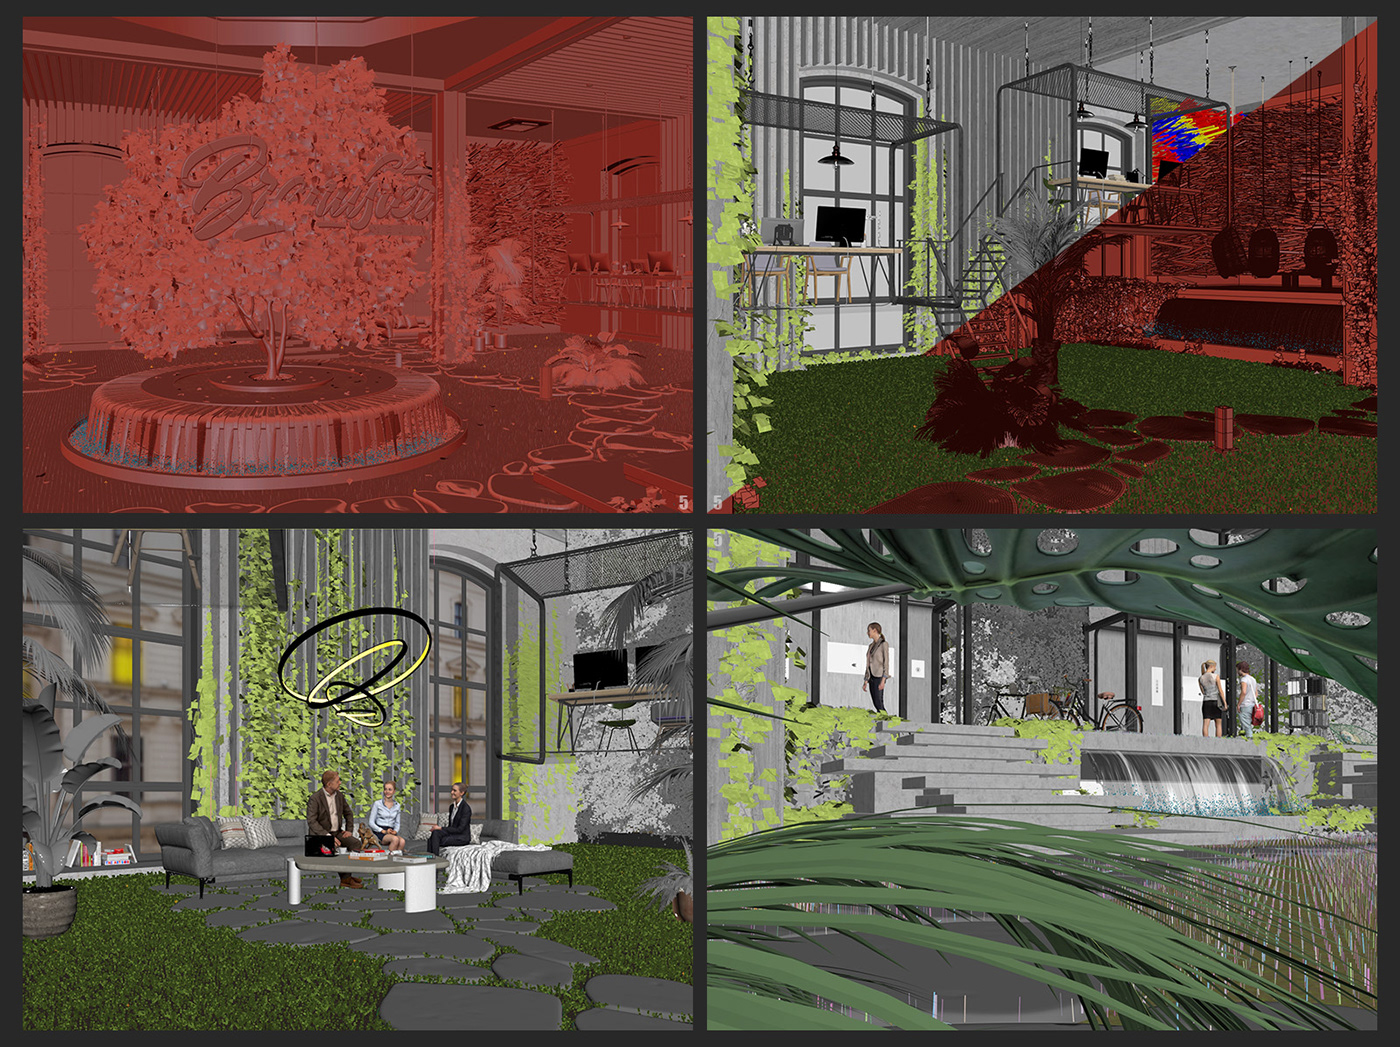
5. Put furniture, plants, hang the sign, wire electrics, hang bulbs etc., fulfill the scene with details. There is nothing difficult in this. So in the end something starts to appear. Then I went back to the general picture, I had done demo renders and made a decision to add peoples characters for more lively atmosphere.
The texture unwrap.
As in previous project, I used RizomUV VS 2018.0 + Bridge + 3ds max. It is really comfortable and fast to work with it plus there is mode of editing unwrap with reverse upload of edited unwrap in 3ds max.
Texturing and shading.
I didn’t use other programs for texturing, I made everything with 3ds max. I had looked for suitable textures, some of them I looked for on the internet and only after that I combined and shaded in fstorm(e). Honestly speaking, I don’t have a lot under my belt in texturing, that’s why, my focus in that project was to upgrade in this direction. But the main difficulty appeared in water and greens settings. Perhaps, that was the most difficult this for me. I had to do a lot of tests to adjust and redesign a shaders, at some moments I had to look for new textures again. The difficulty with water was so that I needed to express the water moving with shading, and I believe that in most cases I succeeded in realizing it. For expressing water moving, used masks, I was pulling and stretching the textures.

In order to make greens various and not to draw a few textures, I applied FstormRandomColor for the whole greens. Stones and wooden boards, stone road I did the same way, almost everywhere where the randomly of material could be created. It’s very fast and comfortable plus you end up with the positive result.

Lighting.
The hardest part in working with project was to refer evening and night lighting and what would blend with each other beautifully. I had used different sources of highlighting in such situations; everything depended on which mood or atmosphere I needed to refer. So that to give the project range of atmospheres, It was made a decision to create night, sunny, cloudy, and rainy situation. In most cases, the HDRI textures were the main sources of lighting.
Composition.
As I had said in the first part, there is almost no composition here. I only pulled up some curves in photoshop, and I worked on the light intensity of its sources in the night pictures. That’s was the final spot of it.
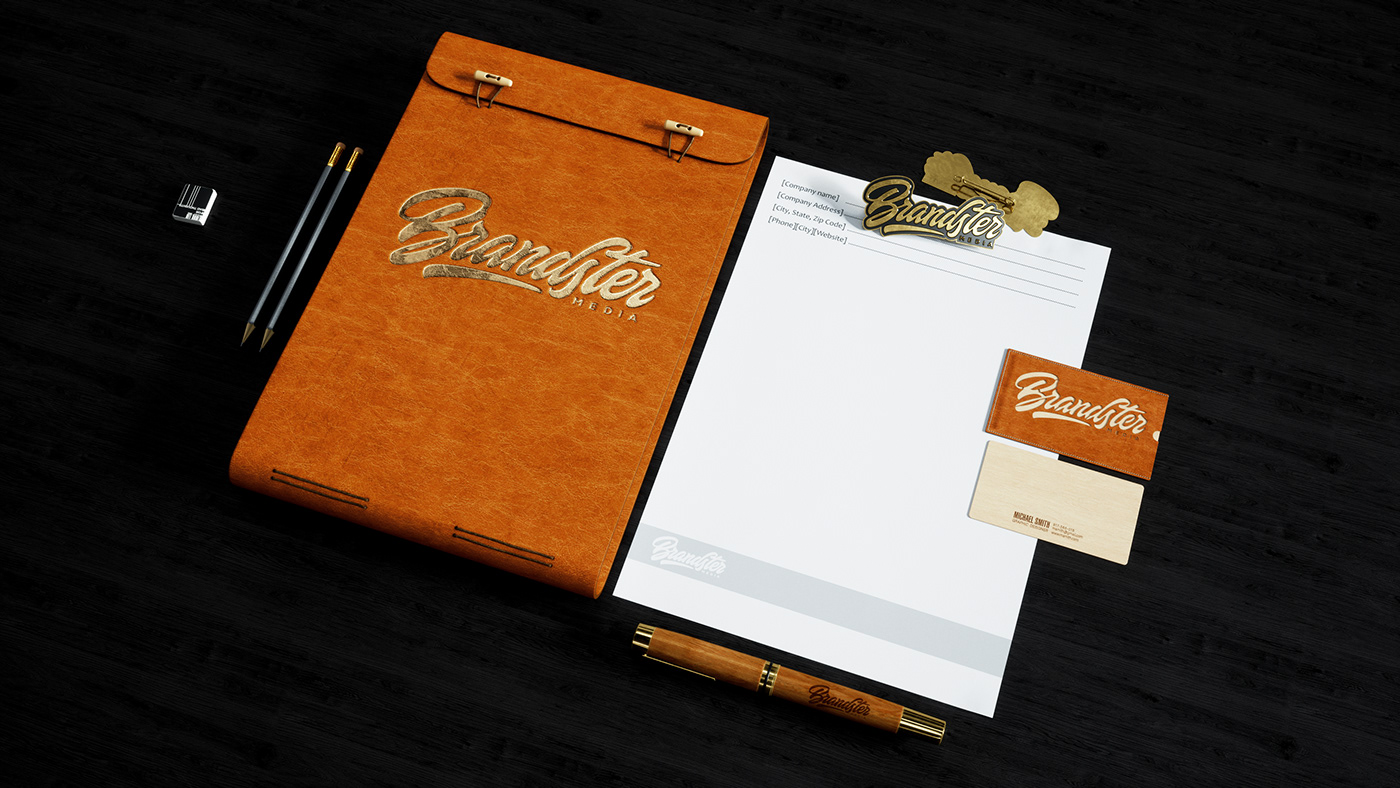
And now, just a few words about the designing part of a project. I didn’t touch all details of brand book, as it would have lasted for long time, I just underlined important moments. Business cards, pen notepad, forms, icon. There was nothing hard in work with these elements. I just only complemented the project with more details and little pizzazz. Processes of modeling and texturing didn’t take a lot of time cause everything happened really fast.
So that the and of making of "CGI: Brandster media" Part II. Interior.
We can make conclusions and results.
1. The huge and painstaking work had been done.
2. Goals and tasks were done.
3. Each time I faced new situation, I found out right decisions.
4. Finally, I have done it.
P.S. Create something, come up with the new ideas, and always rich your targets, regardless on reasons and circumstances, however hard would it be.
I wish you all the best!
Thanks for watching!
email: ms.cgidesign@gmail.com
www.mikhailsizou.com
www.mikhailsizou.com