MAKING OF INTERIOR VISUALIZATION - part 1 - LIGHTING (by Janka)
This tutorial was created for Blender users. We are focusing on Blender version 2.79 renderer - Cycles. I will try to explain basic settings I used, to achieve this final look.
Lighting is an essential part of the 3D project and it is good to make good lighting before you add details to your scene. After you create walls for your interior- lighting should be following right after.
START: CREATING WALLS
I often model basic mesh for walls from blueprints. If you want to create something for yourself I recommend to visit Archdaily, where you can often find similar blueprints of great houses. This time I was working on a plan for the basic family house. I retraced walls on the inside (simple extruding), cut out the windows, and I used solidify with even thickness option. Modeled was just livingroom, not the whole house, because it is not necessary and it can slow down work.
TIP: When you are working with blueprints, try SHIFT + A - Import image as planes, instead of using Background images. You have to work in the textured mode to see it, but at the beginning of the project it shouldn't be a problem. Huge advantage is, that you see your background even if you are not in ortographic view. This option appears after you check it in user preferences (CTRL + ALT + U) in section Addons - Import Export: Import images as planes.
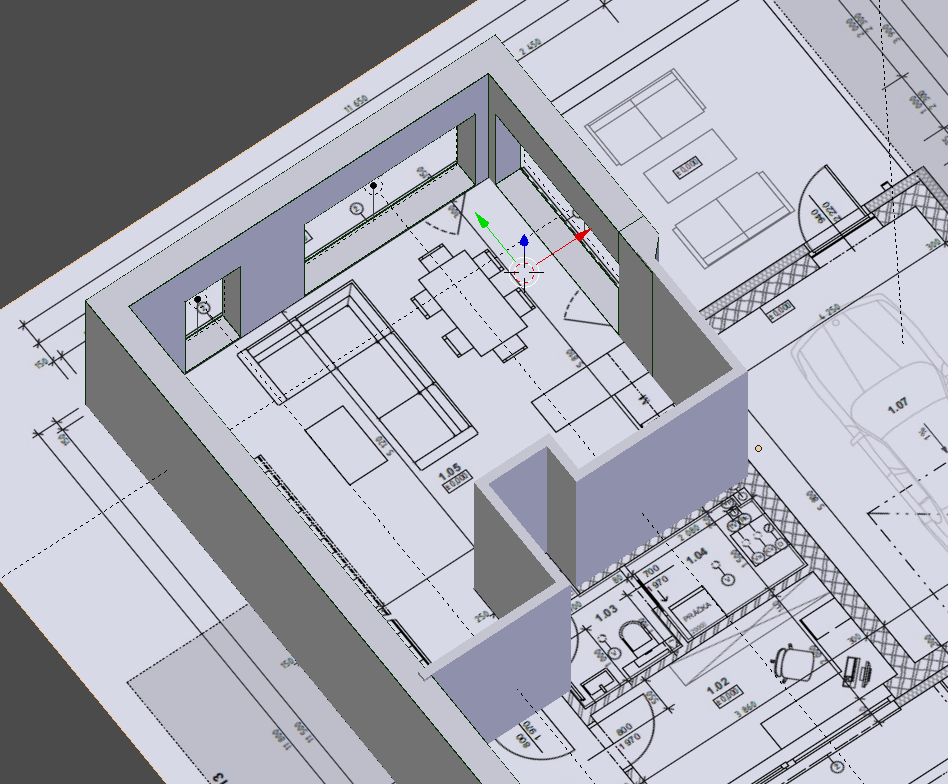
Next step is to add the floor and the ceiling as separate objects. Like this it is easier then to unwrap and material them. When you have all walls you can start with lighting. For the interior it is the best to add in every window - area light, which you change to the portal (mark third option under Cast Shadow, Multiple Importance, PORTAL). The size should be as your window/ hole in the wall.

For outside world, you have few options for lighting.
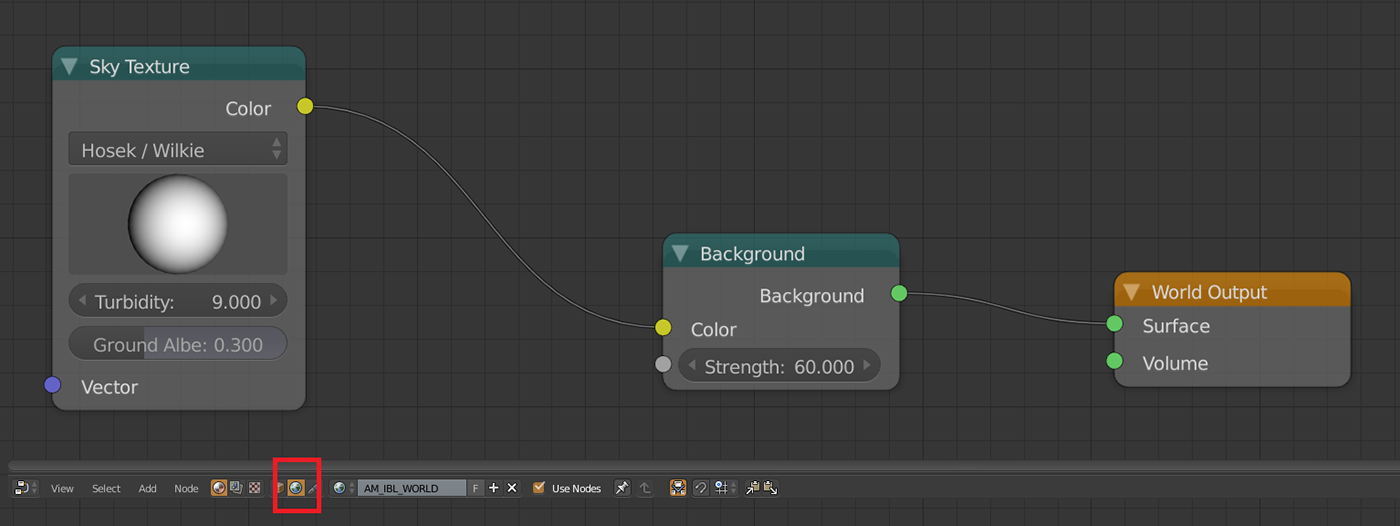
First one is to add sun object into the scene (we used strength 10) and this node set up below for world in Node editor. Node Sky texture serves as black and white HDRI map:
If you like HDRI maps better - it is easier and sometimes better to use them- only catch is to use node Environment texture instead of Image texture in world options of Node editor :) Great HDRI maps you can find on HDRIHaven. Strenght, in this case, do not have to be so low, you can adjust it according preview render.

After you set portals and world lighting - insert inside a camera, press SHIFT + Z and check the light. You can also add window frames without glass for faster rendering, for final render you can add also glass tables if it is necessary.

For interior scenes it is recommended to use the camera with focal length from 17 - 30 mm, placed in the 160 cm heith from the floor. It then looks like somebody was holding the camera and taking a picture. Shots from higher or lower point do not have to look realistic.
TIP: Try to avoid rotating camera according x and y axis. It is better just use Shift option in camera settings. (picture below)
TIP: Try to avoid rotating camera according x and y axis. It is better just use Shift option in camera settings. (picture below)
If in your case it looks like inside is not enough light in world options try to play with Ambient Occlusion.


I hope this helps and I prepare next one on materials soon
Janka :)
Janka :)


