The Shoot
The Stitch
The 3D Animation
The Composite
About
Virtual Reality and 360 degree, immersive video are emerging and growing mediums which cover a wide variety of formats and technologies. They are documented in terms of technological emergence and potential; however, are now undergoing a second phase of growth and development. Although it is essential to understand virtual reality and immersive video when speaking of any use case or practical implementation of immersive technologies, it is also important to have a firm grasp of the inner workings of each subcategory and their accompanying technologies.
The subcategories include, but are not limited to, 360 camera rigs, filming behaviours, virtual reality head mounted displays (HMDs), panoramic stitching and software workflows. Further to these immersive technologies there are areas of research and innovation which are approachable using traditional 3D modelling, 3D animation and digital compositing workflows.
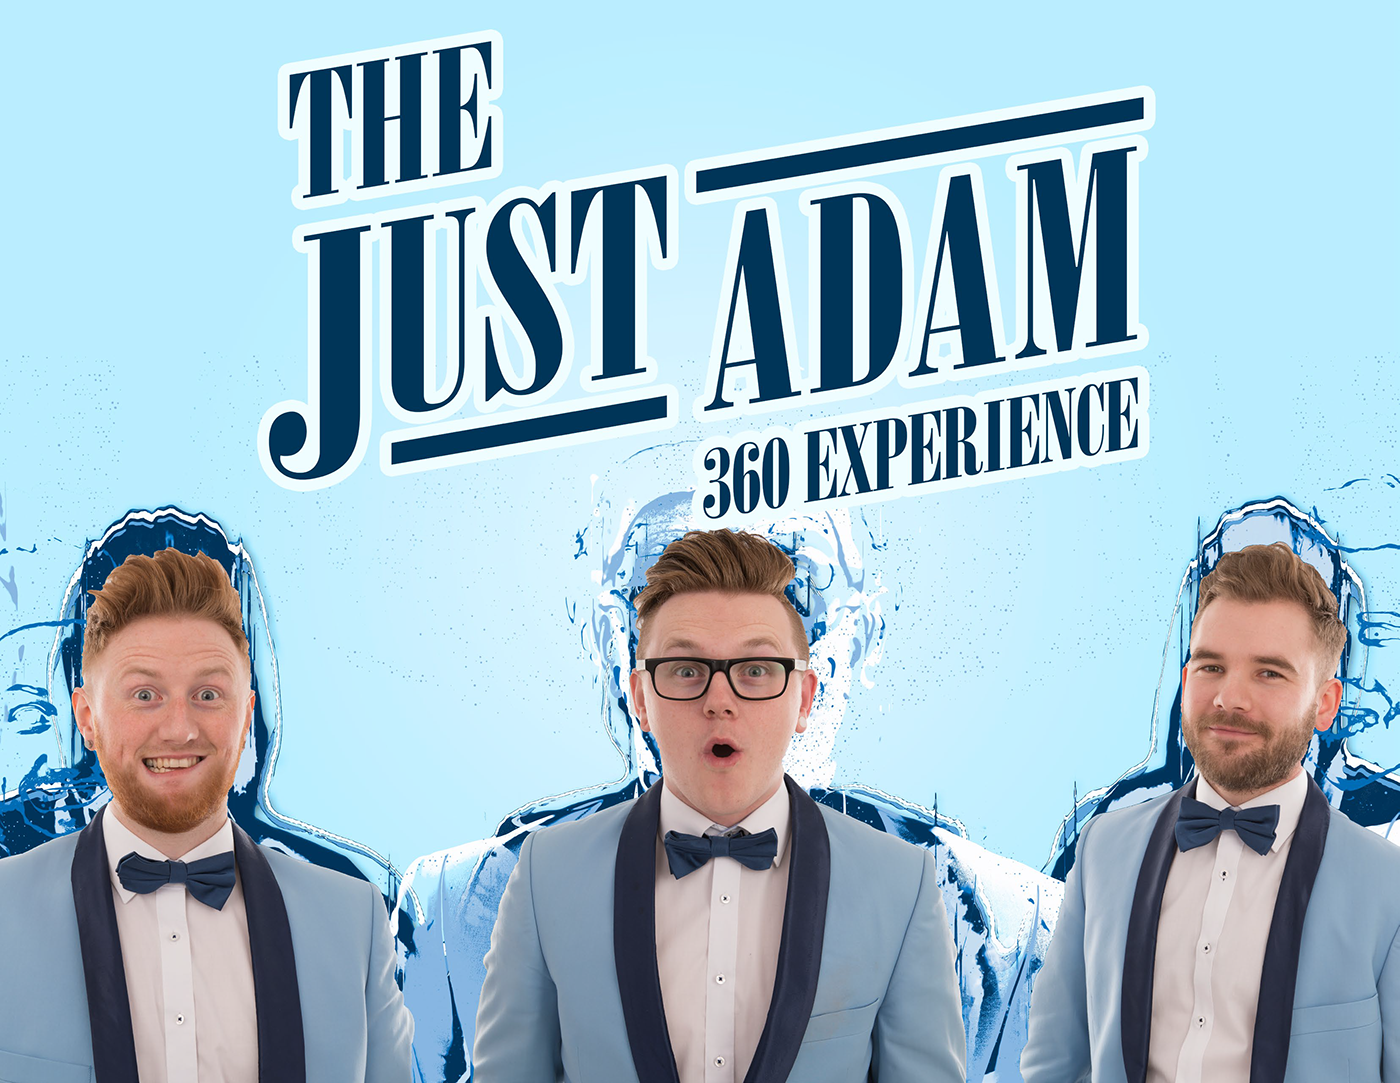
This booklet will document the creative and technical processes involved with The Just Adam 360 Experience.
This booklet will document the creative and technical processes involved with The Just Adam 360 Experience.
The history of this technology can be traced back as far as the late eighteenth century to the mid nineteenth century.
Talented artists would create large room scale paintings or panoramas either for decorative reasons or practical reasons at times of war. Panoramic painting can be sourced back in the form of murals as far as 20 A.D. Throughout the centuries panoramas can be used to give a more immersive, closer to scale depiction of battle plans and the surrounding areas (Goetzmann, 1977). From the mid nineteenth century panoramic paintings translated into panoramic photography and within the past few decades have become largely accessible with the advancements of mobile cameras and lens technologies (Laikin, 2006). Recent adaptations and successful widespread utilisations of panoramic photography has come in the form of products such as Google Maps Street View, various photo based tours and general mobile phone and DSLR photography (Hoelzl and Marie, 2014; Goggin, 2008; Andersson and Geyen, 2012).


Project Planning
The project had been conceptualised and researched as far back as March 2015. Many of the current technologies that were used in this project were still in early development but were unfolding and causing excitement. At this early stage a budget was set aside and added to over time. The timing was just right as this project came to fruition. The correct camera and software solutions were available and traditional project planning took over.
For project planning, much like a gant chart, a Google Calendar was used to visualise and spread the work out over the 12 weeks. Google Calendar allowed for my mobile phone to remind me when certain tasks should be complete and when I should be starting the next. This also allowed the additional calendar to be visualised alongside my more personal life appointments. This method has been tried and tested by myself for many years and also gave some comfort this time around.

The Camera
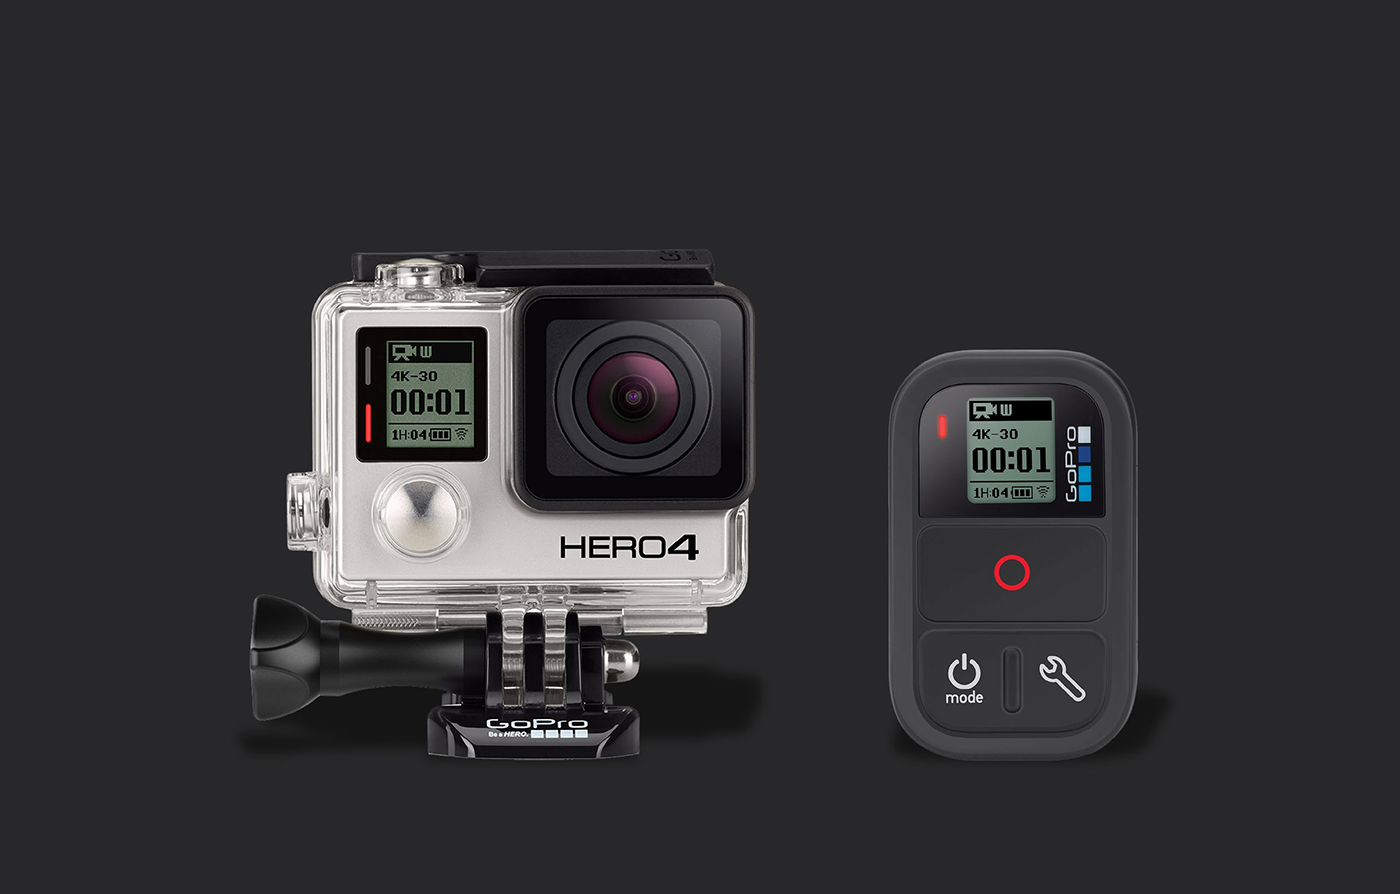
The camera configuration for The Just Adam 360 Experience was made up of six GoPro Hero 4 – Black Edition cameras. They were placed in a cubic configuration, allowing for a full 360 degrees by 180 degrees (a full sphere) to be captured. The cameras were set to the sensors native 4:3 aspect ratio and each were set to a 2.7k resolution. The final equirectangular panorama’s resolution is 8080 by 4040 pixels at 30 frames per second.
Other configurations are available allowing for different frame rates and final output resolutions. Please see the final project report here (also at the end of this booklet) for more details.


The Software
A wide variety of software was utilised to make the project possible.
Adobe Premiere Pro was using for initial digesting, editing and arrangement. Also for final editing and rendering. Autopano Video Pro was used to assist in the synchronisation of the six GoPro camera’s footage. Also the footage was stitched together, regioned and rendered here. Autopano Giga, Autopano Video’s sister application was used to manipulate and mask finer details of the stitching process. Adobe After Effects was used to initially manipulate the equirectangular footage into a manageable box map projected format. After Effects also allowed for all compositing elements of the project including all chromakey workflows. An identical box map projected configuration was created in Maxon Cinema 4D, where additionally all the 3D assets were created and rendered. OTOY OctaneRender was the render engine of choice. X-Particles 3 was used to control large amounts of dynamics and particle generation. GoPro’s Cineform Codec was used to allow for losses video performance between each stage of the editing. Kolor’s 360 degree video player and Adobe Premiere plugin allowed for wrapped, spherical preview of the final output video.
See this software more in depth at the end of this booklet via the Making Of, Timelapse videos.


The Just Adam Band
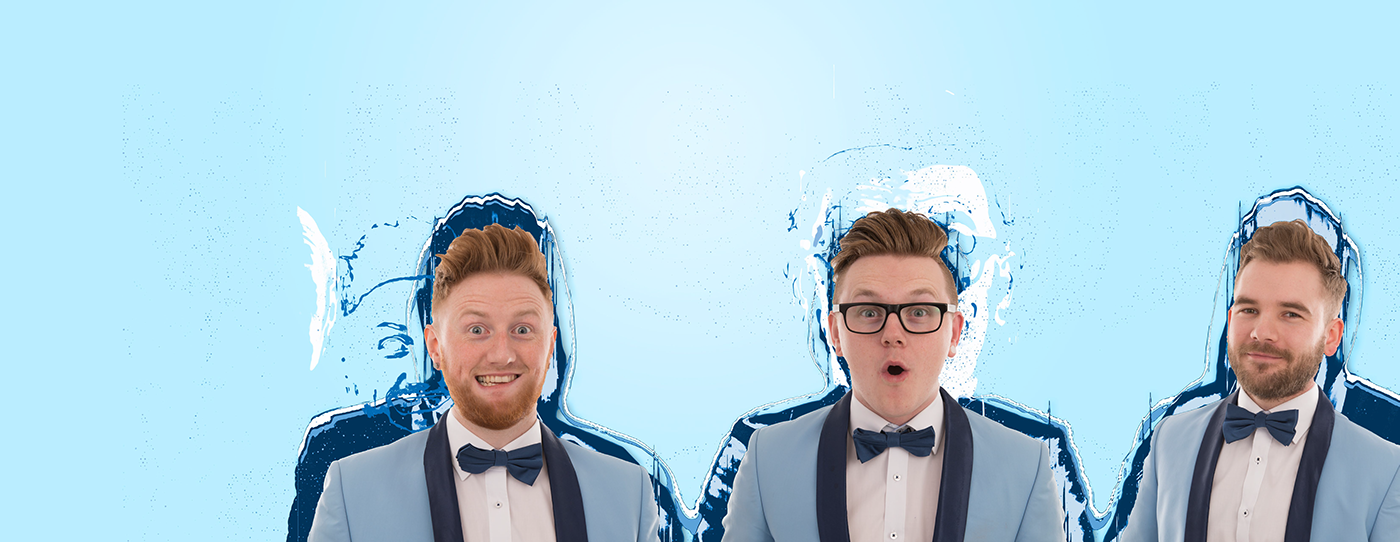
A local 3-piece band from Downpatrick, Co. Down were chosen. The medium would be a 360 degree, motion graphics based music video. The guys do some more modern, energetic cover songs and they do so with their own style and finesse.
From left to right, say hello to; Conhuir, Adam and Conall.
The Audio
Four songs in total were chosen from the bands extensive library. Modern, upbeat songs were the primary focus. We all unanimously, agreed that it would suit the concept and visuals presented.
The four songs were, Bruce Springsteen - Ain’t Good Enough For You, Robin Thicke - Blurred Lines ft. T.I., Pharrell, an R&B Themed Medley and Mark Ronson - Uptown Funk ft. Bruno Mars. Mark Ronson - Uptown Funk ft. Bruno Mars was the final selected track.
All audio was recorded in Downpatrick. Real drums were mic’d up to give the tracks a more unique, realistic feeling. Bass and vocals were recorded at a separate time. Miming to these tracks later, on location would be required.
Recording the audio ourselves allowed for much greater control over the entire project, both audibly but also visually. Having each separate element (the stems) allowed for visuals and motion graphic elements to be driven independently rather than traditional, tedious key framing.
The opportunity for some initial 360 degree video recording and testing was used.


The Location
Initially a mix of outdoor and indoor locations were selected with the idea of placing the three band members evenly around the camera. This plan changed when an opportunity came to allow us to film at the new media studio, Coleraine campus, Ulster University. A new idea with similar concept roots was formed based off of this new, exciting location.

The Concept
The initial idea of placing each member evenly around the camera stayed true, although the new dynamic of greenscreen came to life. The media studio at Coleraine campus had one of the three required greenscreen and some available lighting. Some additional budget was added to provide the remaining needed equipment.


Influence
Creative influence came from previous music videos, album art and some of my heroes in motion graphics.
Maroon5’s Overexposed Album cover had a bright, vibrant style. Although typically hand drawn pieces are not generally on my radar, but previous music listening reminded me of this album cover in particular and how its colourfulness stood out.
The music video from Fleur East – Sax had similar real world vibrancy. Their costumes varied but all carried the same aesthetic. The background was a real and computer generated mix, a great choice though a larger budget would be required for such set pieces. The computer generated backgrounds and high energy are the main areas of influence from this music video.
Other online artists such as Beeple, Joey Camacho and Hoodass have great influence.


Shooting Behaviours
From concept to reality.
Each greenscreen was setup as planned, in thirds around the camera. The existing greenscreen we were lucky enough to have access to was the anchor point of all other equipment as it was fixed in a permanently fitted basis.
A total of six soft box lights were used to fill pockets and shadows with each actor standing in their position. A large existing backlight was used to light the main greenscreen. The studios main roof light was checked for any strobing while filming and these lights were also left permanently on for a much more evenly lit result. The roof lights almost entirely eliminated all casted shadows, the exact desired result.

The Setup
A quick, wide overview of the setup. Further care and attention was taken to ensure all creases were eliminated from the backdrop portion of the greenscreens. The more eliminated now in production the less correction would need done in post.

Nadir Correction
As previously shown in the images in the Concept stages of the project, a unique tripod solution was invented after initial testing showed a large tripod footprint present.
Bespoke monopod solutions are available. One of note trademarked the Ninja-Pole and is almost perfectly made for using within 360 dergee video. But as of this booklet being written there are no definite, stable tripod solutions.
The innovation came from researching various adapters and modifications to tripod solutions. Manfrotto offer a light stand to tripod standard, 3/8” screw mount adapter.
A Manfrotto ball, tripod head was attached to the top allowing for the oblique layout to be shifted to a horizontal one.
Allowing for a light stand to be used as a traditional tripod meant there was a much less footprint left in the nadir. This subsequently meant there was less to fix in post.


Chalking It Out
Chalk was used to temporarily mark the floor for tripod locations. At this stage, all setup of greenscreens and lighting had been completed. Now it was time for camera position testing.
The six camera configuration has four cameras horizontally (more information on the horizontal layout soon). Meaning that there isn’t perfectly one camera per person. Two cameras are vertical while the opposite two are landscape oriented.
Carrying out this exercise allowed for iterative testing until the least stitching work could be achieved in post.


Oblique
As previously mentioned, the oblique layout compared to the horizontal layout was an important learning point.
When the camera is an oblique layout, each of the cameras are angled at a diagonal orientation to any common plane (walls, floor and roof). This method of shooting causes the seams of each camera in the panoramic, equirectangular result to cut unwanted areas in two. Although technically with 360 degree video this should not matter as a full sphere is still being captured, it causes much harder stitching practice later.


Horizontal
The alternative tripod solution allowed for a ball head that would be traditionally used for a photographer to change the orientation of his photographs. This gave the ability for the camera configuration to be rotated 45 degrees in any direction allowing for four cameras to be orientated horizontally.
The resulting panorama is an immediate, noticeable improvement. There are less interceptions through subjects. Even with this project’s subject matter being an uneven, three people between four cameras, there was a possible position where closer to no stitching methods would need to be used on subjects between seams at all.
Additionally, the aforementioned nadir correction method becomes easier as the single, bottom facing camera will be the only one able to see the tripod solution.


Frequent Checks
At this stage, a method of trial and error was used to determine the correct location and orientation of the cameras. This was the step that was previously mentioned that would avoid the least amount of seams cutting the three subjects. From experience and testing, it is much easier to stitch, blend and warp together background elements of panoramic footage than foreground moving elements. The cameras were all plugged into a power outlet, so to not waste valuable battery energy with this testing.
This entire method is an additional measure only required with 360 degree video capture as there are no methods of previewing live what the cameras are recording.

Between Takes
Between song takes the camera’s batteries charge were either topped up, or a large fan would be used to cool them down.
Almost every feature of the GoPro Hero 4 Black Edition cameras adds an element of heat. Even by themselves, they are not able to record the advertised 4k video resolution for longer than around 17 minutes because of overheating. Additionally, using batteries instead of a power outlet, adds heat. Having Wi-Fi enabled for the use of the GoPro Wi-Fi Remote adds heat. Having some colour correction features, such as GoPro’s trademarked ProTune feature, adds heat.
When the next take would be ready, all equipment, camera and production crew must hide after recording but before action takes place.


The WiFi Remote
The GoPro Wi-Fi remote was used as an assistanct to the synchronisation required to the six GoPro cameras. The word assistance is used as it is not a definite solution to synchronising each camera’s starting points. Using the GoPro Wi-Fi remote there would still be a few frames offset between each camera and in some cases a few seconds.
Two methods of synchronisation in post that can be used are audio and motion. Audio means the camera operator must clap, like a clapper board close to the cameras after recording has started.
Motion involves the camera operator lifting the tripod and rotating the entire rig vertically around 180 degrees back and forth.
Motion is the preferred, more accurate method, but as our camera position and orientation were sensitive to the shoot requirements, we opted for the audio synchronisation method instead.
360 Degree Panoramic Stitching
Panoramic stitching has been around for quite some time. In fact, we can now all achieve a simpler but still valid panoramic stitch using our mobile phones.
This method of stitching and the accompanying software focuses on spherical, multi-camera configurations. It also specialises in fine details such as blending methods, control point editing, gradient and vignette based colour correction.
Autopano Video Pro and Autopano Giga are the software of choice.

Synchronization
Arguably the most important step in all panoramic stitches is the initial synchronization of each camera. If one or more cameras are out of sync even by a single frame, the entire illusion of immersion disappears.
Previously mentioned audio or motion synchronization methods are used here. A higher frame rate recording when synchronising using motion will yield the best results.
If the software is not accurate enough, which in our case was true, then a manual offset can be set for each camera. Adobe Premiere Pro was used to help the synchronization method.


States
Throughout the stitching method in Autopano Video, there is a feature that was a requirement to solve some classic 360 degree video problems that occurred.
At the start of the video you will see the band enter the room and walk into place. Within this walk, two of the band members walk through some of the stitching seams.
These states, along with masking and blending methodologies were used to manipulate how much of and which camera were active.
States can be applied to the overall stitch, masking, colour correction and the horizon line.


Masking
Masking, in Autopano Video, is the process of picking points to either keep or remove a camera seam. There is a certain percentage overlap from the six camera GoPro configuration used. This allows for some choice now at this masking stage.
An obvious, initial masking choice was to remove as much of the tripod solution from the bottom of the panorama.
Then additional camera seam paths can be chosen based on image features. For example, a very particular path was chosen for the camera seam around the drum kit. In addition, any required masks were generally kept to seamless, repeating areas such as the greenscreen cloths.

Control Points
Control points are a more advanced feature of Autopano Giga. They are the features similar in relating, neighbouring cameras that Autopano’s algorithm has deemed appropriate for stitching the panorama.
One method for a more accurate result is to force the software to add many more control points to each relationship than the starting point of 100 control points. A general rule of thumb for this project was to add 500 control points per camera relationship.
Each addition would help the optimisation process over the whole panorama. In a lot of cases, this would fix any previous stitching issues.


Colour Correction
Colour correction is a well-known practice in moving image, film and cinematography, although there are some differences when colour grading 360 degree video.
Each camera will have a different exposure setting naturally from the available light in the orientation and direction each lens was facing. For example, in this case it is only natural the top camera would have more light entering its senor from the roof lighting than the bottom camera which is facing the ground. This needs corrected, although the colour correction needs to be thought of for the overall panorama and not each camera individually.
Autopano Video has some amazing exposure tools that allow for vignetting and grading of the edges of each camera. The end result is a controllable single light setting over the entire equirectangular image.
Finally, one camera can be chosen as the anchor point for the software to base its colour correction algorithm on.


Rendering
Autopano Video’s rendering capabilities are more aimed towards intermediate, lossless encoding. The intentions of rendering from applications such as these are that there will be additional editing or manipulation done afterwards. In this project this was exactly the case, no quality loss throughout the different stages of the entire edit was a must.
GoPro’s Cineform codec was used as the chosen intermediate codec. The codec is lossless, includes an alpha channel and all with around half the file size footprint of the traditional, uncompressed AVI. Image sequences were not a choice with such large resolution imagery and also with image sequences not having or using a decoder, the raw frame size could not be buffered. This means it would have been drawn for every frame in the next stages of the project.


Hardware Acceleration
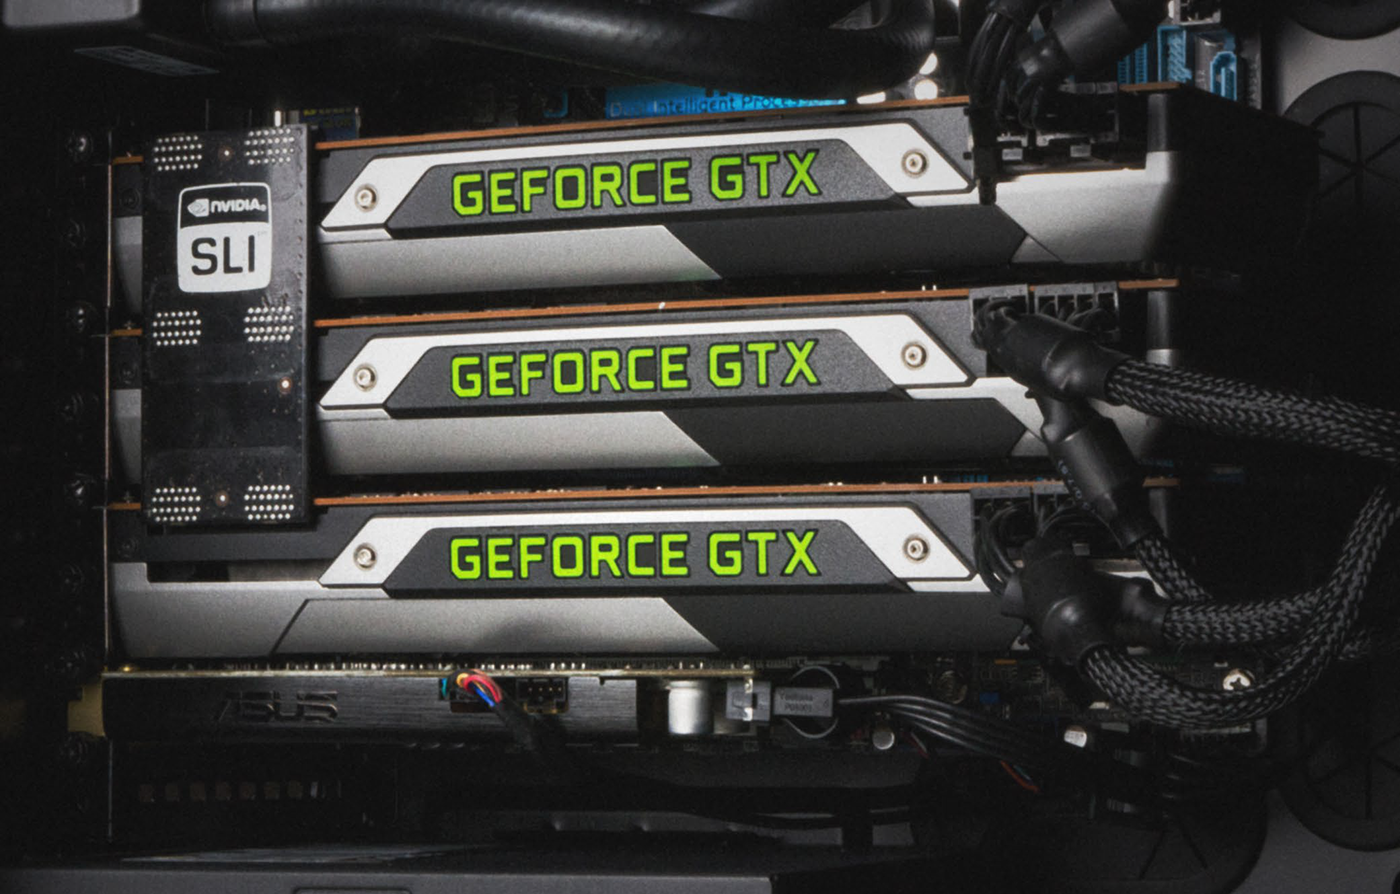
A technology that has advanced in the past five years is NVidia’s CUDA core technology. It is a parallel processing method that allows for repetitive tasks to be computed simultaneously, therefore allowing a much faster output.
At the later stages of this project, the budget was readjusted and three NVidia GeForce GTX 780Tis were purchased to assist with both Autopano Video’s rendering capabilities, OctaneRender’s live preview and rendering capabilities and finally Adobe Premiere Pro’s playback and rendering performance.
Without this technology, the deadline of this project would not have been met.
Editing
From this point in the project traditional video editing, compositing and 3D animation workflows would be considered but ultimately altered to allowed for an equirectangular or box map workflow.

Ingest & Setup
All footage was imported into Adobe Premiere Pro and Adobe After Effects simultaneously.
Premiere Pro would be used for more convenient playback, additionally the ability to plan and lay out markers to the rhythmic qualities of the song. This marker system has been used in various projects throughout my career and with my musical background has gave me a great starting point for creative edits.
Adobe After Effects would be centre point of this project. All greenscreen composting and additional elements will be combined here. The ability to translate between Maxon Cinema 4D and After Effects from timecode will be invaluable.

Masking & Chromakey
A traditional chroma key method was used. Within Adobe After Effects the greenscreens were regioned off and masked to only include the desired area to work. The colour attributes of the masked area were altered to include much more green information to allow for an easier key.
An older but reliable, built in plugin called Key Light was used to start the initial keying process. The plugin was only used in an intermediate mode. The final result from the plugin alone was not desirable. Matte layers were made that could be choked and softened to allow for a more pleasing key result.
Finally, the green fringes were removed with a ‘Color’ subtraction, blending method.
Masking and keying of the drum kit was very challenging. A much larger room would have been desired to stop as much green reflection as was recorded. Manual masking of the crash cymbals in particular was required on a frame by frame basis. The remainder of the drum kit was masked by hand rather using the traditional chroma key method.


Box Map Projection Conversion
A method was created to convert the equirectangular footage to a box map projected configuration. This allowed for After Effects to preview the footage as if it were a final output. An After Effects camera could be placed in the centre of the wrapped box and create the illusion of immersive video. This was invaluable to the 360 degree video, compositing workflow.
Around the half way point of the project a company called Mettle developed and released an After Effects script and plugin combination that would be much more robust and polished than the conversion system I invented. At this stage this plugin was utilised instead.


Nadir Correction
As previously mentioned, the nadir element of the panorama would need corrected and the tripod would need to be masked out.
The equirectangular footage was warped and tilted so the ground would be the centre of the frame. This allowed for a flat, Photoshop like working environment for any corrections to be carried out.
The choice to work within After Effects was used as a still image correction method would have no element of moving noise or naturally occurring camera artefacts and would undersell the illusion and immersive quality of the final video.
Footage from a separate, nadir correcting take was used.


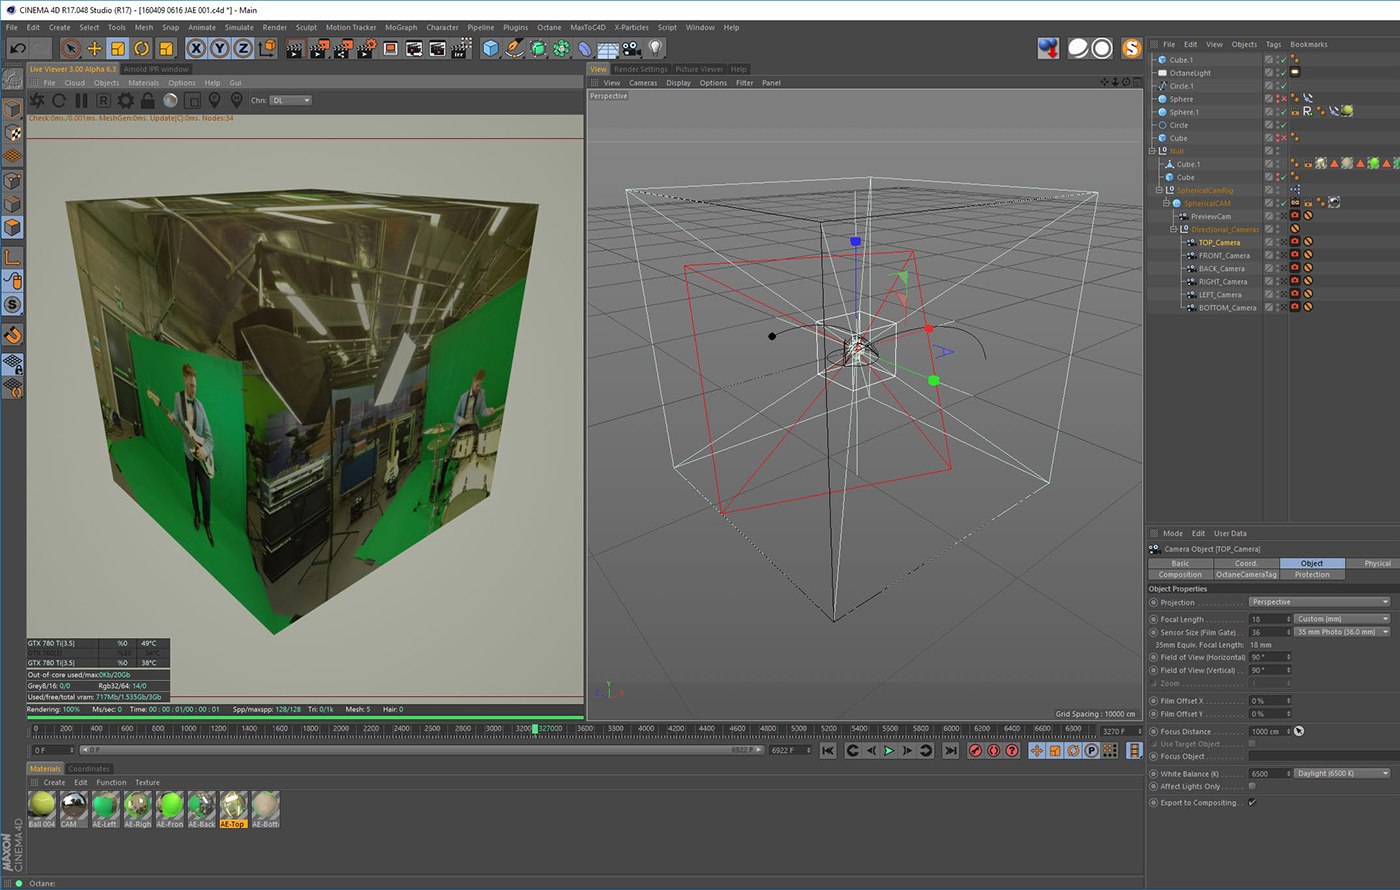
Cinema 4D Box Map Rig
An identical After Effects box map rig to was configured in Maxon Cinema 4D. This allowed for anything exported from either program to be imported into the other as a working method.
The box map configuration within these 3D applications allowed for a sort of depth perception while editing and creating content.
All elements within Cinema 4D would be exported with transparency and appropriate layer masks to be rebuilt and composited within Adobe After Effects.
This workflow, to the best of my knowledge, has not be tried before. It allows for a simpler 360 degree, motion graphics and compositing workflow without the need for programmers or very complicated tracking software.

Cinema 4D Box Map Rig
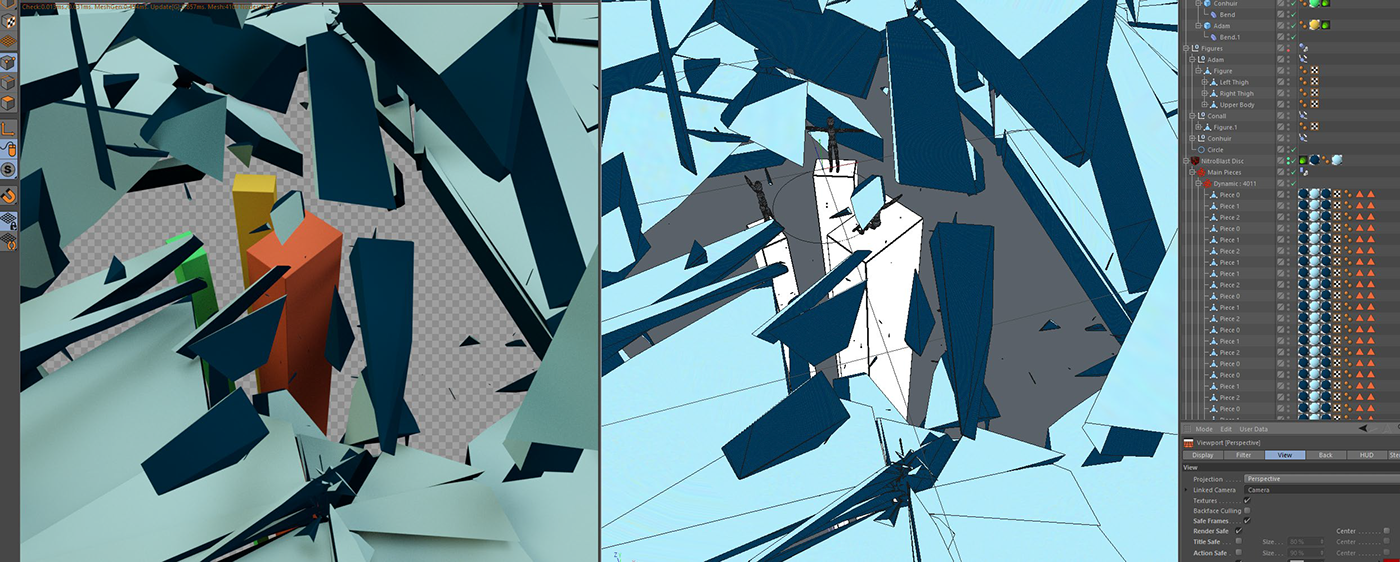
The gold standard for fast, reliable and extensive particle creation.
X-Particles hit the world by storm many years ago but it has not stopped innovating and developing cutting edge features.
The main, desired element of X-Particles for this project is to easily create millions of audio driven particles that would be visually pleasing to the viewer.
The separate musical elements, or stems that were previously recorded were used to drive the particle systems without overcrowding the scenes. For example, the kick drum was perfect as a constant pulse for particle addition.


Sound Modifier
The lazy man’s key framing.
Ok not really, but it was a form of automation for the animation of various elements of the project.
Ok not really, but it was a form of automation for the animation of various elements of the project.
This technique could be used both in Adobe After Effects and Maxon Cinema 4D. In Cinema 4D it was mainly used to drive
X-Particles and their velocity. In After Effects is was used to control the background colour of the composition. It gave an abundance of control that was not previously available. Manually key framing this type of animation would be extremely time consuming and in some cases you would never be able to achieve the same organic effect.


Take System
Take 2… “ACTION!”
A relativity new feature to the Maxon Cinema 4D toolset. The ability to render variations of each scene from one project file.
A relativity new feature to the Maxon Cinema 4D toolset. The ability to render variations of each scene from one project file.
This tool became very useful to the project as each scene require six cameras to be rendered separately. The cameras were already available from within the box map projected configuration. The cameras were loaded into the take system then a render queue was populated from these takes.
There were no worries if the correct camera was being rendered, the same render settings were active or if an old version of the project files had been rendered for some of the cameras.


OTOY OctaneRender
As previously mentioned with the hardware render capabilities available today; OctaneRender is one 3D render solution that is driving and pushing the boundaries of the CUDA core technology.
OctaneRender utilises every last resource available from the previously mentioned graphics cards and was a definite requirement for the large amounts of frames needing to be rendered with the box map method of working.

Compositing
Rendered elements were once again imported back into Adobe After Effects. The compositing technique involved layering elements from Maxon Cinema 4D’s box map configuration to After Effect’s same layout. The results were quite seamless.


Brand Development
While using the greenscreens, also the guys already in costume, we couldn’t resist an opportunity to monkey around and take some promo shots.
This coincided with additional brand development and colour palette selection. This made the entire project feel more coherent and professional.
A Canon 5D MK II and 7D were used for the photography. Adobe Illustrator for the typography. Adobe Photoshop for high detailed chroma key work and general editing.