
1. Adjustment Panel
Before...
After...

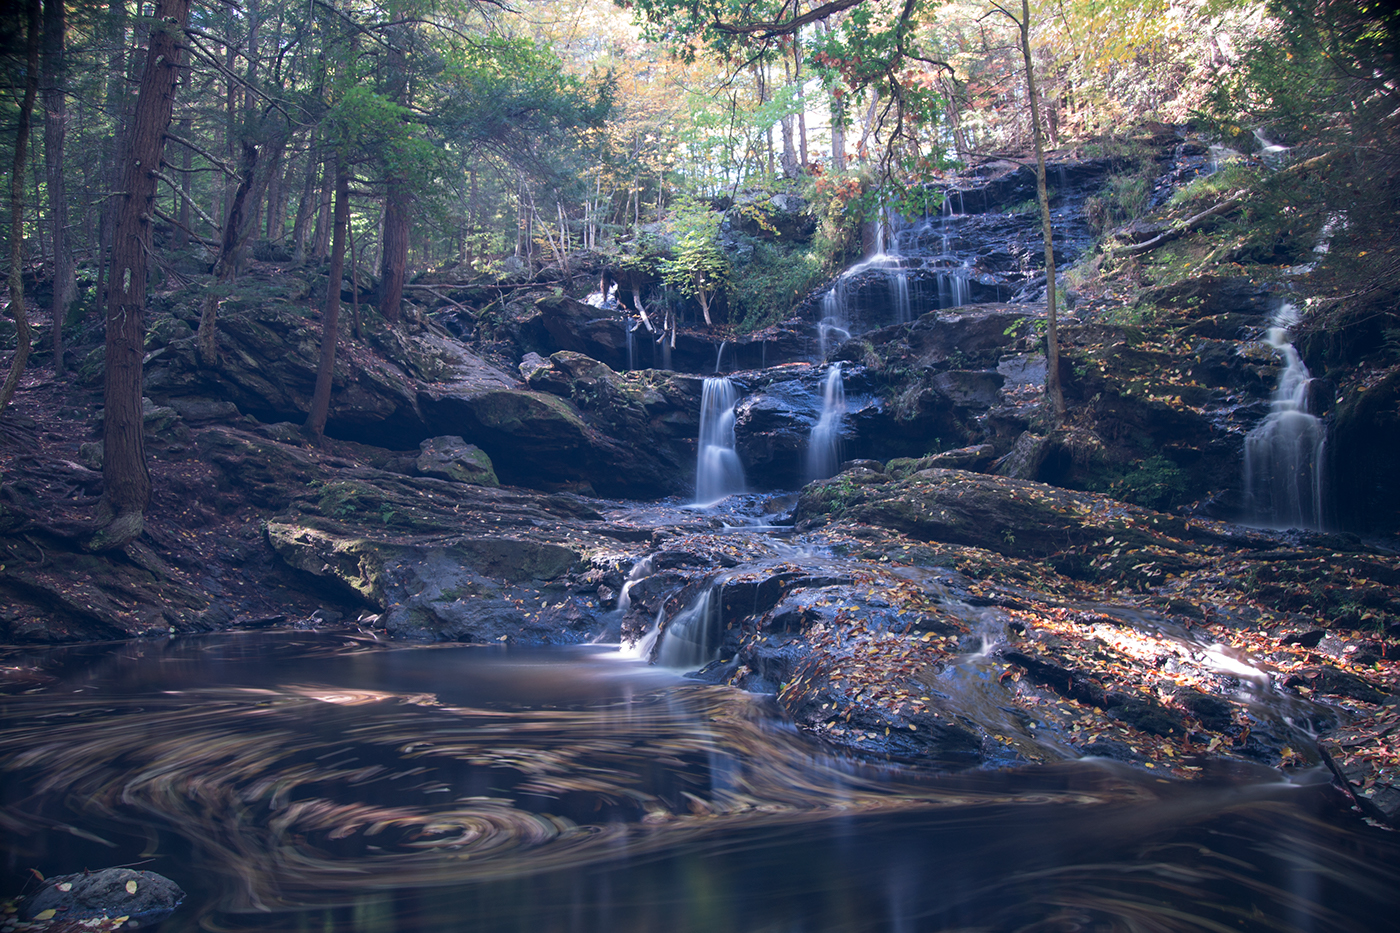
I took this photo in Wilton, New Hampshire at the Garwin Falls. The top photo is the RAW file straight from the camera and the bottom photo is edited by using adjustment layers. The first adjustment panel I used was the curves adjustment panel, this panel allowed me to edit the pixels of the photo directly allowing me to darken and recolor the image as needed. This panel also removed the blue tint that the ND filter gave the photo as a result of direct sun exposure (by adding yellow/curving the exposure line downwards under the blue channel). I also used the brightness/contrast and vibrance adjustment panels. These panels added brighter and more vivid colors to the leaves as well as the water. To enhance the color of the water and leaves, I also used the dodge tool which allows for the colors to become brighter without effecting the darker colors.
2. Adjustment Layer
Before...

After...

I took this photo of the Toronto skyline from the Toronto Islands when my family and I went to Toronto a few years ago. The top photo is the unedited (with the exception of stacking multiple images into one) while the bottom has been edited with adjustment layers. The adjustment layers were used to make the photo black and white (using the Black and White layer adjustment). The slight bluish color was added to the photo with the use of a gradient map which helped to increase the contrast and clarity. The black and white adjustment panel allows for you to change a color image to black and white while being able to adjust the brightness/darkness of each color in the image. The gradient map works by mapping certain colors to specific pixel colors (and darknesses) in the photo. The gradient map I used allowed me to map a dark blue color to the blacks, whites, and grays of the image.
3. Blending Modes (Linear Light)
Before...


After...

I took the photo of the skyline in Brooklyn Bridge Park at sunset while the photo of the milky way was taken in Shapleigh, Maine. The before image (top) went through editing with the use of the curves adjustment layer to enhance the sunset color, the original RAW photo taken straight from the camera was primarily blue and with the curves adjustments layer I was able to increase the vibrance of the image resulting in a bright pink photo. The milky way photo was taken with a high ISO (12800) which allowed me to capture more of the milky way than was actually there. I also used curves and adjustment layers to edit the milky way photo. Although obviously fake, the edited photo (bottom) shows what blending modes can do. I placed the milky way photo taken in Maine over the New York City skyline and added a layer mask with a gradient of black and white to make the stars gradually appear in the sky (like they would if this was a real shot). From there I set the blending mode to Linear Light which resulted in this really cool effect which, in reality, is unachievable, nut with Photoshop it i. Because the milky way photo was very noisy, I used the noise reduction filter to smooth out the noise that was present in the sky.
4. Red Eye Tool
Before...

After...

I took this photo of a Northern Screech Owl in its Red Morph in Natick. The top photo was what the photo looked like straight from the camera while the bottom photo is the finished product. To get to the final product I cropped the image to place the owl in the upper left corner** (using the rule of thirds) to achieve good composition. To make the owl's eyes black, I used the red eye tool (which is the quickest). This tool is useful when the subject's eyes turn red usually as a result of using the camera's flash. The red eye tool is one of the many ways that you can remove red eyes from the subject. I also used curves and vibrance adjustment layers to bring out the color of the bird's feathers. To remove the small branch in the way, I used a combination of the clone stamp tool, the spot healing brush tool, and content-aware.
**The owl is in the upper left corner because subjects that are in this area create an aggressive and powerful feeling unlike in the bottom right corner which creates a calming and soothing feeling. Since the owl is a strong and powerful bird, I chose to place the subject in the top left to achieve this feeling.
5. Highlights and Shadows
Before...
After...

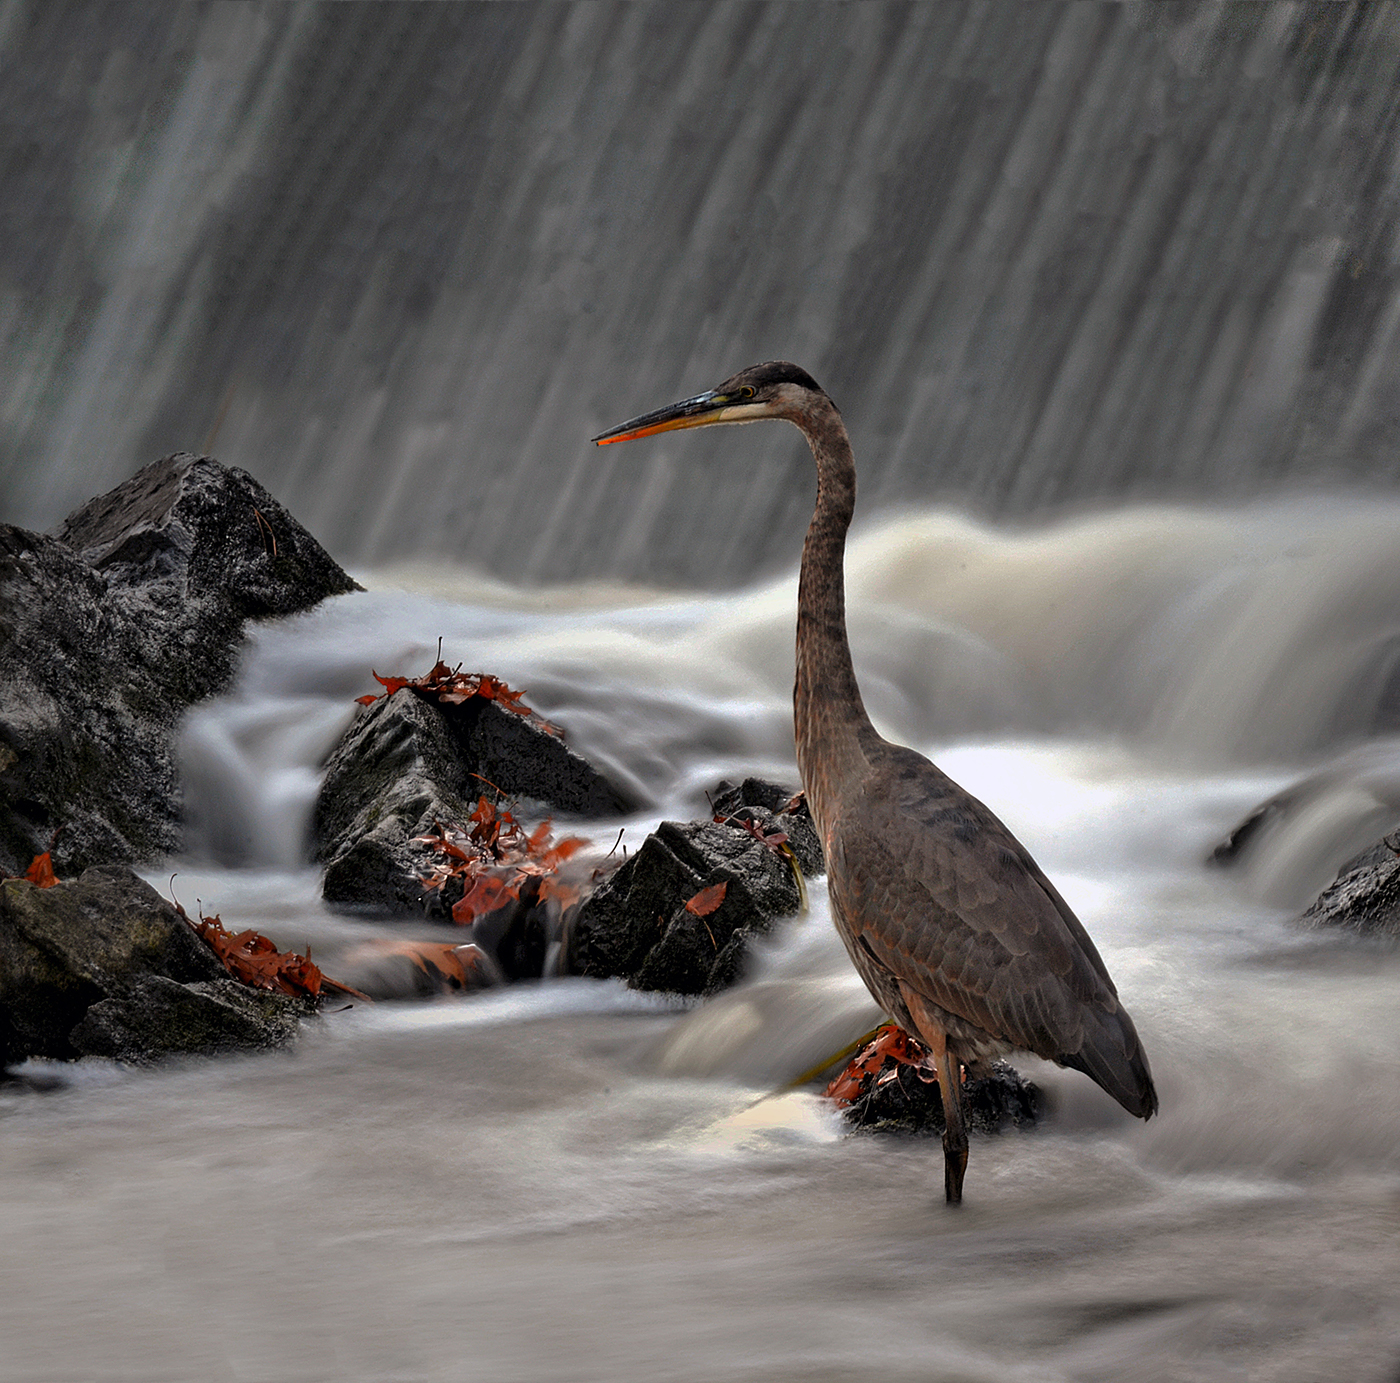
This photo of a great blue heron was taken at the South Natick Dam. The bird was really still which allowed for me to capture a long exposure of the water while keeping the bird still. To edit this photo, I first used curves to adjust the exposure and level out the histogram. After that, I used highlights to brighten the water and shadows to darken the rocks. I used a layer mask for each so the highlights would not intrude on the bird or the rocks and same with the shadows. I used content-aware crop tool to give the bird more head space at the top and the dodge and burn tools to adjust the brightness and darkness of the water and the head of the heron. I also used the burn tool to add a slight vignette to the image, centralizing the bird as the subject.
6. Blending Images
Before...


After...

This panorama was taken in Brooklyn at Pebble Beach. Since I did not have a wide angle lens and I wanted to capture this iconic New York scene, I took two photos (above) and used the auto-align tool to align the two shots into one panorama. To do this, I first imported the two RAW files into a stack in Photoshop. After this, I used the auto-align tool (edit > auto-align layers) and the photo was aligned. Then, I had to crop the photo and expand the sky (using content-aware crop) to get this photo. Like all my photos, I used curves to adjust the brightness and colors of this image. I also had to use spot healing brush tool as well as the clone stamp tool to remove the plane that flew through the image.
7. Brushes
Before...

After...

I took this photo in Shapleigh, Maine on a clear, moonless night. It was my first time trying to capture the milky way and it turned out alright. To edit the photo, I first used content-aware to remove the tree branches. Then I decreased the noise using despeckle (filter > noise > despeckle) and reduce noise (filter > noise > reduce noise). From there, I added vibrance and a little saturation. I used a black brush on the layer mask to make the sides of the image less vibrant to keep the milky way vibrant. I also used curves to darken the dark pixels while lightening the white pixels to give the photo more contrast. I also used the red channel to make the photo reddish (took away cyan), the blue channel to make the photo warmer (reduce blue), and the green I left alone. I used the layer mask to add a small gradient at the bottom to reduce the brightness that was there.
8. Star Trail/Layer Mask (Comet Effect)
Before...


After...

This photo was taken in my backyard, it's not the clearest photo because I didn't do the best job of focusing on the stars (just a quick photo to demonstrate the process). After an hour of shots, I combined all the photos to create a star trail! I got the "comet effect" through using a very complicated technique that involves many layer masks and changing of the mask opacity opacity. What I did was loaded all the photos into a stack (file > scripts > load files into stack) and selected all the photos I took. From there, I added a layer mask to every image. After that, I adjusted the fill opacity of the masks going down proportionally from 100% (last shot) to 0% (first shot). This creates a gradual increase in opacity of the stars from the first shot to the last shot, creating this comet effect. After completing this effect, like always, I used the curves adjustment layer to increase the brightness of the stars while making the sky a little darker. I also used the vibrance adjustment layer to give the trees and stars more color, increasing the saturation a little bit as well. This effect is easier to achieve using the free program StarStax, but I wanted to try and make this effect using only Photoshop (I think it turned out OK).
9. Camera RAW Filter
Before...

After...

I took this photo in Peru, NY of Lake Champlain. This is a 30 second exposure of the sunrise I woke up for at 6:00AM. The top photo (before) is the RAW file directly from my camera while the bottom one (after) was edited using camera RAW. Camera RAW is a very useful editing tool used to correct the exposure along with all other types of settings. If you did not shoot the photo in camera RAW and still wanted to edit the JPG or PNG like a RAW file, it's simple! All you have to do is convert your photo to a Smart Object (right click on the layer > Convert to Smart Object) or go through the menu bar (Layer >Smart Objects > Convert to Smart Object)***. After converting to a Smart Object, now go to Filter > Camera Raw Filter. After clicking this, a window will pop up with all these different settings and tabs. From here, you can change the exposure, highlights, vibrance, etc. On the other tabs, you can chose to change the curves, sharpen the image, lens correction, as well as many other useful settings. At the top of the Camera RAW window on the right is a "Color Mountain" this is the Histogram. The histogram is a tool used to properly expose and color your image. If the histogram is skewed to the right, then it is underexposed. If it is skewed to the left, then it is overexposed. The camera RAW filter is a good tool to use to correct the skewing (proper photo exposure). In the top left, there are a few tools which include spot removal, radial filter, and graduated filter.
***This step is not necessary, but it is more convenient to see the before and after image as well as edit the changes you have made.
10. Clone Stamp
Before...

After...

I took this photo of my eye in my house. To take this photo, I used my camera on a tripod with a 72mm extension tube*** and looked right into the lens of the camera, taking the photo with a shutter release switch. To edit the photo, I first flipped the image horizontally to put my eye on the top left of the photo. From there, I removed the light reflection from the lamp in the room. I did this by copying an area of my eye and placing it over the reflection. Using the clone stamp tool and healing brush tool to remove the harsh edge of the image to better blend the area to my eye. Then, I used the camera RAW filter to enhance the clarity and exposure of the image. I also used curves and vibrance adjustment layers to improve the color of the image. I used a gradient map to make the image black and white using the layer mask to make only my eye have color (making the skin black and white). I used the smart sharpen filter to increase the sharpness of the image as well.
***an extension tube works by increasing the distance between the lens and the body of the camera to allow for a closer focus distance resulting in a macro shot like this.


