PROJECT TITAN
I want to share my latest project with you! It's a full CG-animation of the Titan X (1.0), made for private practicing purposes!
For the last couple of months I worked on this animation, beside my fulltime job.
For the last couple of months I worked on this animation, beside my fulltime job.
I really hope you like it!
If you want to see more, visit my website.
WORKFLOW
When I started rendering my projects with Otoy’s Octane Renderengine, I was totally blasted from the huge speed increase which GPU-rendering is offering. A Nvidia GTX 970 was the card in my running system but not the card of my dreams. It was fast, but not fast enough! Than a friend of mine bought 2 Titan X’s which worked as fast as hell. That was the starting point for rethinking about upgrading my system! BUT... the highclass-cards were quite expensive. After thinking about alternatives I decided to wait until the new Pascal-cards from Nvidia would come out. After a while of researching how a graphicscard work I started to model some smaller parts of the actuall Titan X graphicscard. From this point I wanted to do more to honor this freaking brutal GPU! That was the beginning of the biggest project of my carreer...
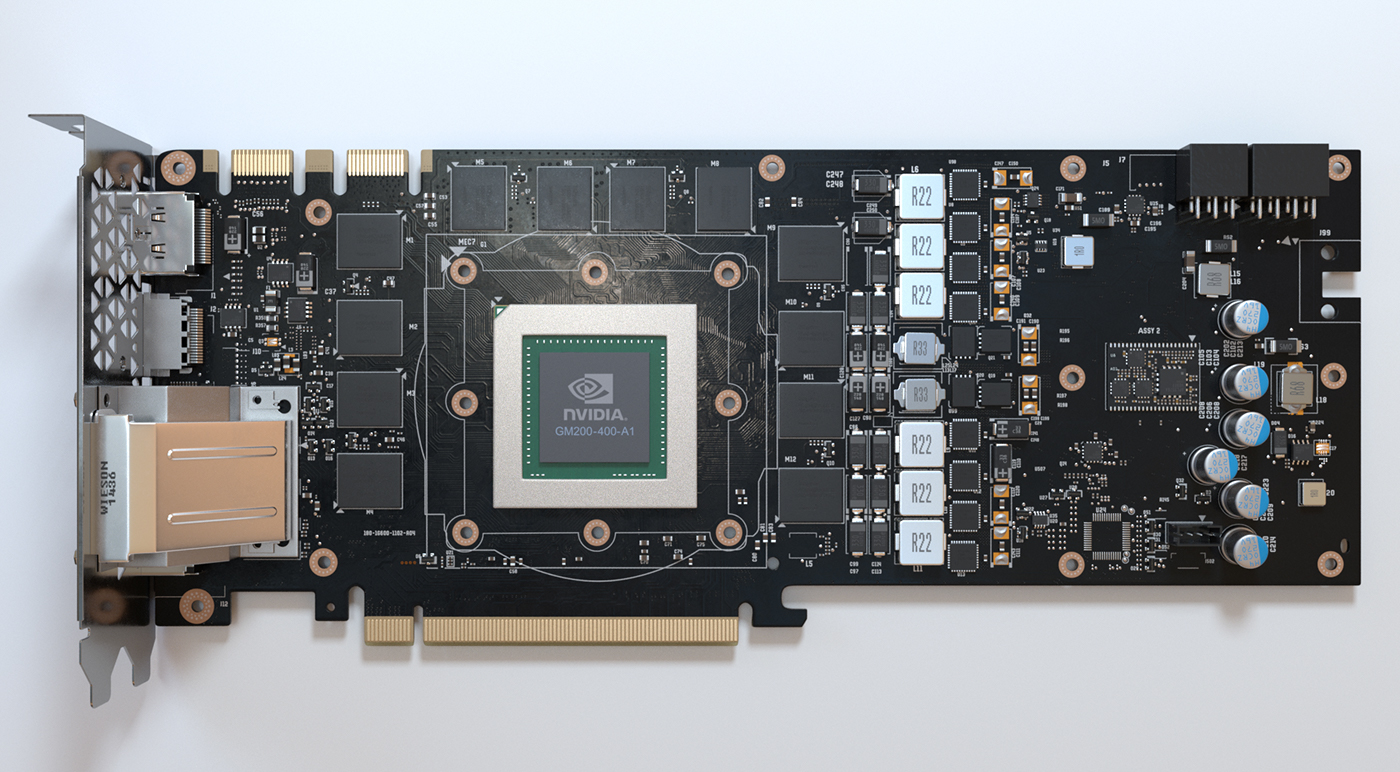
The research was quite difficult because nobody ever opens his 1000+$ GPU to get to know how the card works and looks inside. After researching a lot of reference pictures I reached a very disapointing moment. When I realized that there were not so many pictures which show the GPU-cooling parts inside the card. That caused me to buy a real physical GPU-cooler from a (Titan X) and rebuild it in 3D. Now I had the chance to open it up and try to achieve a quite realistic result in my modeling process.
Another part of the story are the textures. My goal was to keep everything as realistic as possible by using the very limited VRAM (3,5 gb) on my actual GPU (GTX 970).
The first part I textured was the PCB-plate. There were several parts I need to think about, like the translucency of the baseplate. Also the copperlines under the black melted foil where a little hard to g. I first loaded a picture of the PCB into illustrator where I tried to recreate every copperline underneath the surface as single splines (more than 500 single splines). Next I jumped into Cinema 4D where I did the UV-unwrapping of my fundamental base-model. After doing this I loaded the UV-Texture and my Splines from Illustrator. After loading it into Cinema 4D and rendering a little test I realized that the splines looked completely straight and not distorted like on the real surface. Back in Photoshop I reduced the amount of sharp edges of the splines by blurring it with 1%-2%. That helped me to achive a pretty good result of the displacement-falloff. Additionally I gave a little noise-warp effect on this layer so that the falloff was not in a straight line anymore. Now it looked a litte bit randomized as if someone really put copperwires on the pcb and melted a thin layer of black plastic over it.

I researched some material properties and learned that this varnishlayer has to be heatresistant which is achived by different chemical prodecesses. This baking process heats the varnish and as an result you can see a thin oily layer.
Let me say that this part took me some weeks of work because every single number, every single wire-displacement, every single pressing hole had to be done by hand and placed on it’s correct position.
As the next step I wanted to model the monitor-connectors and the aluminium plate. Working with the metalplate was a pretty difficult part and I gave up modeling it with the sub-d technique because this was such a hard model to do that I switched to Autodesk Fusion 360. This CAD-programm helped me a lot with this hard part. But as I wanted to have my geometry as clean as possible I never touched it again in this project. I hope Autodesk will implement a solid triangles-to-quads-feature soon.
From my point of view the real power of ensurance was in the stage of modeling and texturing all the little datailed parts on the PCB. It was a long process to keep them in the right places. Here I had to instance a lot of pieces and if I hadn't instanced my geometry probably my viewport would have crashed. I tried it once and it did! :D

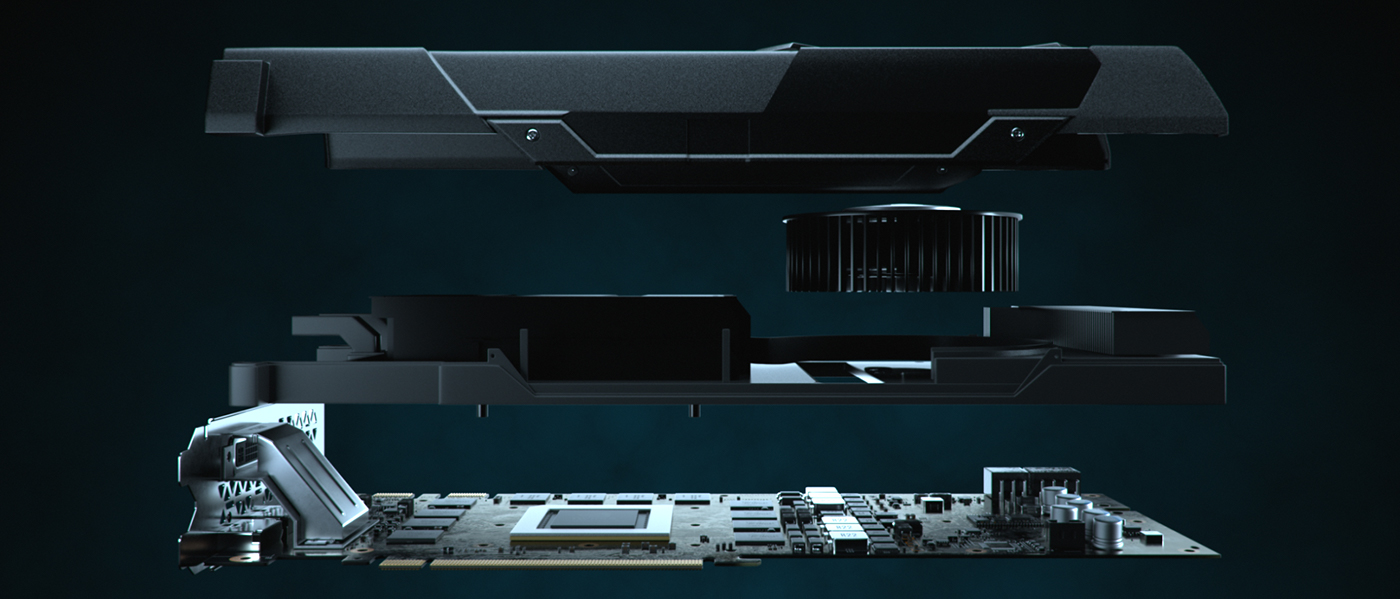
Some weeks later I bought the physical GPU-cooler as I mentioned earlier. Which also meant that the whole PCB was ready!
But I had a big timeconsuming modeling process in front of me. I think it took me about 4 weeks more to build every single piece of geometry in this card. Like the coolingparts, the fan, the plastics inside, powersupply-ports and at least the body.
In the texturing-process of the plastic and metallic parts I decided to give Allegorithmic Substance Designer 5 a try. I wanted to create my own normal- and displacementmaps which simulate the grainy vanish of the metall body. I wanted them to have a crispy sharp looking noise with some plateaus because I wanted to recreate the feeling that the metal was melted into a form and stick together before it gets pulled out. That’s why you got this litte plateaus.
Facts
Software Cinema 4D, Octane Render, Substance Designer 5, Adobe-Suite
Client non-commercial
Period about 4 months work beside my job, every day about 3-6 hours.
Objects 1358 (2719)
Polygons about 2 mio.