![pixar photoshop naming tutorial](https://mir-s3-cdn-cf.behance.net/project_modules/max_1200/ed63c635619607.56fd6607dcf5c.png)
![pixar photoshop naming tutorial](https://mir-s3-cdn-cf.behance.net/project_modules/disp/c9cbdc35619607.56fd66afce344.png)
Have you ever asked to yourself:
"What if my name was written like Pixar Studios does?"
Follow this 5 quick steps to learn how to reach this final result ;)
![pixar photoshop naming tutorial](https://mir-s3-cdn-cf.behance.net/project_modules/max_1200/ae710c35619607.56fd6607dd9bc.png)
...it’s easy like sunday mornin’!
First of all, let's speak about the fonts: which one to use?
![pixar photoshop naming tutorial](https://mir-s3-cdn-cf.behance.net/project_modules/disp/eb56ad35619607.56fd6607dd348.png)
![pixar photoshop naming tutorial](https://mir-s3-cdn-cf.behance.net/project_modules/max_1200/80cbd735619607.56fd66afcda51.png)
Get the most important element! You need a Lamp like these...
You can draw it or just download something from the web.
![pixar photoshop naming tutorial](https://mir-s3-cdn-cf.behance.net/project_modules/disp/e1a1ae35619607.56fd66f1b2811.png)
![pixar photoshop naming tutorial](https://mir-s3-cdn-cf.behance.net/project_modules/disp/d2136435619607.56fd6760494c6.png)
![pixar photoshop naming tutorial](https://mir-s3-cdn-cf.behance.net/project_modules/max_1200/fdca5b35619607.56fd676049bf4.png)
![pixar photoshop naming tutorial](https://mir-s3-cdn-cf.behance.net/project_modules/max_1200/280b6e35619607.56fd67604a6d8.png)
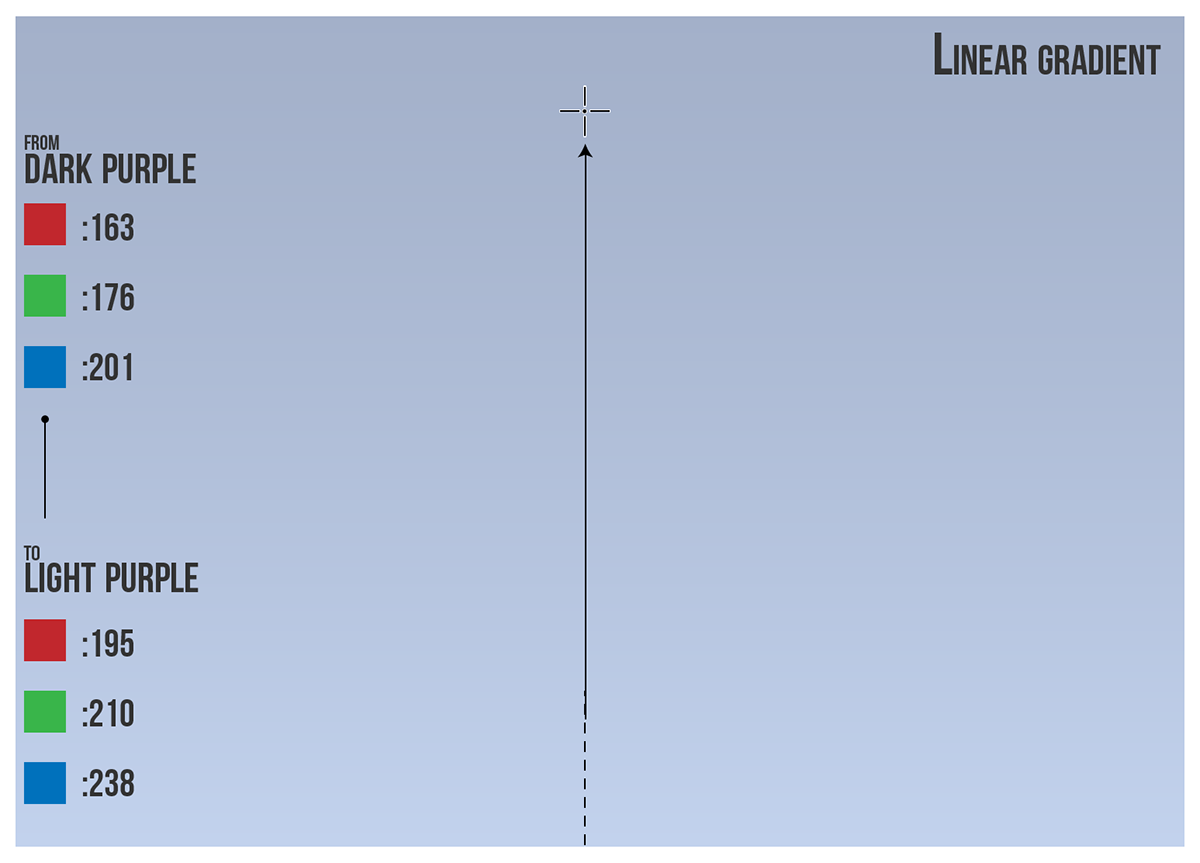
Step 1: Setting the background
![pixar photoshop naming tutorial](https://mir-s3-cdn-cf.behance.net/project_modules/max_1200/b43b4035619607.56fd678e85e82.png)
Step 2: Type your Naming...leave 1 empty spot to embed the lamp
![pixar photoshop naming tutorial](https://mir-s3-cdn-cf.behance.net/project_modules/max_1200/14c90135619607.56fd6854b04a0.png)
![pixar photoshop naming tutorial](https://mir-s3-cdn-cf.behance.net/project_modules/disp/f6fb0535619607.56fd6854b0b07.png)
Then positioning the lamp in place
like I did below
![pixar photoshop naming tutorial](https://mir-s3-cdn-cf.behance.net/project_modules/max_1200/e8c48335619607.56fd6854b1121.png)
Step 4: drop shadows and place highlights spots
Just watch where the letters are most exposed to lights and where (theorically) lies the shadows behind them.
![pixar photoshop naming tutorial](https://mir-s3-cdn-cf.behance.net/project_modules/max_1200/9c5dd135619607.56fd68872a6c9.png)
You should have something like this shown below:
![pixar photoshop naming tutorial](https://mir-s3-cdn-cf.behance.net/project_modules/max_1200/46778c35619607.56fd69c0532f5.png)
![pixar photoshop naming tutorial](https://mir-s3-cdn-cf.behance.net/project_modules/disp/9e975d35619607.56fd69c0539a1.png)
Step 5: adding the spreading light
Now you must do the "focal point" of the composition: the light reflected on the ground.
Following this quick step below, you should have something like this:
![pixar photoshop naming tutorial](https://mir-s3-cdn-cf.behance.net/project_modules/max_1200/90e1f935619607.56fd69c053f9e.png)
Final Step: Retouching, Color Correction and Finishing
Now you should do your final corrections and then add your favourite payoff, as i did here below
![pixar photoshop naming tutorial](https://mir-s3-cdn-cf.behance.net/project_modules/max_1200/aef89d35619607.56fd6a05f3e38.png)
![pixar photoshop naming tutorial](https://mir-s3-cdn-cf.behance.net/project_modules/disp/7ef77935619607.56fd6ab92cdb6.png)
And this is the final composition:
![pixar photoshop naming tutorial](https://mir-s3-cdn-cf.behance.net/project_modules/max_1200/e860f635619607.56fd6b06a6781.png)
Quick and easy, don't you think?
Let me know if you like it.
Thanks
Let me know if you like it.
Thanks