

YouNote
The aim of this project was to design an innovative product to improve online learning experience through the use of interactive video. It was a partnership between City University London and Hub Productions.
Exploring Initial Stakeholder Needs
We started by conducting four meetings and unstructured interviews with three staff development managers and learning technologists to better understand the technology landscape for online learning and elicit user needs that arise in the use of video in a learning context.
Market Research & Literature Review

At the same time as talking to stakeholders, I conducted market research and literature review. I also attended the Learning Technologies and Learning and Skills exhibitions as well as the seminars. This helped us gain insight of the current market trend and technologies.
I produced a map of market research and literature review, which we used to identify potential gaps in functionality that were currently not addressed by learning and video technology providers. This map helped define the space in which innovation was needed and therefore the positioning of the proposed product in terms of its functionality.
Participatory Design Sessions

The crucial stage of our innovative practice was understanding user requirements. While traditional user-centred design approach is very effective in helping designers understand user requirements for incremental changes to interactive systems, it has been noted that users can have serious problems envisioning future needs for radically novel technology.
To achieve our goal of understanding user needs, we designed a study to conduct very brief semi-structured interviews followed by participatory design sessions.
Participants
Our target population of users included Higher Education students, employees at companies who undertake online training, people who support the technology in support of the learning, and professionals who set the learning outcomes and usually are in charge of the videos’ content.
We therefore recruited participants from all these roles in order to cover all perspectives. Ten participants plus two for pilot studies took part in these sessions, ranging in age from 21 to 53.
Design Sessions
Short Interviews
I started the design sessions with a short interview where we discussed their current use of video to support their learning, and investigated any established habits or preferences. The participants were also introduced to the focus of the design sessions.
Participatory Design Session – First Stage

The first stage was intended to allow participants to creatively express their future needs. Each participant was given several sheets of papers that included a sample video screenshot. They were asked to imagine that they were watching a video on a topic, which they wanted to learn about, and a screenshot of the video was on-screen. They were invited to draw or write on the paper whatever they thought would be needed to support a new way of interacting with the video, including screen elements and interface controls. To assist them envision the future system, I gave questions to help form their ideas.
All participants started to explain what they wanted quite easily, however, the quality of their envisioned solutions varied drastically, both in the creativity of their solutions and the amount of information provided. We observed that participants used and adjusted the features that they had seen in other software, occasionally expressing their liking for other existing software. Participants also quickly ran out of ideas: in two cases after only 5-6 minutes. The average session lasted 12 minutes, with the longest time being 19 minutes.
Participatory Design Session – Second Stage

The second stage of our design session took a different approach. In order to generate more ideas as well as evaluating our own ideas I had designed graphical user interface elements, some containing sample contents, representing different sections or controls that we thought could be the building blocks of our interactive system.
I had drawn these widgets using drawing software and printed and pasted them on thin cardboards. I then cut out each widget or building block and used Blu-Tack® to paste it to another cardboard temporarily. This made it possible for us to easily detach the widget from the cardboard and paste it on the paper with video screenshot.
Each participant was presented with a blank page of large paper with, as previously, the printed video screenshot. This time however, they were given the pre-made widgets one at a time, with an explanation of their content and features. The participant was asked their opinion of the widget, and if they wanted to have it on the interface. If they did, they were asked to place the widget on the interface where they wanted. Participants were encouraged to draw on the new page as before and optionally, draw or write on the widgets, or change their text or labels. Some widgets had areas without either controls or content that participants could use to build new building blocks.
We observed striking differences after adopting this process. In this part of the session, engagement was stronger, with the participants taking from 24 to 58 minutes, with an average duration of 37 minutes.
Working with the widgets helped them visualise their desired system easily and dive into the system and explore it.
Five participants volunteered, without prompting, to participate in future sessions, suggesting a favourable experience of the sessions.
I need to mention that our aim with the provided prototype widgets was not to use the session to arrive at specific designs, but rather to identify new aspects of functionality, assess the relative merits of potential features, and scope the goals for the first actual prototype.
Short Video from Design Session
I selected some parts from videos of design sessions and made a five-minute video. This was used to illustrate the design process, and demonstrated to stakeholders the engagement of the participants in the prototyping sessions.
It proved to be an effective tool to engage stakeholders, and to help increase buy-in and commitment in an inherently risky project.
Team Affinity Diagramming

After conducting the interview and participatory design sessions we started to review the recorded videos of the sessions as well as transcribing them. I studied two out of ten sessions and extracted presented topics as well as answers to questions. I built blocks of information including the question along with its answer or the topic and the user’s ideas and printed each on a Post-it®, which resulted in 119 notes for the two sessions.
Following this, the project team used affinity diagramming to group the related topics together to find the themes. A two-hour session produced ten themes that I used for thematic analysis.
Matrix of Requirements

As a result of the thematic analysis, I produced a matrix of requirements associated with the topics we developed alongside their potential value to the user and the business. This matrix also listed participant information and a reference to the actual text of the transcript to further substantiate user-centred need.
Functional/Non-functional Requirements Specifications

The matrix of requirements was very helpful within the project team to review and prioritise requirements. This also extended to using it for validation of user requirements with external parties in two meetings, which ultimately led to the functional/non-functional requirements specifications of the new system.
Personas and Storyboards


After defining and prioritising the functional and non-functional specifications, we developed three personas based on the research we conducted as well as the business goals. We then created storyboards that showed our personas working with our product in different contexts of use. We used the storyboards for marketing purposes as well as designing the system.
Collaborative Design Sessions

We used the storyboards and functional/non-functional specification as the basis for interaction design. We conducted collaborative design sessions where we used Adaptive Path’s “sketchboard” technique to generate, explore and evaluate a range of interaction concepts while involving business partners.
Low-fi Paper Prototypes
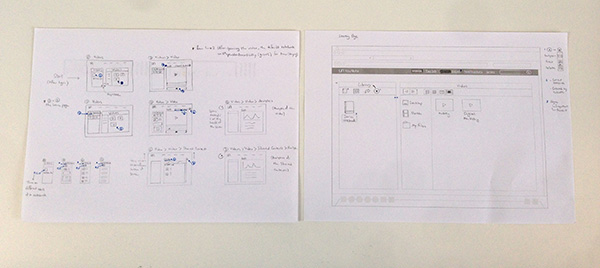
I extracted common themes from sketches as well as the important ideas and notes, and considering the constraints, designed the low-fi paper prototypes, which we later evaluated within the project team.
Interactive Wireframes


In order to test the designs and our ideas with users, I subsequently created interactive wireframes using Axure RP.
Guerrilla Tests
I conducted six guerrilla tests using the interactive wireframe. Four of our participants were Master’s students at City University London and the other two our colleagues at Hub. These early tests helped us gain a good understanding of the main interaction problems that our participants had before starting the implementation of the system.
Wireframes – Design Specification

Based on the outcome of guerrilla tests and during several sessions we revised the wireframes. I then designed new wireframes in 17 pages showing the design specification. These wireframes became the basis for developing the proof of concept interactive prototype, which was developed by the development team.
I collaborated with programmer, project technical lead, and visual designer. I also managed the development process, checked the prototype for bugs in four rounds, and provided the bug lists.
Usability Test

We conducted usability tests on the implemented prototype. After writing the test plan, which described the goal of the study, methodology, procedure, tasks, participants, schedule, and budget, I conducted one pilot test and eight usability tests with the recruited participants at the City University interaction lab.

I then analysed the test sessions and prepared the usability test analysis spreadsheet with 77 issues/needs, their descriptions, participants experiencing/expressing them, their impact on usage and user experience, and their severities. We also evaluated the overall satisfaction of using the prototype using “System Usability Scale”.
Wireframes – Redesign
Based on the outcome of the usability tests and during several sessions we revised the existing design. I then designed new wireframes in 7 pages showing the design specifications and changes to be made to the existing prototype.
Video Tutorial
In order to address some of the issues that we noticed in usability tests, and provide the first-time user with an overview of the system and its functionality, we decided to produce a short video tutorial. Before asking the professional team at Hub to produce the video, I made a 5-mintue video using QuickTime Player screen recording. I then conducted five guerrilla tests to find out if participants understand the main functionality of the system and whether they can use them, after watching the tutorial. We then revised the script based on the outcome of the tests and produced two short video tutorials.
Visual Design

I also created the visual design and collaborated with the development team to implement it.


