
Steel Hybrid Bike Frame
I love cycling. I use my own hybrid bike to get around everywhere, from getting to classes to the occasional long ride to Decatur or Smyrna, and while I love my bike, it’s a heavy beast – great for the Dallas trails I used to ride back home, but cumbersome on the Atlanta roads that now make up my stomping grounds. As such, I’ve been looking at buying a new, lighter bike, but…that’s a boring solution to the problem. It’s unfortunate to say the least that, despite my interest in both metalwork and vehicle dynamics, my specialty is static woodwork, so I wanted to make some steps to change that! This was an opportunity for me to do something new and make something cool in an area I’m passionate about - I set out to build my own bike frame.
My goals were to learn about how frame geometry impacts bike handling, get experience in welding thin steel tubes, learn about the overall framebuilding process and, perhaps most importantly, to get to ride a bike I built myself.
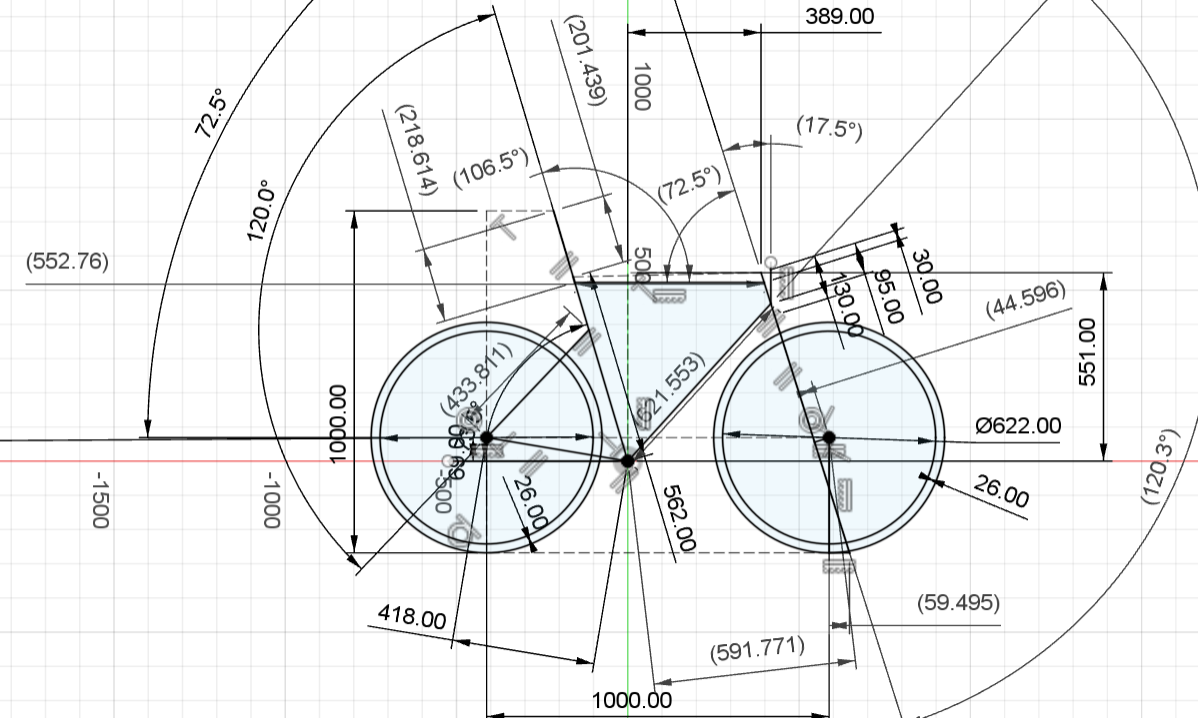
Bike frame design begins, as with car suspension design, with a skeleton borne from the fixing of certain parameters. The only problem I had when I started this project was…I had no idea of what made bikes handle how they did, and even less idea what I wanted mine to handle like. Cue several days of research in which I ascertained the following: frame geometry tends to fall on a spectrum between mountain bike geometry (a long wheelbase and less steep head tube angle, capable of stable, sustained cornering) and road bike geometry (a shorter, sharper bike, with much less stability but much faster input response). Having primarily ridden a mountain-like hybrid prior to this project, I wanted something a little more road-focused, so I found the dimensions used by a popular road bike brand's premium steel offering and modified the geometry slightly for rider comfort (primarily adjusting the size to better suit my 5’9” frame and slackening the head tube angle by a degree to make the handling a little more predictable for a road-biking novice). Those dimensions set, I drew and marked up a skeleton in Fusion 360 (shown above and fully modeled below), before buying my materials and getting to manufacturing.
My material selection was fairly simple – CroMoly steel, through the amount it flexes, provides great ride quality in a bike frame, and is also by far the easiest widely available material in terms of manufacturability (welding/brazing). As an added bonus, it’s not too expensive! Thankfully for budding framebuilders, there are a number of online vendors that provide a good selection of tubing and are very easy to work with. My chosen ones were BikeFabSupply and MetalGuru. Sample chainstays from the former are shown below.

On of the most important factors in determining tube type is the butting of the tube. Bike tubes are butted, which means the wall thickness of the ends is thicker than in the middle. This allows weight to be saved overall, while maintaining strength and stiffness at the tube joints, which are stress concentrations for the overall build (as shown below). I'll admit my determination of butt length was...somewhat informal, in that I simply took some accepted values from notable Invention Studio framebuilder Iain Mackeith and added some buffer in to err on the stronger side, but, per Iain, under normal conditions even a somewhat inadequate tube should not fail, so I wasn't concerned. I just needed to make sure that my butt lengths were enough, even after cutting the tubes to size. This took some time, and I'll spare the details, but it was done thoroughly.

Constructing the frame begins with joining the “triangle” of top, seat, down, and head tubes. These are a good start because they form the primary structure of the frame, but also because, being the (generally) largest tubes in the frame, they are the easiest to join together.


Each tube has to be cut to length on the band saw and mitered before welding and brazing. Mitering involves cutting a circular indentation in the end of the tube so that it can join together with the others. This is done by clamping each tube in the vise of a mill using blocks, setting it at the correct angle using a digital angle gauge, and drilling it out with a hole saw. Sometimes, I couldn’t reach the right angle in the vise, so I had to physically tilt the spindle of the mill. A note that low RPMs (~150) work best for hole saws like this.

After the holes are cut, it’s a good idea to test-fit them to the tubes they are meant to join to. Given the nature of cutting tube stock, the surfaces were rarely as smooth as desired, so I had to take a file to them and clean them up as best I could. Above is shown my cleaned-up bottom bracket joint
Then, the tubes get mounted in the frame jig, as shown above. The frame jig is a construction of 80/20 extrusion, with some custom machined parts, designed to hold mitered tubes in position so they can be joined. I had to adjust the distances and angles between mounting points of the jig to match my design, and then I mounted my mitered tubes on the jig, part by part, to test their fit. The headtube, chainstays, seat tube, and bottom bracket are held in place by custom clamping pieces. Though, as previously mentioned, those blocks on the top tube are mainly for holding the tube in a mill vise, they it's interesting to note that they also provide a convenient datum for the angle of the tube when mitering.

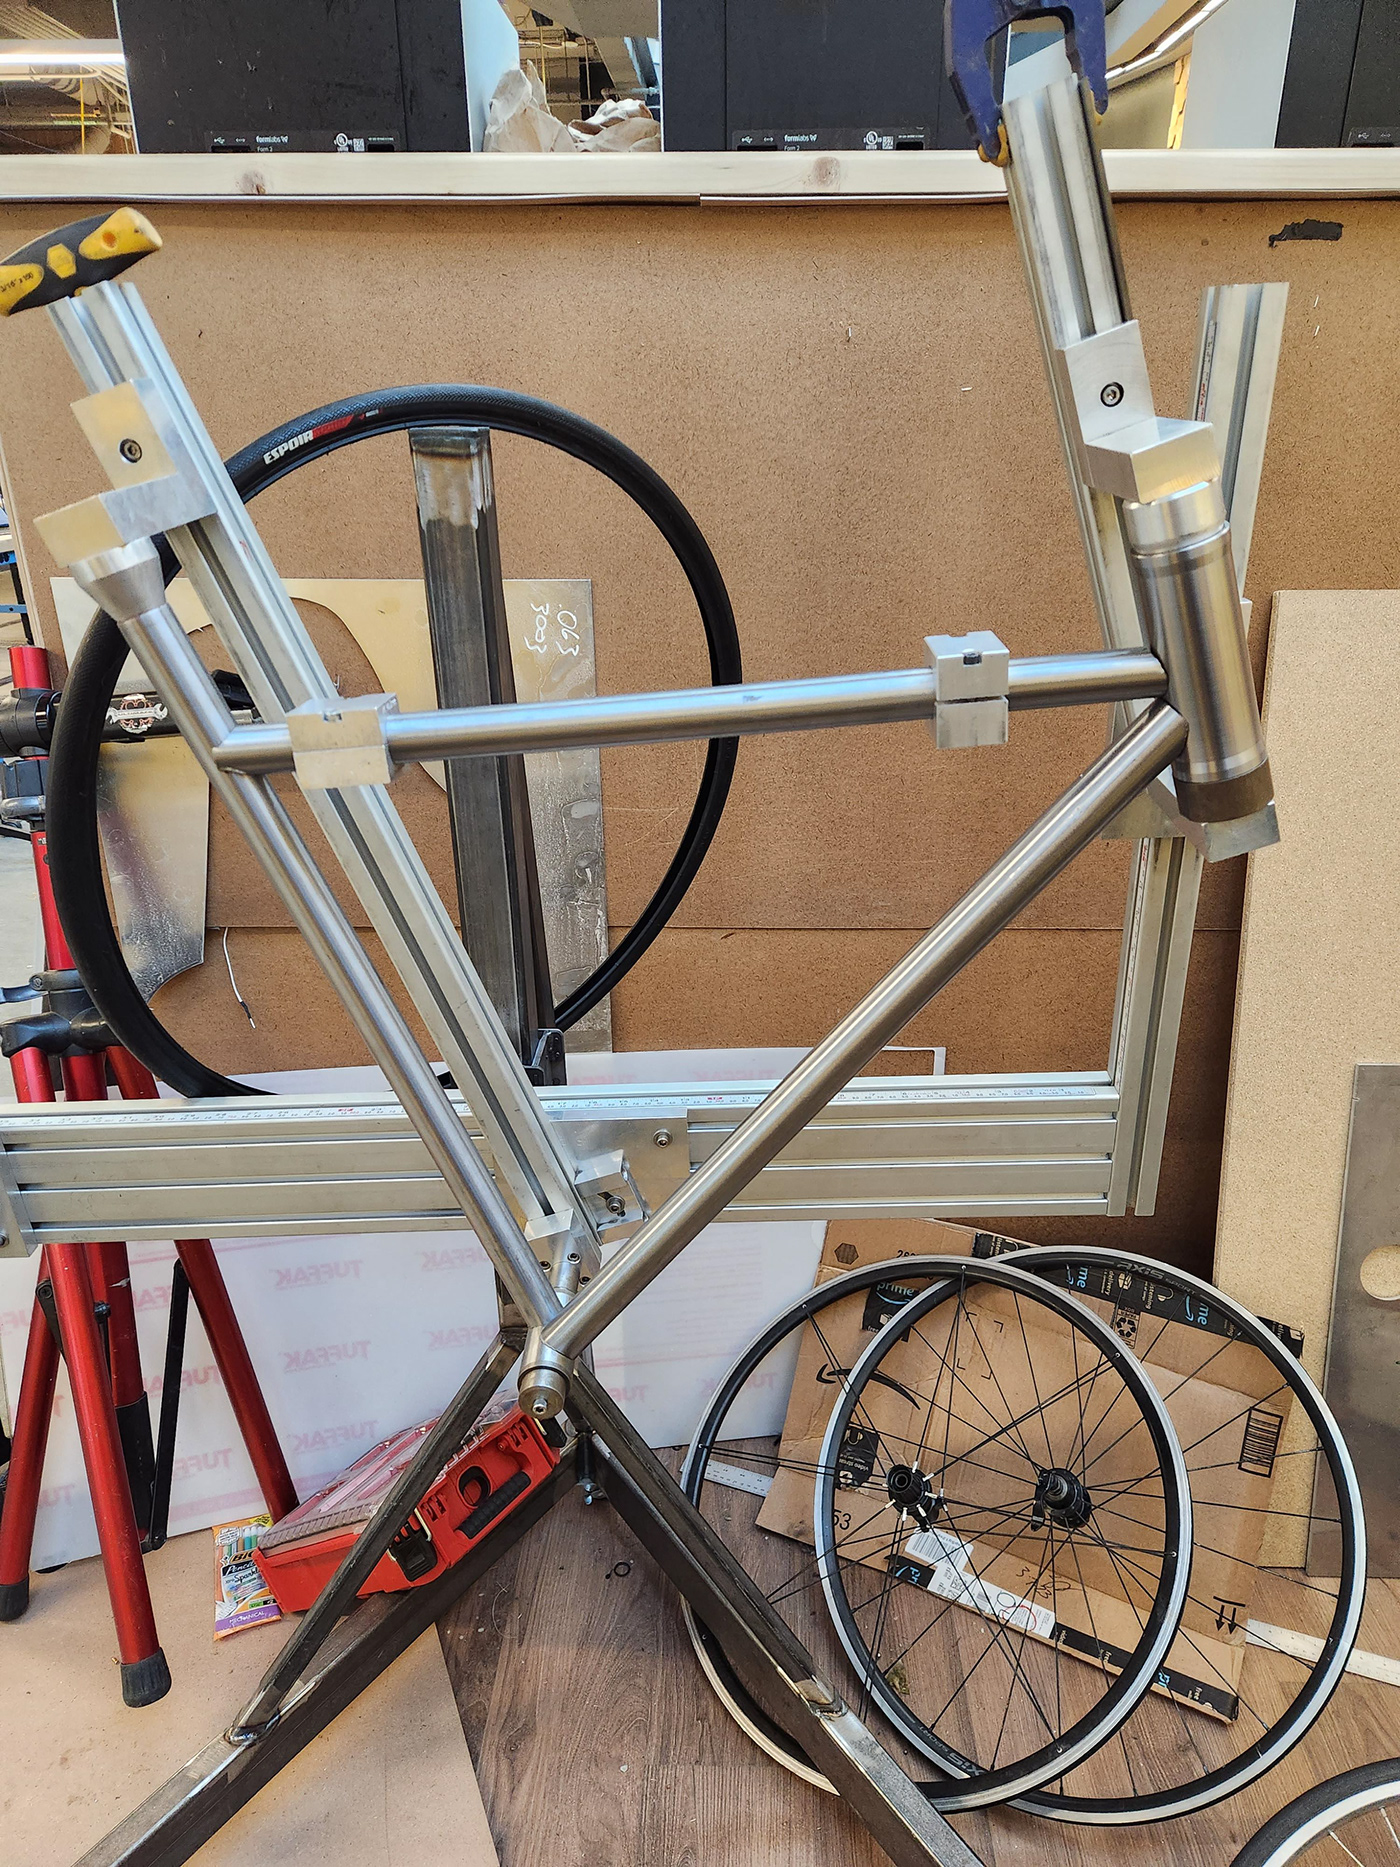
Once I was sure my joints were clean and my tubes fit together well, I moved the frame jig into the welding room and took a TIG welder to it, tacking the tubes together so that they would be firmly joined and ready for brazing. Above is it on a stand right after welding. After this photo was taken, I used an oxyacetylene torch to heat up the joints, and fed brass brazing rod into them to build up a fillet that both joins the parts, and removes the sharp edge's stress concentration. This process is tough, because brass melts at a fairly low temperature (metal-wise, at least), so you cannot overload the budding joint with heat, or the brass will melt and flow away. You have to keep it hot enough to melt just a little bit, so that it will accept some more brass from the rod at the slightest provocation, but you cannot keep the torch on it for very long. It took some time to get right, but once I found my rhythm, it was going pretty smoothly!

And here she is in all her brazed glory! It took a good amount of work to build the fillets up to the size i wanted them to be, and they required a LOT of cleaning after this picture was taken, but it's now ready for me to mount the fork and headset, and get riding!
I enjoyed this project immensely overall. It gave me the metalwork experience I wanted, and it also provided me with the unique motivation of having a bike I could truly call my own. I learned to weld and braze, I learned how difficult it is to miter tubes (especiallyon two-sided miters), and I learned what effect frame geometry has on bike handling. I can't wait to start putting miles on it.


MADE AT AND FUNDED BY THE GEORGIA TECH INVENTION STUDIO

