

Here is my final study project at INAsup in 3D Motion Design ! I had 2 weeks to create an advertisement for the 2024 Olympic Games. I will describe the entire creation process of this project.
I used Cinema4D from Maxon for 3D, with the Redshift rendering engine.
For compositing, I worked on Adobe After Effect software.
Keep in mind that this Behance page is an adaptation of a thread i made for my french twitter account, so few videos have french captions, I hope it's ok.
The final result :
Stillframes


Firstly, the concept ! I wanted to go from one sport to another with smooth "matchcuts" transitions, meaning transitioning from shot A to shot B with continuity, predominantly in motion
For example, those shots from "Salomon - Tomorrow is yours" were my main inspiration.
I wanted a rather dark universe, with a black background or some gradients to spatialize everything at times. I came across this YouTube video that served as a good reference for me, both in terms of transitions and visual style.
First Scene
The deadline was 15 days after receiving the instructions. So, I started writting down my ideas and creating a storyboard (it looks terrible, I'm not sharing it). And I knew I wanted to start on a race track.
I searched for race track's textures on the internet, but I couldn't find anything satisfactory for free. So, I thought that changing a leather material could work. Then, I found the floor numbers on Quixel Bridge and the starting block on a free website:


I quickly created the race lines in After Effects and made a seamless image, meaning that you don't notice the cuts in repetitions. Then, I cloned it along the entire track using the basic cloner in Cinema 4D.
Using the Bend deformer, I bent the track as the camera moved to the left to transition to the next scene with the arrow. There were cloned lights throughout. I made sure to keep my camera straight to facilitate the transition.
To achieve a bend that folds both sides of your object like a mirror, don't forget to use "unlimited" as shown here by placing the bend on one side; otherwise, it can get confusing quickly.
Second Scene
The transition from the track to the arrow is done in After Effects with desaturation and a mask. I used the first arrow image with Motion Tile and position's keyframes, instead of creating additional 3D images.
There might be a better method, such as using a field that transitions between the two materials in 3D on the same object (as shown in this example video), but in terms of size, it could be difficult to deal with. My quick test worked, so I moved on to the next step.
For the scene, I added a null object designated as a camera target (with a target tag), attached and offset from the center of the arrow to make the scene shake when the arrow rotates. By moving this null object, it create the shake effect.
To clarify further: The camera follows the null object, which is itself attached to an object that rotates. So, if you offset the null object, it rotates with a delay, creating the shaking effect.
I created the target with a spherical UV projection on the wood material to achieve circular stripes, with just a good backlight and a left-sided light to highlight the object's side.


For the particles, I kept it simple. It's a small extruded plane cloned and scattered around, which does the job well and prevents the scene from looking empty. Additionally, it serves as a spatial reference for the arrow.
Third Scene
For the velodrome, I used the same wood material as for the target, trying to maintain similar lighting conditions to facilitate the transition. I took the image below as a reference and directly modeled it in Cinema 4D.


By the way, to model this structure, I used a text remesh with the nice shape of a "0". After that, it involved extrusions here and there, material assignments by selections, and proportional modifications to keep everything smooth and fluid.
The logos on the track are images in plane materials, and, like the texts, they are applied to objects using the Shrinkwrap modifier! It can deform our textures if we don't place them close enough or straight enough in relation to the target.
In this scene, a camera is precisely guided along a curve with the "Align to Spline" tag. This system was challenging for me in terms of timing and rotation, but eventually, after spending a lot of time on it, I got the hang of it.
The technique to avoid getting frustrated with this is to use as few points as possible on the Bezier curve to keep it as smooth as possible. Combined with a target on the camera, it eliminates the hassle of having to constantly change the camera rotation.
Personally, I struggled a lot with the camera animation because I didn't want to use a target. With the target, it kept turning strangely all the time because it didn't have a reference for how to align itself. I only understood how to fix that much later:
I needed an UpVector, which indicates where the camera should orient the top of the image. You can use a null object and designate it as the UpVector. So, by combining Align to Spline (position), a target (rotation), and the UpVector (axis), you can create smooth camera animations!
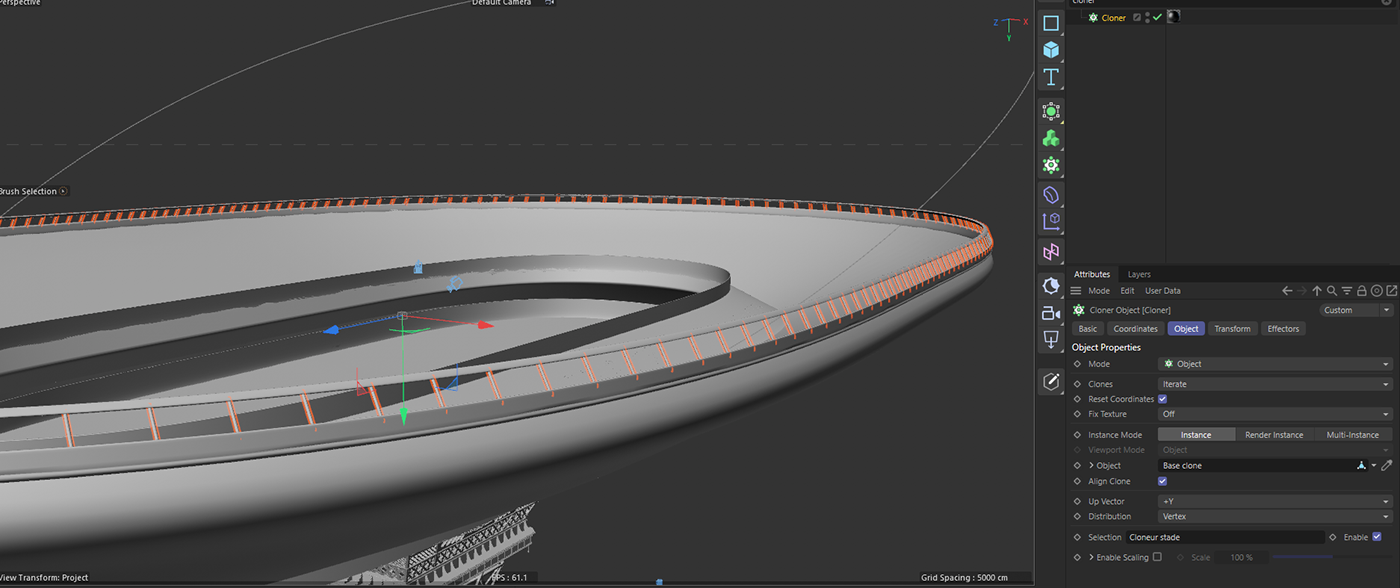
the velodrome barriers come from a cloner that places a bar for each vertex of a given selection. Like in this example, where I put spheres on the vertices of a cube
I found the Eiffel Tower for free on Sketchfab, and with this i can talk about assets recovery. Here's what i modeled or not :

So why didn't I model everything when I study 3D motion? Well, because it would be counterproductive. We're supposed to simulate a real professional project, and modeling
assets that can already be easily found online can result in significant time losses!
It's pretty common to use ready-made objects, but it's crucial to understand modeling, shaders, and model optimization to address the various issues that may arise.
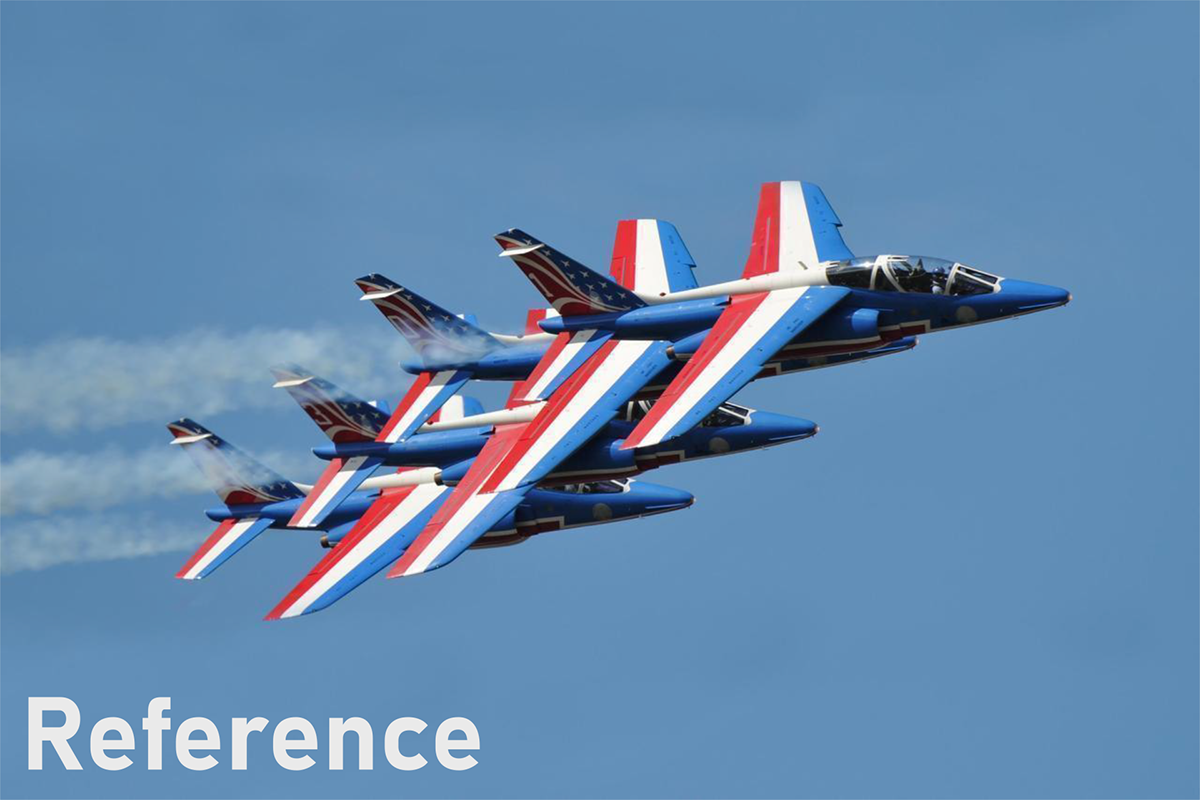
For example, i modified the planes to get a look similar to my reference.

To speed up my workflow, I switched to Blender for this part because I'm familiar with the tools. I used gradient curves in constant mode for the stripes and created a camera projection for the pattern at the back (auto UVs and bake for C4D).
After importing the new plane into Cinema 4D, I did a preliminary animation test, and my goal was to simulate colored smoke like the real Patrouille de France. It was optional because I wasn't sure if I would have time to do it at that point. I finished these smoke effects right at the end of my project, once everything else was in good shape. I encountered quite a few bugs, but in the end, I managed to complete this process, and I'm very pleased with the result!
For the fireworks, it was very convenient because I created them the previous year in a personal exercise using Blender with geometry nodes. I rendered the sequence from Blender as an image sequence and imported it into the materials of three planes in Cinema 4D!

To create the fireworks with geometry nodes : Lines are projected from the vertices of a sphere in the direction of the normals, and they are trimmed in such a way that they shorten more and more with the slider. You can get my blender file for free here.
You can achieve more complex shapes by changing the projector object, for example, using a head or a symbol.. But since those are personal tests, i guess my techniques are not optimised

Fourth Scene
I started to feel comfortable with camera animations, and things went much faster. I wasn't sure about adding a ball initially; I thought of having just the racket. However, after a quick soft body simulation, it looked good, and the scene was much less empty.
Like many of my shots (and projects), I set up my lighting with strong backlights. I love the visual impact it creates and how it highlights elements! For those starting out, I encourage you to experiment with classic three-point lighting setups.


From the first day, I had in mind a camera descent along the handle of a racket with an image stretch through a focal length change, and it worked really well. I noticed afterward that it created a visual pause at the base. Then, I got the idea to place the Olympic Games logo there and transition that corner from dark to illuminated to emphasize the moment. It's one of my favorite shots, even though I think I should have used a less circular and flatter logo.
Fifth Scene
I should have found another transition than the wheel and then the fire because some people interpret it as conveying the message "burning disabled people." I didn't think about that at all because I was too immersed in the project. In reality, a big mistake, as I was told it could be a serious issue in an official advertisement.
Now, I realize that I should have taken a different approach, perhaps focusing on the wheelchair with a ball rolling on the ground, followed by the camera tracking it to a hoop, and then transitioning to the flame by rotating around the hoop... but let's get back to our main subject.
I created a curve that wraps around the wheel and attached the camera to it. After quite a few adjustments, I settled on this animation with its timing. I liked the small jolts caused by the manually placed curve.
We can observe the movements of my camera target and the UpVector in this video.
I started the fire simulation with the pyro system in another Cinema 4D file, beginning with a compressed sphere emitter to achieve something convincing. I had the flame cutting oddly on the top part, but I needed to improve the rest of the project first.
Then I exported the simulation as a VDB (Volume) file, which is a heavy file (120GB) but less prone to cache-related bugs. I placed the VDB on the wheelchair wheel in the correct project and instructed the software when to initiate it.

To blend the arrival of the torch's base in my scene, I raised the object while the flames started. I hide from the camera the elements of the wheelchair that need to disappear for the wide shot, as well as the floor and the ball, using an "RS Object" tag, like in the video below.
The "RS Tag" is placed on the object you want to hide (although it can be used for various other purposes). In the "Geometry" section, you set keyframes for "override" and remove the primary and secondary rays.
For the sound effects, I conducted the sound search during the time my renders were in progress, I would say spread out over 3 days, and then I did the sound design in one evening afterward. Here is the project with just the sound effects and audio clips from the Olympics.
I mainly used "Zapsplat" to get sfx, and a little bit with the BBC Sound Effect Archive website too. Both are great to download free sound effects.
For the music at the beginning, I was initially searching for old French songs that talked about Paris. However, I came across the Olympic Fanfare from 1984, and WOW, it works really well. It's as if I had synced to it from the beginning, so I got quite lucky on this front.
Voilà voilà, if you have any questions, go ahead! I've always wanted to share and help in everything I do, so take advantage! There are obviously many small details that I haven't covered, but I hope you have a good overall understanding of this project :) ! (And I think the Behance page is quite full now)


