The Art of Disappearing: How the Ghost Mannequin Effect Elevates Fashion Photography
When utilized as product models in your product photography, mannequins are a great and reasonably priced way to present your products.
Mannequins assist in keeping your products in shape, which can increase customer interest in product Ghost Mannequin Effect images by making them appear more professional and consistent. Because mannequins can be intrusive, using a ghost mannequin effect for your product shots, like the ones below, is a wonderful alternative.

An amateur photographer might initially find it difficult to recreate this kind of shot. Like most problems, it becomes doable when you attack each stage separately.
To create the intended impression, we will employ a simple technique that requires combining two images of the object. Understanding how you must shoot your items is crucial for increasing the effectiveness of the post-production process.
This simple, step-by-step article will show you how to use post-production image editing to give your product photographs for e-commerce a "ghost mannequin look.
The Best Way to Get the Ghost Mannequin Effect
1. Picking a model or mannequin and posing it
Using models or mannequins to highlight the distinctive shape and fit of each product is one of the most widely used techniques in fashion photography.
Unfortunately, showing the model or mannequin in every picture isn’t always beneficial. Some retailers choose to take photos of their mannequins modeling their wares, then use Photoshop to edit out the models and make the mannequins appear invisible.
For smaller retailers who do the majority of their own image editing, model and mannequin removal can be a challenging talent to master.
To create the "ghost mannequin" effect, also known as the "invisible mannequin," you must first take many photographs of your product being worn by a model or mannequin while being photographed from various perspectives. The advantage of this is that you can include these images in your product galleries with any "ghost" images you create.
If you decide to use a real model, hold it in a static position like what was shown above.
Your model should wear little makeup and keep her long hair back to ensure that the product can be viewed. Image editing will be lot simpler thanks to these details.
Mannequins are readily accessible in a wide variety.
Depending on your needs, you can choose to purchase a mannequin with or without arms, hands, legs, or a neckline. If your mannequin has arms and hands, make sure they can be moved out of the picture.

Pro Tip
Mannequins made of white matte are frequently non-reflective and may be made to blend into white backdrops, making the process of removing the mannequin from an image considerably simpler. Make sure your product fits your model or mannequin by arranging the garment to fit properly or utilizing the appropriate size. Moreover, if your product has sleeves, be sure to place them so the spectator cannot see down them.
80 Instagram Shopping Graphics
There is no need to look up examples of Instagram shopping on the internet. Hence, we finished it for you.
You'll get to:
You can quit following individuals to find out what they are doing if you look at these more than 80 real-world examples of Instagram shopping.
Use inspiration to guide your own content and approach. Some people claim an up to 1,416% increase in traffic and sales!
PLEASE SEND YOUR EXAMPLES.
Use inspiration to guide your own content and approach. Some people claim an up to 1,416% increase in traffic and sales!
PLEASE SEND YOUR EXAMPLES.
2. Setup and Equipment
You must have great studio lighting in order to employ the ghost mannequin technique.
The ghost mannequin effect will be less appealing to add to your photos as their quality declines. Depending on the specific product you’re photographing, camera and lighting techniques, tools, and positioning all come into play.
Configure the controls on your DSLR.
This is a step-by-step tutorial on how to capture gorgeous product shots using the settings on your DSLR camera.
If you need inspiration, have a look at this skillful example of a ghost mannequin photoshoot provided by ecommerce photography firm Fotoempresas.

3. Photographing products
It's important to position the camera level with the chest while photographing shirts; nevertheless, when photographing bottoms, the camera should be positioned crosswise from the hip area.
A product may appear erroneously "tapered" when it is photographed from a height that is either too high or too low.
Here are two pictures of dolls sporting tank tops: The merchandise appears flattering because the front and back photos on the right were taken at chest height. The image on the left was taken from below the chest, giving the item an unflattering aspect.
Using a telephoto zoom lens when shooting images will lessen distortion and allow you to move closer to little items while staying further away from larger ones.
Make sure your studio shooting space is sufficient for your camera, tripod, two studio lights and umbrellas evenly spaced on either side of the product, a backdrop, and invisible mannequin shoots.
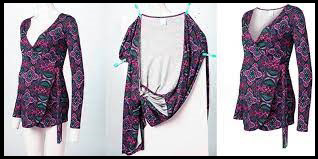
In order to create a 3D image using the ghost mannequin method:
Take front and rear pictures of your mannequin or model wearing the goods before anything else.
Take updated front and rear views of your product after styling and hanging it on a piece of white foam board. You can incorporate the interior of the garment when you blend the shots by using foam board for these pictures, as seen in the example below.
Take updated front and rear views of your product after styling and hanging it on a piece of white foam board. You can incorporate the interior of the garment when you blend the shots by using foam board for these pictures, as seen in the example below.
Check that collared shirts and related products have an open top and a clear view of the inner back. You might even want to turn it inside out in some unusual circumstances.
A Step-by-Step Guide to Post-Processing Pictures
Producing a ghost mannequin effect is actually rather simple if you have captured the appropriate perspectives if you have the appropriate post-production tools (like Adobe Photoshop) and your products have been photographed appropriately. You can also hire skilled editors to do the editing for you, who will deliver the finished product—ghost mannequin photos—in 24 hours.
Use these seven simple methods to create your own ghost mannequin effect in Photoshop if cost constraints compel you to make the changes yourself. Your company may end up saving a ton of time and trouble by outsourcing this labor.
1. Launch Photoshop and add layers to your files.
The photos of the foam board and the mannequin must first be opened in Photoshop. Choose your mannequin image and create a new background layer.
Put the white layer in; it will serve as your overall background after you're done. You can distinguish between your layers and keep structure by labeling them.
2. Choose the item in the image of the mannequin using a selection tool.
It’s time to choose the item for your mannequin image now. Choose your preferred selection tool, such as a fast selection, lasso, or magic wand, and zoom in closely.

All three of them can assist you in making the right choice.
Remember that, in the majority of situations, shooting against a white background makes it simple to remove the mannequin due to the clear color distinction between the subject and the background.
3. Polish and Position Your Mask
Refine your mask to be excellent and tight after selecting the full product and removing all of the background and mannequin.
The “Refine Edge” tool under the “Choose” menu can be used for this.
In the “Refine Edge” dialogue box, click “OK,” then add a mask to the layer representing your shirt.
You ought should now be able to see your product floating freely on the white background you initially made.
For a neat, polished appearance, you may need to slightly more refine the mask and/or further refine the product’s edges.

4. Repetition of the Earlier Steps Using the Foam Board Image
Repetition of Steps 1, 2, and 3 on your foam board product image is now required.
This kind of product image might initially seem strange, but having one to work with is crucial; by photographing the object from the inside out, you can reveal the product’s interior back, completing the mannequin illusion.
We assure that it will look excellent in the end!
Make a new layer, choose the product, then design and fine-tune your mask.
5. Merge the Pictures
Drag the mask from your foam board picture to the image of your ghost mannequin product image once both photos have neat, tight masks on them.
Layers should be arranged so that the mannequin image is higher and the foam board image is lower.
Finally, modify the foam board layer’s positioning and dimensions such that they exactly fit behind the mannequin layer, in a rounded curve immediately behind the shoulder.
6. Cut away any extra foam board layer pieces.
At this point, it’s wise to conceal your mannequin layer and remove any unnecessary foam board material.
The neckline triangle between the shoulders is basically all that has to be maintained. Take note of how the thread running across the back is visible in the video below.
Because it is present in the photograph of the mannequin, it is crucial to remember to remove that portion in the foam board image.
Once you’ve finished, double check your layers to make sure nothing is out of place, particularly around the neck and shoulders.
7. Include shadows, then save
In order to give the final product depth, apply a shadow between the two layers. To be safe, save a backup of the Photoshop file that still has all of the layers in place.
After saving the layer file, combine or flatten all of the layers and save the image once more as a separate file. Your image will look professional and lifelike after this last phase.
If the editing process is done well, you’ll get a stunning 3D effect like the ones below, which will enhance your product picture and aid in growing your online store’s sales.
Want to see examples of all seven steps? A step-by-step explanation of the procedure is provided in the tutorial below.
As you can see, by following the procedures, you may make your own ghost mannequin-effect professional clothes product photos. You can download this comprehensive guide on ghost mannequin product photography to view examples of product photography using various types of clothing.
Always keep in mind that this effect on your product photographs will not only make your products look more unique and interesting, but it will also give your online business a very professional appearance. Your brand will become more desirable to customers, which will increase sales.


