Exploring the limits of Selections and Masks in Photoshop
Versions Effected CS5, CS5.5, CS6 and CC (this tutorial will probably work with versions of Photoshop predating CS, but there would be no workspaces and no Refine Edge in very old versions)
By: Mark Wood

Introduction
Extracting picture elements from photographs is a major reason creatives use Photoshop. Over the years Photoshop’s Selection and Masking Tools have matured. Though sadly over time myths have propagated. Fables in portraiture include how hair can be selected from a busy detailed backgrounds. And the web is littered with how-to tutorials that just don’t cut it.
This tutorial doesn’t cover fresh ground. Rather it pulls together the most versatile photographic selection techniques and explores these processes. It also illustrates how Layer Blending Modes are essential in photo-composite work.
To follow this tutorial try using a portrait shot against a sky or similar neutral background; plain flat colours however would be too easy! I’ve used this aircraft image because the rigging presents a similar problem to selecting hair and the propeller is rendered semi-transparent as it spins.

1. A Magnificent Man…
This photograph presents some real selection challenges. The background has a similar tone to the fine rigging and uncovered airframe; there are spokes in the wheels. The hair of a portrait sitter would be equally challenging, if not shot against a plain background. I used Photoshop CS5 for this tutorial and the Essentials Workspace. Window > Workspace > Reset Essentials.

2. Channels Reveal Differing Contrasts
In the Layers palette duplicate your first Layer by dragging it to the Create New Layer icon. Now choose Channels. Click on the words Red, Green and Blue to cycle through each Channel. Here the Red Channel is shown. Assess each Channel and note which one has the greatest contrast between the object you want to select and its background.

3. Duplicate A Channel
With my Blériot image it’s the Blue Channel that has the best contrast. In the Channels Palette drag your best channel down to the Create New Channel icon, just to the left of the Channel’s trash icon. There are several ways to duplicate a Channel, just like everything else in Photoshop. Now let’s make the duplicate Channel more contrasty.

4. Apply Levels Directly
Stay in the Channels Palette tab. Make sure you have your duplicated Channel selected. We now need to apply Levels directly to the new Channel. Adjustment Layers are the way to go for pretty much everything else in Photoshop, but not here. Go to the Menu Bar and choose Image > Levels.
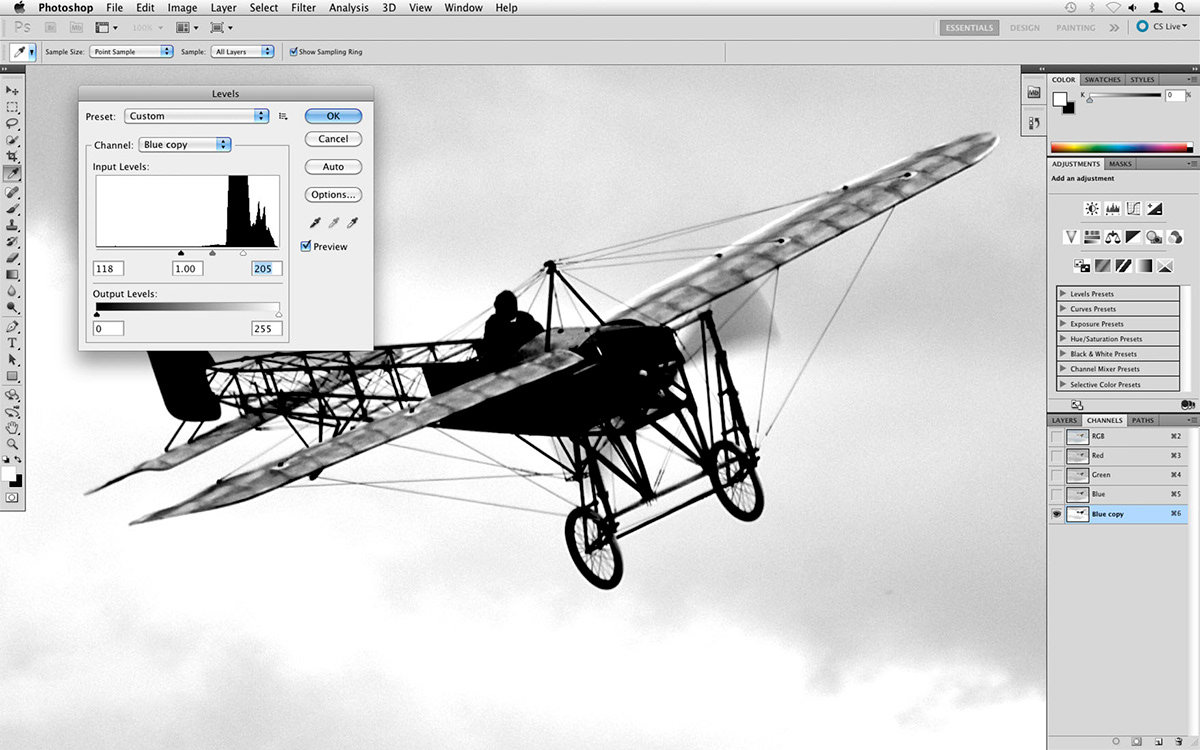
5. Push The Contrast
In Levels, on the Input Levels section, drag the White and Black Points about. Also move the mid point slider, aka Gamma, to the left and right assessing which settings help isolate your object from its background. I accept that Curves can be used as an alternative to Levels, but only try Curves if you’re familiar with their foibles.

6. Burn It
Whether you’ve used Curves or Levels there’s a limit to the contrast you can apply. The wings and fuselage are still grey. Use the Burn Tool, from the Tool Palette, to paint in the shape you hope to select. Burn Tool parameters include Highlights, Midtones and Shadows, there’s also Exposure. These can be set in the Tool Options bar.

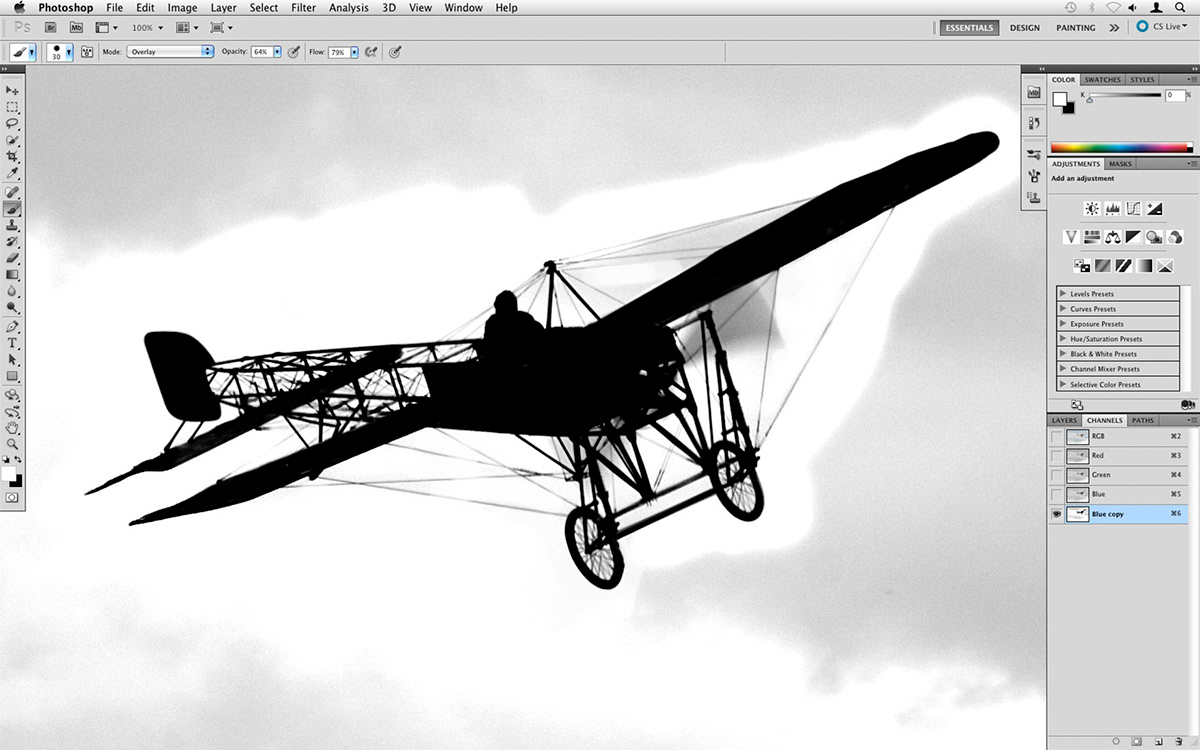
7. Brush Mode Alternative
Dodge and Burn aren’t everyones favourite, though they’re much improved. Alternatively try the Brush Tool, with a simple soft edge. Set the Brush mode to Overlay, and with a solid Black colour paint over the fine detail. I used this method on the rigging to further enhance contrast. My brush was a little broader the wires I was painting.
8. Dodging
With the positive area painted in solid black. Turn your attention to the background. The Dodge Tool is useful; having the same parameters as the Burn Tool. Care is needed so that Exposure isn’t set so high that it immediately obliterates fine details such as hair or, as here, the rigging. Undo or use History to recover any mistakes.

9. Clean Up The Background
Cleaning up a background can be a compromise. You may find that making the background a pure white, around hair and other fine details, dodges out too much. Leaving some areas light grey is OK. You are making a mask. Pure black or white are solid masks, greys are semi-transparent. So, light grey is almost invisible.

10. Make A Channel Selection
Using a big solid white Brush I cleaned up the remaining background. To turn your efforts into a Selection drag your duplicate channel to the Load Channel As Selection icon, found at the bottom–left of the Channels Palette. The marching-ants appear. Don’t worry if they don’t appear on the finest details of your image such as the rigging.

11. Check Back To RGB
In the Channels Palette click of the letters RGB to make the RGB channels active. With the marching-ants still on the move, click over to the Layers tabs, next to Channels. In Step 2 you should have made a duplicate of your first pixel layer, by default this will be called Background copy, make it active by clicking it.

12. Refine Your Edges
From the Select menu, chose Refine Edge. From Refine Edge’s View Mode select Overlay. Try using the Refine Radius Tool on fine details to see if you can improve your selection. Refine Edge is great and can improve all kinds of selection. So far we’ve been preparing the ground so that Refine Edge has something solid to work with.

13. Make A Layer Mask
Click OK on Refine Edges. With the Background copy Layer selected, press the Alt key and click the Add Layer Mask icon. Between the Background and Background copy make a new layer. Do this by clicking Background then on the Layers Palette click the Create New Layer icon. Paint this layer a solid colour. I chose green for my new background.

14. Urgh - Fringes?
After all that effort the masked image has pale fringes that look incongruous. To cure this problem we can use Layer Blending Modes. Chose the top layer and from Layers‘ blending Mode chose Multiply. Instantly the pale fringing disappears, but now my aeroplane is semi-transparent. Drag this Layer to the Create New Layer icon to duplicate it.
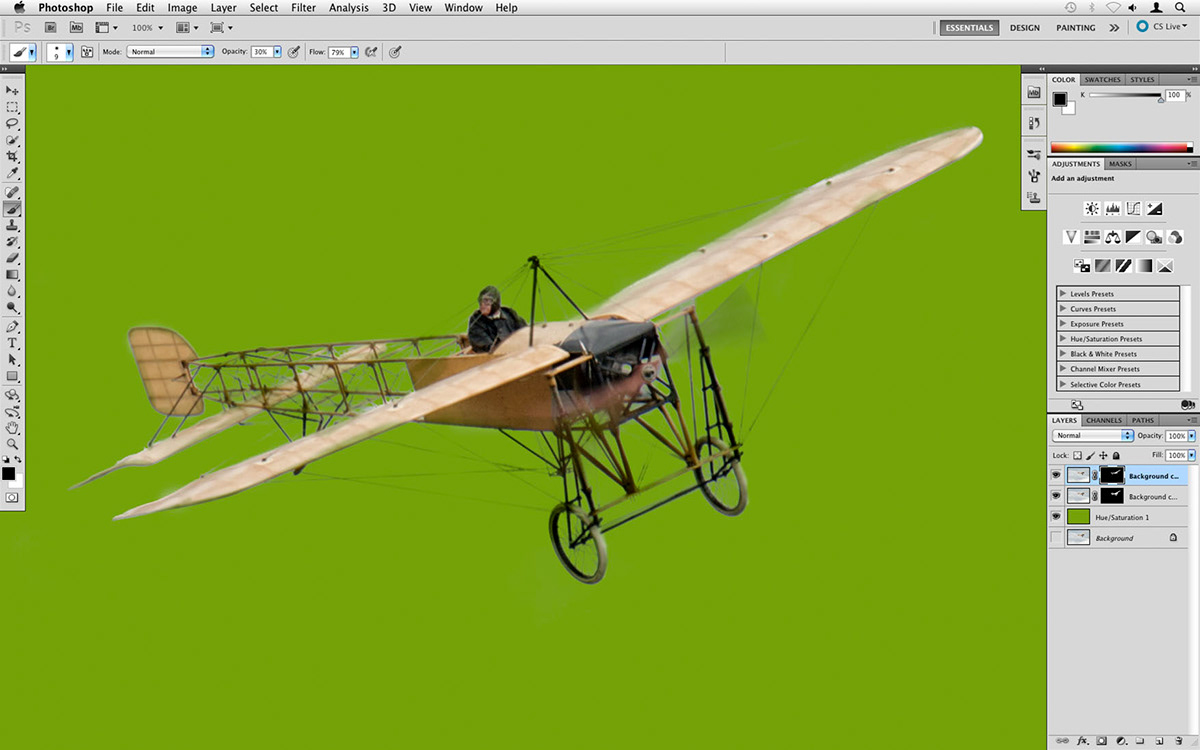
15. Paint Through Normal
With the new top Layer selected change its blending mode to Normal. Click on this layer’s Mask. Use a soft Brush and paint through the mask of the Normal layer to reveal the Multiplied layer. I brushed over the rigging. Working at differing Brush opacities I has able to create a convincing extraction of this venerable flying machine.

16. No Selections Required For This Cut-Out
There’s mistaken belief that composite images need to be made from cut-outs. With plain backgrounds blending modes can be used. Here Jonathan and Charlie were photographed against a black background. The composite was then stacked in Layers. From the bottom up: a blank layer, the landscape image, the portrait layer copied three times. The bottom two portrait layers were set to Screen; duplicating Screen helped define the hair. As Screen mode is semi-transparent a top normal mode was needed. On which, the black background was Quick Selected, Refine Edge was used then a Layer Mask made from this selection. Done!

