Statuesque - The Tutorial
Digital Photomanipulation Tutorial
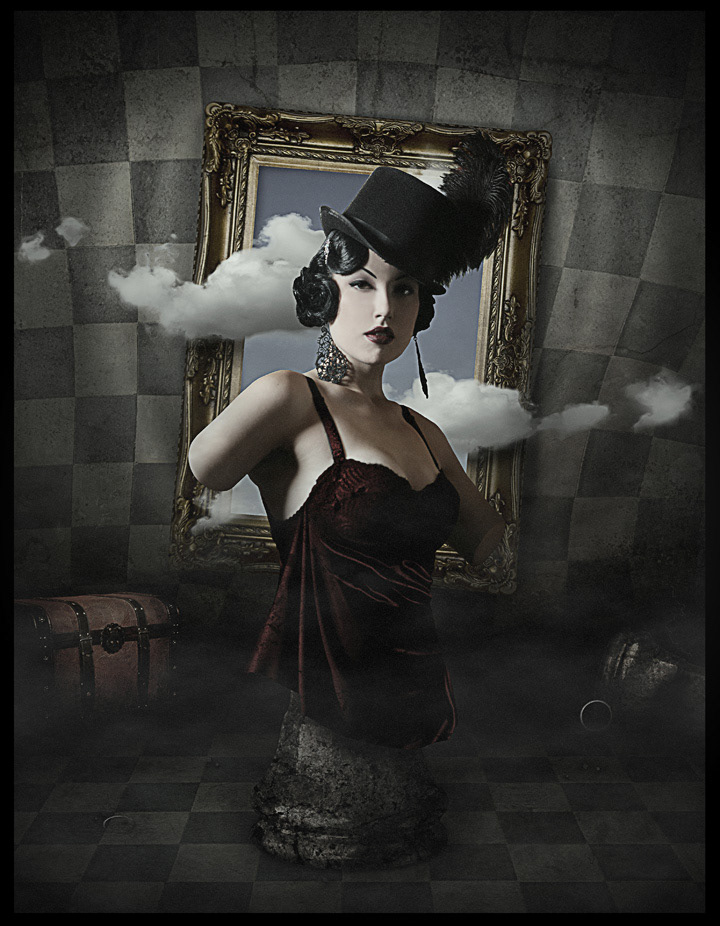
After creating the Stygian Statuesque photomanipulation, I thought it might be a good case study to share the methods for creating the composition within Photoshop. As a result, below you’ll find the tutorial of the steps I used to create this piece.
This tutorial uses a variety of different methods and filters that will be useful to any future photomanipulations you may create. Hope you enjoy it and good luck!
This tutorial uses a variety of different methods and filters that will be useful to any future photomanipulations you may create. Hope you enjoy it and good luck!
Source Elements
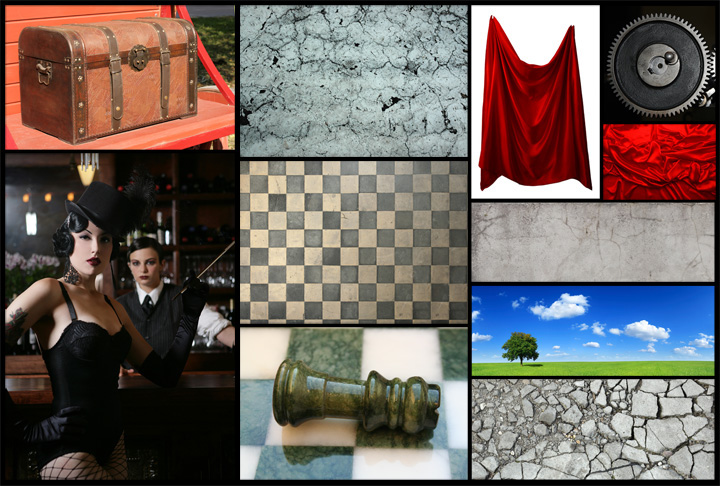
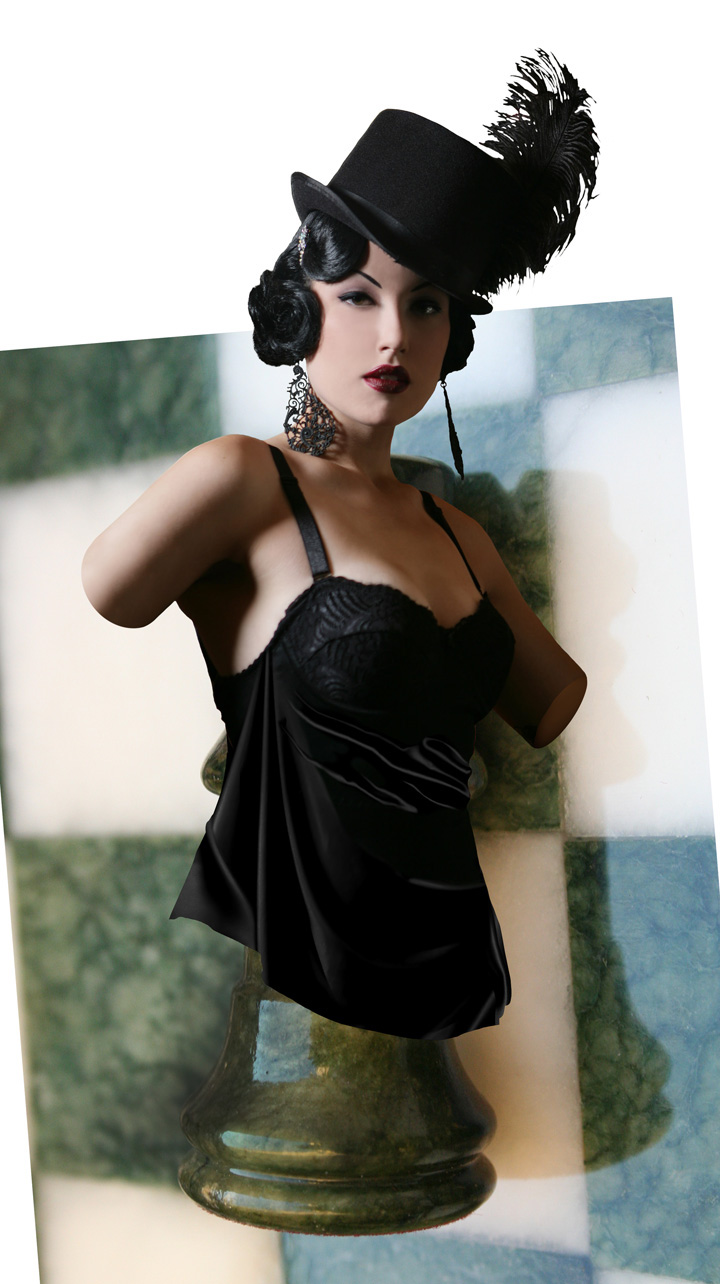
Firstly as a point of reference, shown here is a selection of the source images used to create the final composition
Firstly as a point of reference, shown here is a selection of the source images used to create the final composition
Step 1
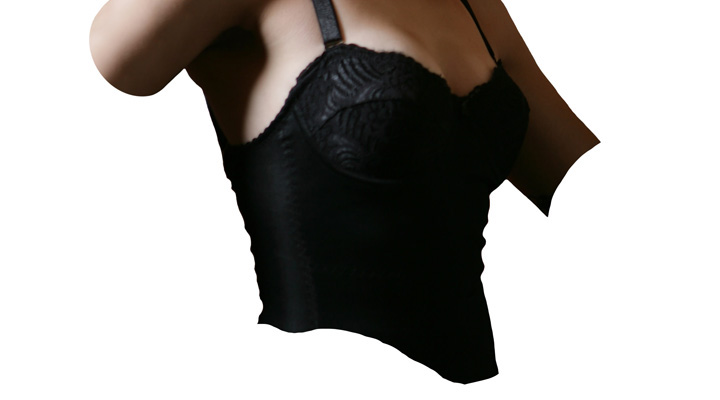
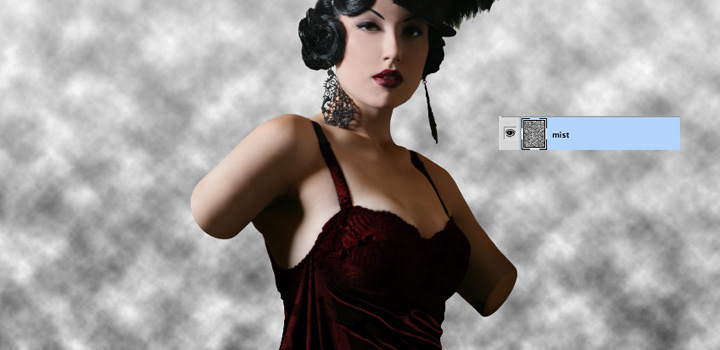
Starting with the original photo, available at http://www.photostogo.com, the initial task is to cut the woman from the background in the image.
Starting with the original photo, available at http://www.photostogo.com, the initial task is to cut the woman from the background in the image.
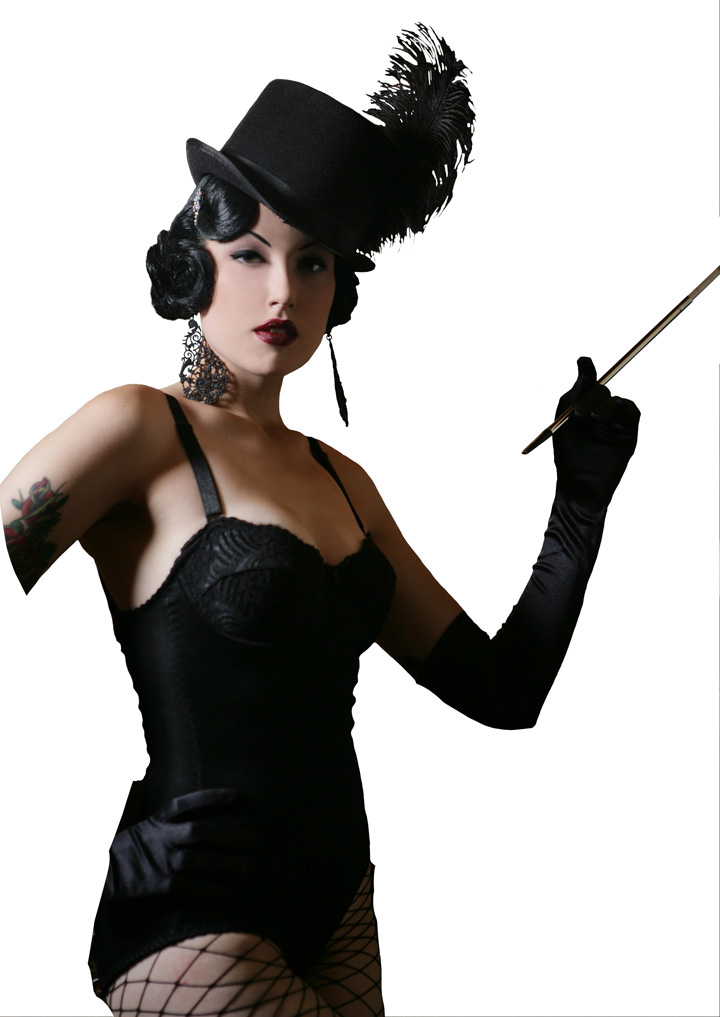
There are a number of ways to remove the woman from the background, however my personal approach is to add a layer mask to the image and then using a hard brush set to 100% opacity, paint out the background.
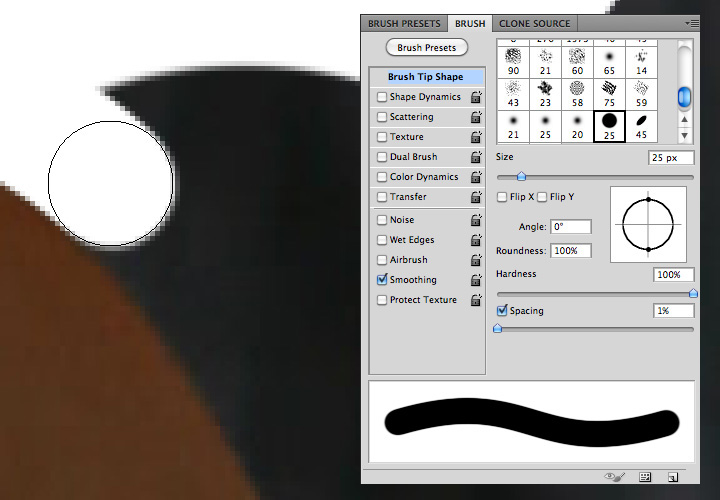
In any troublesome areas where the detail becomes too difficult to define where the outline is, I find the easiest approach is to use a ‘levels’ adjustment layer to either brighten or darken the image temporarily in order to accurately mask.

Step 2
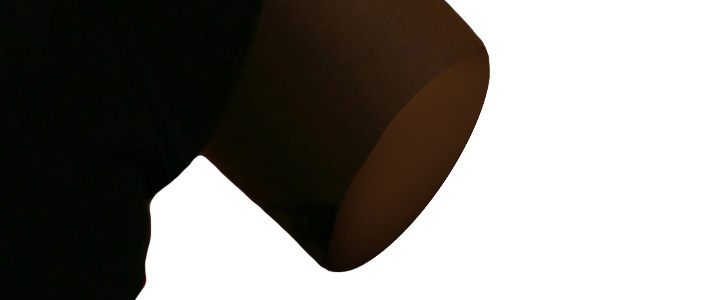
Once the woman has been isolated from the background of the original photo, the next step is to prepare her for the composition which is to be created. Firstly, she is resized using the Free Transform tool (apple + T / ctrl + T) and then moved to a more central location on the page. As the concept of the final composition is ‘Statuesque’, the body and forearms need to be masked to create a more typical statue-like feel. Selecting the same mask as before, use the hard brush to create curved ends to both arms, taking into account the correct angles depending on which direction the arms are pointing.
Once the woman has been isolated from the background of the original photo, the next step is to prepare her for the composition which is to be created. Firstly, she is resized using the Free Transform tool (apple + T / ctrl + T) and then moved to a more central location on the page. As the concept of the final composition is ‘Statuesque’, the body and forearms need to be masked to create a more typical statue-like feel. Selecting the same mask as before, use the hard brush to create curved ends to both arms, taking into account the correct angles depending on which direction the arms are pointing.
To create the end to the facing arm, create a new layer and using the elliptical marquee tool click and drag to create an oval selection. Using the clone stamp tool, paint within the selection, aiming to match the colouration of the arm as much as possible. Once this is done, use the burn and dodge tools to fine-tune the tones and shading to perfectly match the arm.
Step 3
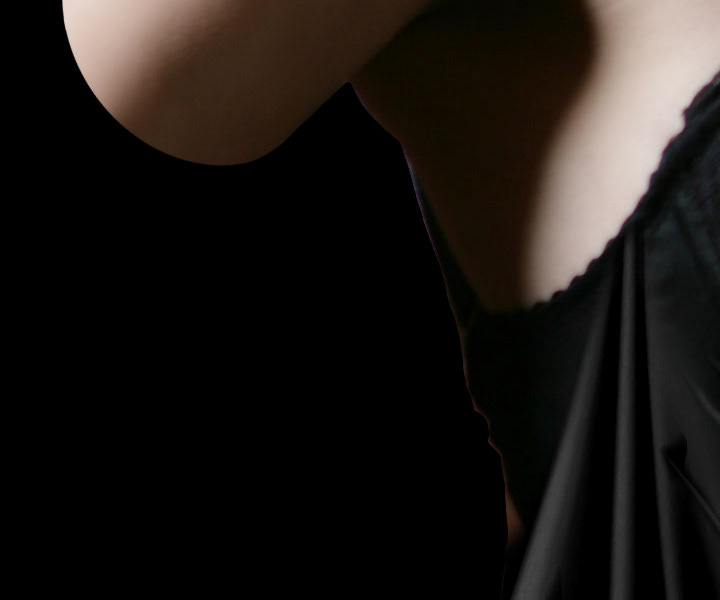
To improve the flow of the torso crop, I’ve added multiple fabric elements on separate layers to create a more balanced feel. There’s some great material textures for use at http://www.cgtextures.com, which is where the fabrics in this composition are from. The best way for adjusting the material to create the flow you are after is to use the Puppet Warp tool (Edit – Puppet Warp). Experiment until you are happy with the shapes, then mask the layers and use a soft brush at 100% opacity to blend them onto the existing torso material. Additionally, if you are using a coloured material, you may need to add Channel Mixer and Hue/Saturation adjustment layers to tie the colours together between your added fabric and the torso material.
To improve the flow of the torso crop, I’ve added multiple fabric elements on separate layers to create a more balanced feel. There’s some great material textures for use at http://www.cgtextures.com, which is where the fabrics in this composition are from. The best way for adjusting the material to create the flow you are after is to use the Puppet Warp tool (Edit – Puppet Warp). Experiment until you are happy with the shapes, then mask the layers and use a soft brush at 100% opacity to blend them onto the existing torso material. Additionally, if you are using a coloured material, you may need to add Channel Mixer and Hue/Saturation adjustment layers to tie the colours together between your added fabric and the torso material.

Step 4
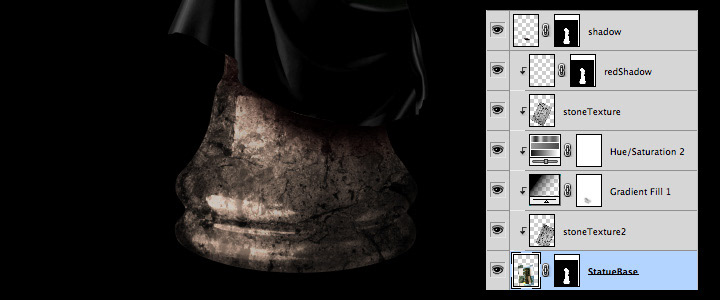
The next step is to create the base of the statue. Find a good base image to use here, maybe from a statue or column. I’ve used a marble chess piece image from http://www.photoxpress.com. Import your photo into photoshop and ensure that this layer sits below all the statue torso and material layers. Once placed, resize and rotate if necessary to find the right angle and position for the composition.
The next step is to create the base of the statue. Find a good base image to use here, maybe from a statue or column. I’ve used a marble chess piece image from http://www.photoxpress.com. Import your photo into photoshop and ensure that this layer sits below all the statue torso and material layers. Once placed, resize and rotate if necessary to find the right angle and position for the composition.
As with the woman’s torso, using a mask and a hard brush at 100%, paint out all the areas you don’t need of the statue base background. At this stage, it’s worth checking to make sure you have a fairly crisp edge to all elements. I always find it best to place a solid black and solid white temporary layer behind all other layers to see how the mask edges look on both a dark and light background. If there are any rough edges, go back to the masks and refine those edges.
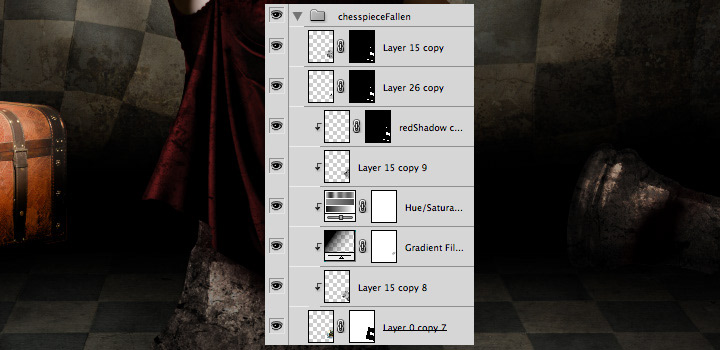
So as to give a stone texture to the statue base, I’ve added a selection of layer adjustments and textures. Firstly, I imported a stone texture (again from http://www.cgtextures.com) and set the layer mode to Soft Light at 100% opacity. On top of this a Gradient layer and a Hue/Saturation adjustment layer are added. The gradient fill colour is set from black to transparent with an angle of approximately 50 degrees. Once set, the layer mask can be brushed onto with a soft brush (set to 20% opacity) to slightly tweak the highlights and shadow left by the gradient. The Hue/Saturation levels can be adjusted until you have found a colour and saturation that you feel will match the mood of the composition. Create a duplicate of the stone texture layer and move it above the Gradient and Hue/Saturation layers, changing it’s layer mode to Colour Dodge at 50% opacity. The statue base should now be looking less polished and more textured. In order to make the statue base feel connected to the woman’s torso, add a new layer and using a soft brush (set to 20% opacity), paint black shadows onto the surface of the base under the fabric folds until you have a good blend. Repeat this process on a new layer using a dark red colour. To crop all these layers to only fit the statue base, select the layers in the layer palette then right-click and select ‘Create Clipping Mask’.
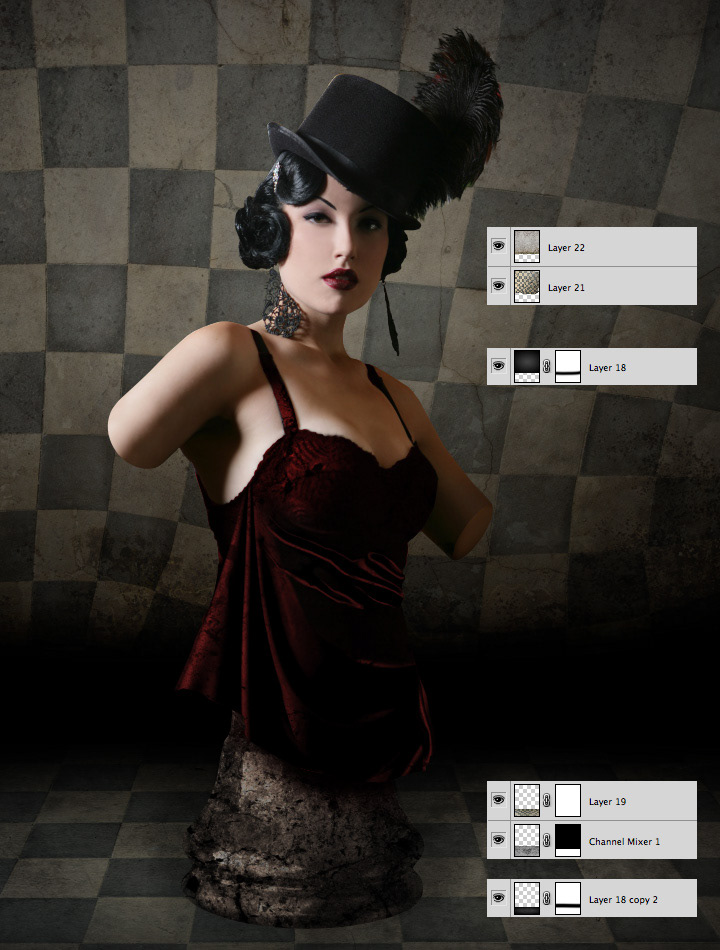
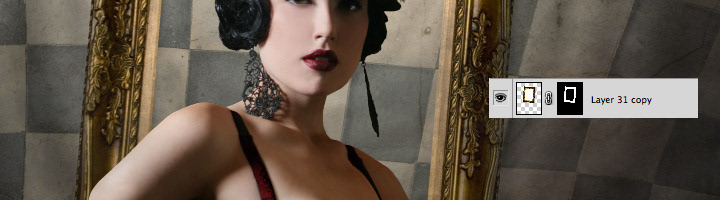
To add a bit more depth to the statue, I decided that the material should have some colour added. By adding a Channel Mixer adjustment layer to each of the fabric layers, tweak the colours to give an even base grey to all the fabric. Then add a Hue/Saturation adjustment layer and check the ‘Colourise’ box, sliding the hue and saturation sliders to create a deep red. Create a clipping mask for each adjustment to it’s respective layer. Duplicate the woman layer and using the hard brush set to 100% opacity, paint the mask to remove everything except the clothing around her torso. Repeat the Channel Mixer and Hue/Saturation adjustment layers as well as the Clipping Mask to match the colour on all other fabric layers. To tie all the fabric layers and the statue base together, add another stone texture above all these layers setting the layer mode to Multiply and the opacity to 100%. Mask this layer so only the fabric and statue base are affected. In preparation of the background for the next stages, choose a foreground colour of mid-grey and background colour of black. Select a ‘Foreground to Background’ radial gradient and create a wall (covering the top two-thirds of the composition) on one layer and a floor (covering the bottom third of the composition) on a separate layer, both below all the other layers except the solid black background.

Step 5
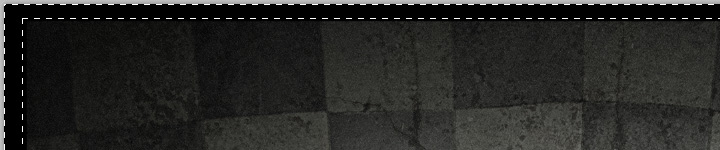
Find an image or texture that you would like to use on the floor and wall. In this composition I’ve chosen a tiled image and a cracked concrete image, both from http://www.cgtextures.com. I want to combine the two for both the floor and wall in this composition, so first import the tiled image in front of the background gradients and duplicate it, transforming and warping both layers individually until you are left with a wall and floor that are angled in the way you want. Change the layer modes on both the tiled image layers to Overlay. Repeat this process with the cracked concrete images on top of the tiled images and set their layer modes to Soft Light. If necessary, add layer masks and brush the edges to blend the wall and floor to a black vanishing point.
Find an image or texture that you would like to use on the floor and wall. In this composition I’ve chosen a tiled image and a cracked concrete image, both from http://www.cgtextures.com. I want to combine the two for both the floor and wall in this composition, so first import the tiled image in front of the background gradients and duplicate it, transforming and warping both layers individually until you are left with a wall and floor that are angled in the way you want. Change the layer modes on both the tiled image layers to Overlay. Repeat this process with the cracked concrete images on top of the tiled images and set their layer modes to Soft Light. If necessary, add layer masks and brush the edges to blend the wall and floor to a black vanishing point.
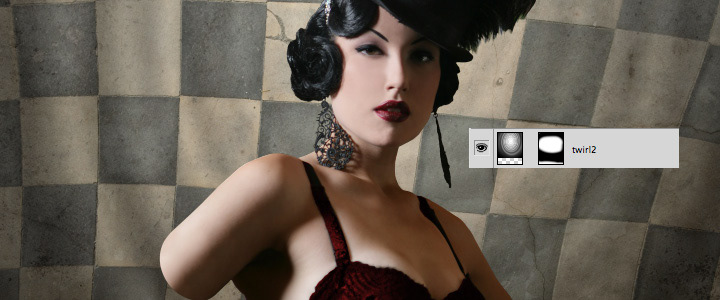
For the ripple on the wall, first create a new layer behind both the tiled and cracked concrete wall layers. Choose a foreground colour of white and background colour of black. Select a ‘Foreground to Background’ radial gradient and click and drag to apply it to the new layer. To create the ripple effect use the Twirl filter (Filter – Distort – Twirl), then shift the layer mode to Difference with layer opacity set to 50%. If there is a hard edge visible, mask the layer and paint the edges of the mask with a large soft brush.
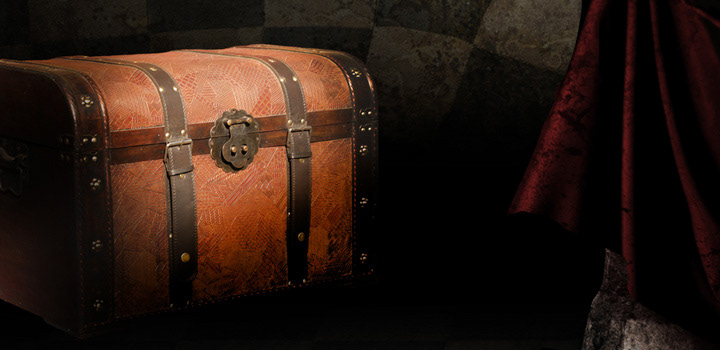
Now that the composition is beginning to take shape, it’s time to start introducing some background elements to add depth to the scene. The first of these is a trunk/chest found at www.photoxpress.com. After importing the image, use the methods described before to mask the chest from it’s background then place it at the left of the composition, taking a guide to placement from the floor and wall angles.
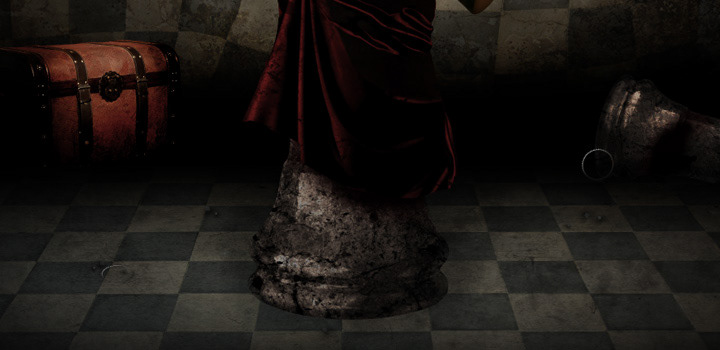
Duplicate the statue base layers, then rotate and resize using the Free Transform tool (apple + T / ctrl + T) and place on the opposite side of the composition to the chest. Select the Burn Tool and use this with a soft brush (30% Opacity) individually across the ranges of Shadows, Midtones and Highlights on the chess piece layer aiming to blend the fallen statue into the shadows.
Focusing back on the chest layer, add three adjustment layers (Brightness/Contrast, Hue/Saturation and Levels) and use clipping masks to tie their effects to the chest layer only. Play around with the values in each of these adjustment layers to blend the chest into the shadows as well. Use the Burn Tool with the chest layer to further blend into the composition. In order to increase the depth of the scene, try adding subtle elements to the floor and/or wall to draw the viewers eye around the composition. As an example, I’ve added some old cogs and small pieces of broken concrete to the floor. For each element that’s added, re-visit the methods previously described to blend them into the composition as much as possible.
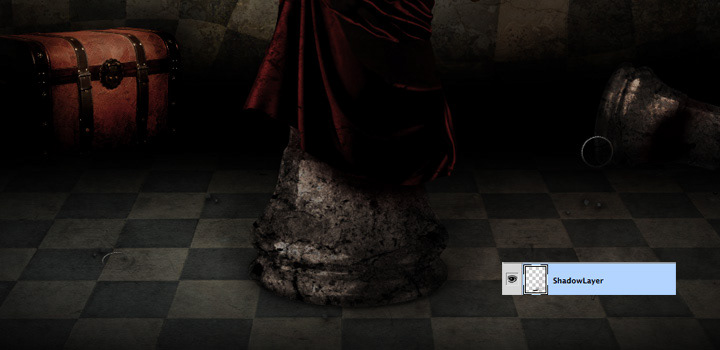
Looking at the composition, the statue base and chest still appear disconnected from the floor and wall as they don’t currently cast any shadows. To resolve this, add a new layer below all the statue base and chest layers with the layer mode set to Multiply. Select a soft brush with an opacity of 20% or 30% and ensuring your foreground colour is black, start to paint onto the new layer, building up the shadows below and around the statue as well as behind the chest. Aim to make the shadows as accurate to the composition light source as possible.
Step 6
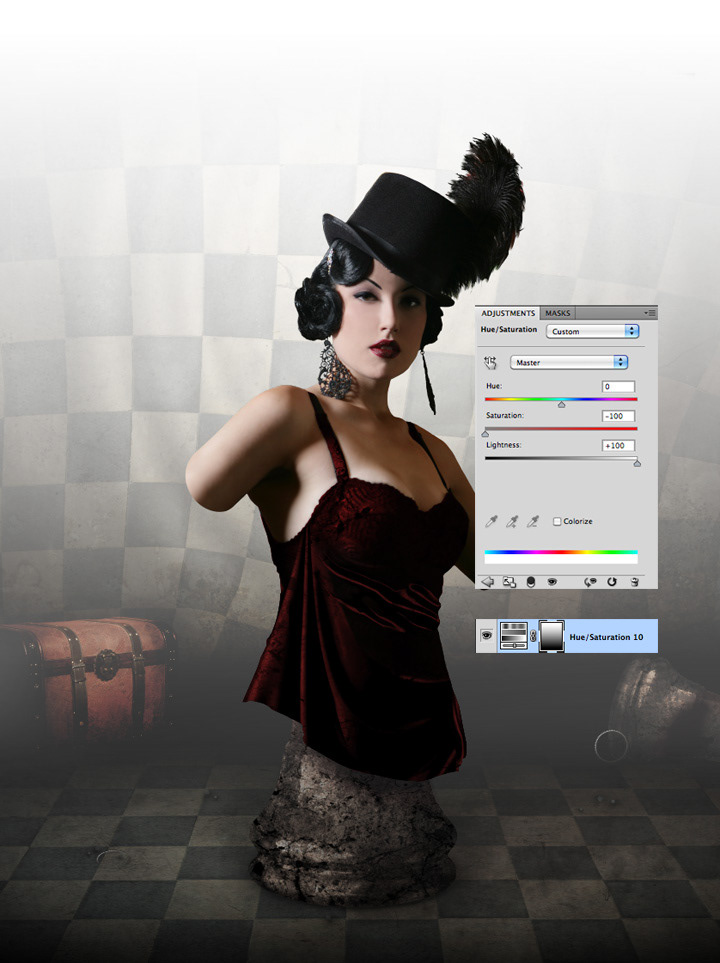
In this step, mist/fog will be introduced to subtly add to the atmosphere within the piece. Start by adding a Hue/Saturation adjustment layer below the statue base layers but above the chest and fallen statue layers. Set the Saturation to -100 and the Lightness to +100. Press D to set the foreground and background colours to default white and black, then select the adjustment layer mask and using the foreground to background linear gradient click and drag from the bottom of the composition to the top.
In this step, mist/fog will be introduced to subtly add to the atmosphere within the piece. Start by adding a Hue/Saturation adjustment layer below the statue base layers but above the chest and fallen statue layers. Set the Saturation to -100 and the Lightness to +100. Press D to set the foreground and background colours to default white and black, then select the adjustment layer mask and using the foreground to background linear gradient click and drag from the bottom of the composition to the top.
Add a layer below the Hue/Saturation layer and then render clouds to it (Filter – Render – Clouds).
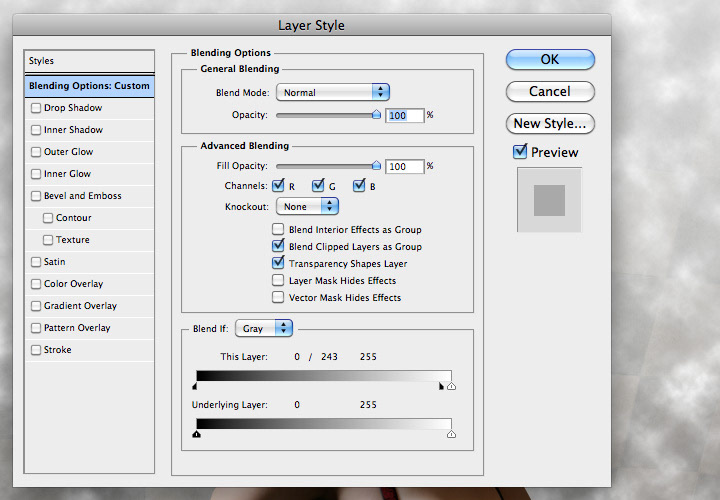
Right-click on the clouds layer in the layer palette and select ‘Blending Options’ from the drop-down menu. In the dialog window, to the right of ‘Blend If:’ make sure Grey is selected. Then on the ‘This Layer’ slider, alt-click the right-hand black handle and drag it almost all the way over to the right of the slider. Click OK to exit this dialog window.
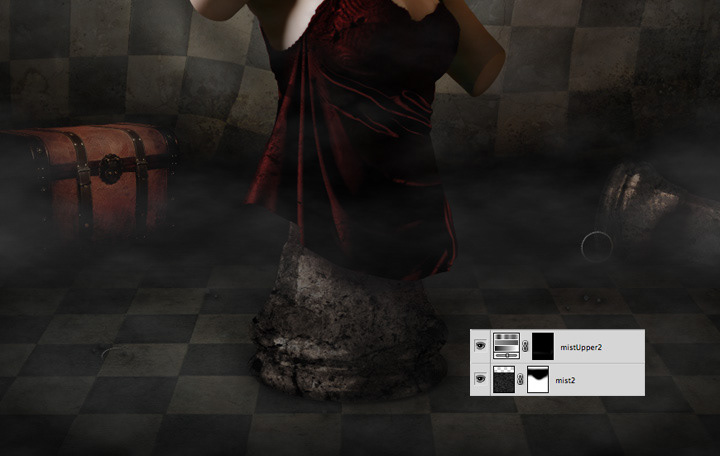
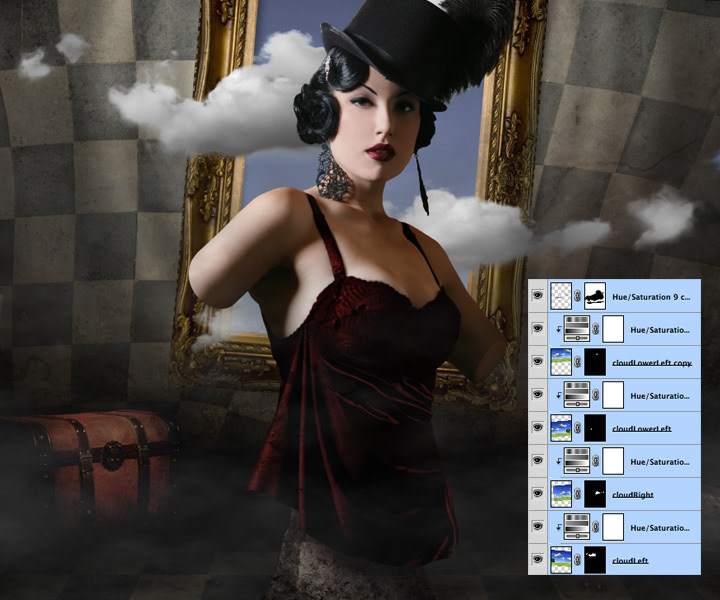
Add a mask to the clouds layer and using a soft brush set to 30% opacity, gradually paint out the clouds until you are left with a light scattering of mist floating around the floor and the background elements. Then using the same brush, repeat the process on the Hue/Saturation layer above.

On the layer palette, select both the mist layer and Hue/Saturation layer and duplicate them both. Move them up in the layer palette until they are above the statue layers. Once again using the soft brush and/or soft eraser, add or remove parts of the mask to alter the mist so it appears to float around the statue.
Step 7
Now that the floor of the composition is starting to take shape, it needs to be balanced by incorporating some depth to the wall behind the statue. For this, I used a frame image from http://www.photoxpress.com, imported and placed behind all the statue layers in the layer palette. Play around with the rotation and scale of the frame using the Free Transform tool (apple + t / ctrl + t).
Now that the floor of the composition is starting to take shape, it needs to be balanced by incorporating some depth to the wall behind the statue. For this, I used a frame image from http://www.photoxpress.com, imported and placed behind all the statue layers in the layer palette. Play around with the rotation and scale of the frame using the Free Transform tool (apple + t / ctrl + t).
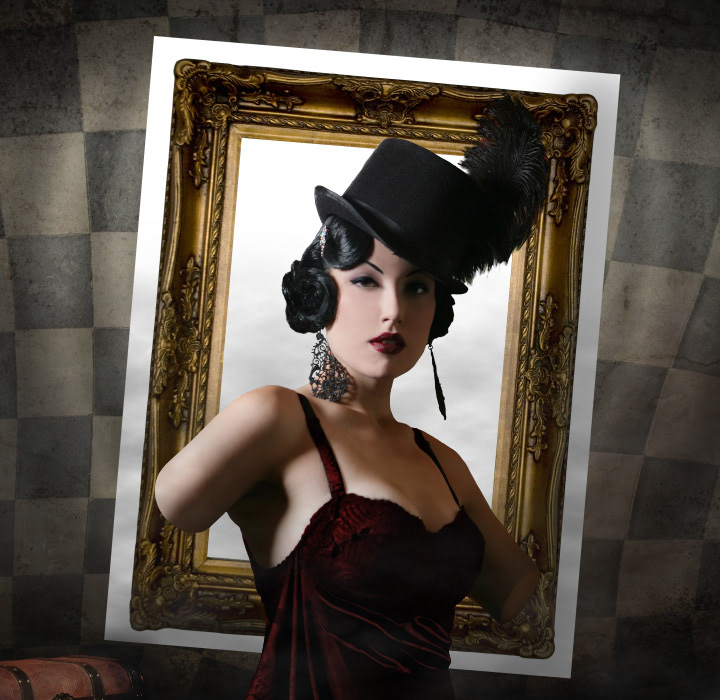
Using the same masking methods as before, remove the background from the frame, leaving only the frame itself. Add a layer below and using a soft brush at 20% opacity, paint shadows behind the frame onto the wall, matching the light source.
Next, find a landscape image making sure that it has a clear sky with a few substantial clouds in it. The one I’ve used comes from http://www.istockphoto.com. Add the image layer behind the frame and frame shadow layers, then apply a Hue/Saturation adjustment layer, setting the values so that the tones are matched to the rest of the composition. Right-click on this layer in the layer palette and ‘Create Clipping Mask’.
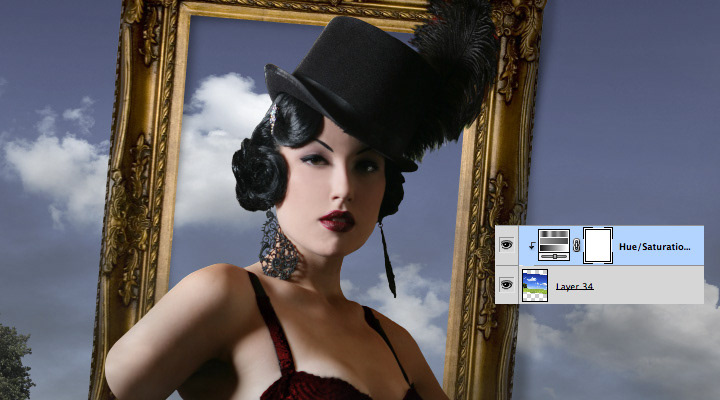
Mask the sky image so only the clouds and sky appear within the frame.
To bring the content of the frame into the composition, we’re going to make the clouds appear to float out of the frame and into the room. To do this, duplicate the sky image and Hue/Saturation adjustment layer. Move these above the frame layer and using a soft brush and/or soft eraser, add or remove parts of the mask until you are left with a cloud extending out into the room from the frame. Repeat this process as necessary, depending on how many clouds you have in your image.
On top of the frame add another layer and using a soft brush set to 20% opacity, build up black shadows on the frame beneath the clouds.

Step 8
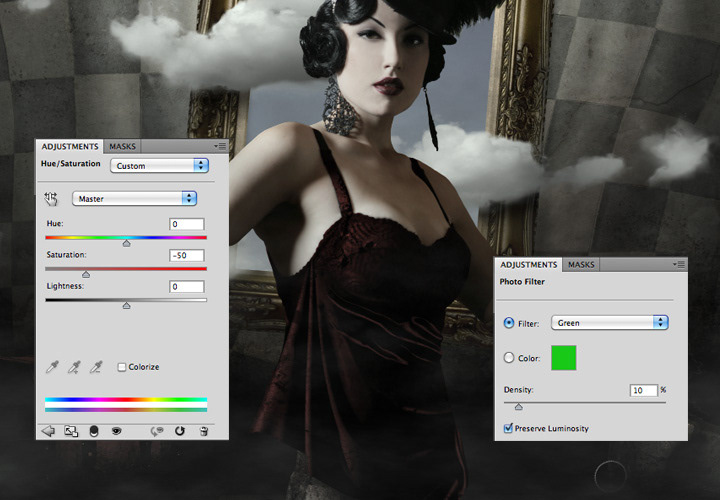
Now that all the elements of the composition are in place, it’s time to adjust and regulate the colouration and tones. Above all the layers, add a Hue/Saturation and Photo Filter adjustment layer. On the Hue/Saturation layer, slide the saturation value to -50. On the Photo Filter layer, select a green filter and adjust the Density to 10% ensuring that the ‘Preserve Luminosity’ checkbox is ticked.
Now that all the elements of the composition are in place, it’s time to adjust and regulate the colouration and tones. Above all the layers, add a Hue/Saturation and Photo Filter adjustment layer. On the Hue/Saturation layer, slide the saturation value to -50. On the Photo Filter layer, select a green filter and adjust the Density to 10% ensuring that the ‘Preserve Luminosity’ checkbox is ticked.
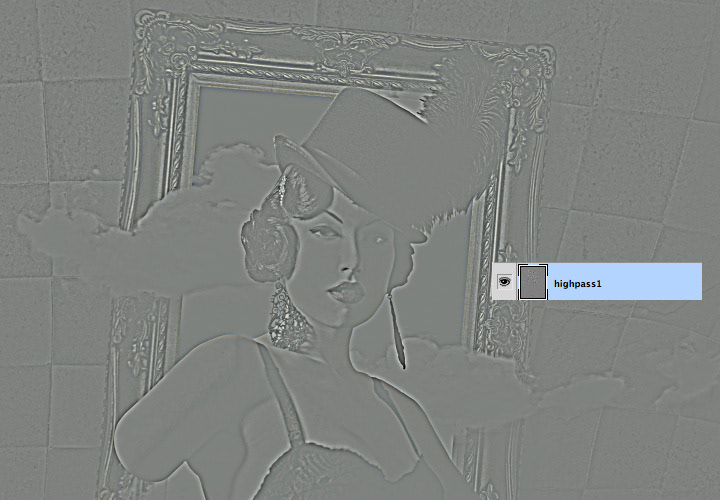
In the layer palette, select every layer below these two new adjustments then merge them together (apple + E / ctrl + E). With this single layer selected, apply a High Pass filter, adjusting the slider to pick out the main contours and details in the composition (Filter – Other – High Pass).
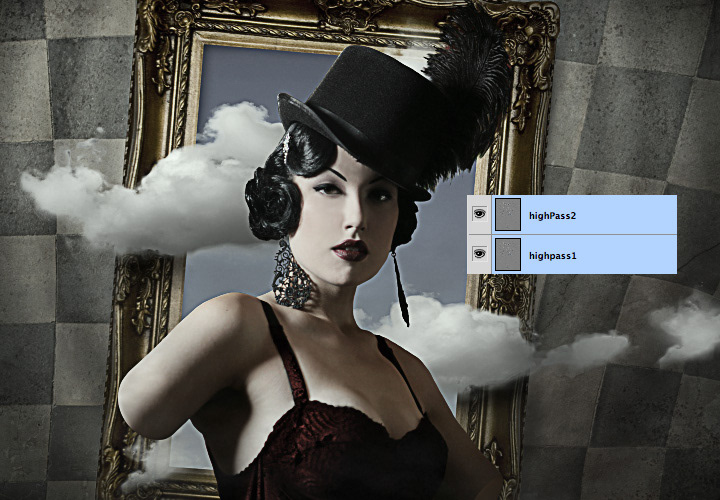
Change the layer mode to ‘Overlay’, then duplicate this layer. On the new High Pass duplicate, alter the layer mode to ‘Soft Light’.
Step 9
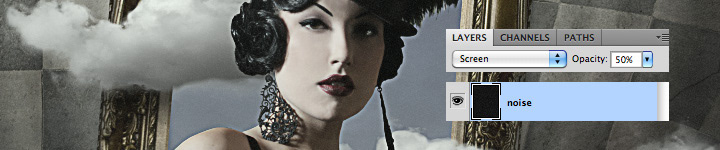
To add some graininess and texture to the composition, add a new layer above the two High Pass layers. Fill the entire layer with solid black, then add noise to the black (Filter – Noise – Add Noise). In the dialog window, select how much noise you’d like to use, I’ve chosen 20% with Gaussian Distribution and ticked the ‘Monochromatic’ checkbox. Press ‘OK’ to apply the noise, then adjust the levels so the noise becomes a subtle grey (apple + L / ctrl + L).
To add some graininess and texture to the composition, add a new layer above the two High Pass layers. Fill the entire layer with solid black, then add noise to the black (Filter – Noise – Add Noise). In the dialog window, select how much noise you’d like to use, I’ve chosen 20% with Gaussian Distribution and ticked the ‘Monochromatic’ checkbox. Press ‘OK’ to apply the noise, then adjust the levels so the noise becomes a subtle grey (apple + L / ctrl + L).

Adjust layer mode to ‘Screen’ with an opacity of 50%
Step 10
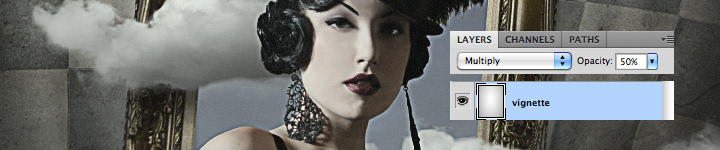
Adding a subtle vignette will help to gradually blend through the tones in the composition. Start by adding a new layer and choose a foreground colour of white and background colour of mid-grey. Select a ‘Foreground to Background’ radial gradient and click and drag from the centre of the layer outwards to the edge.
Adding a subtle vignette will help to gradually blend through the tones in the composition. Start by adding a new layer and choose a foreground colour of white and background colour of mid-grey. Select a ‘Foreground to Background’ radial gradient and click and drag from the centre of the layer outwards to the edge.

On the layer palette, change the layer mode to ‘Multiply’.
Step 11
As a final step to enclose the composition as a whole, add a black border. Above all other layers, add one final layer and fill with solid black. Select the Rectangular Marquee tool (M) and click and drag so there is a thin border outside the marquee. Invert the selection (shift + apple + I / shift + ctrl + I) and then add a layer mask in the layer palette.
As a final step to enclose the composition as a whole, add a black border. Above all other layers, add one final layer and fill with solid black. Select the Rectangular Marquee tool (M) and click and drag so there is a thin border outside the marquee. Invert the selection (shift + apple + I / shift + ctrl + I) and then add a layer mask in the layer palette.
Final Composition
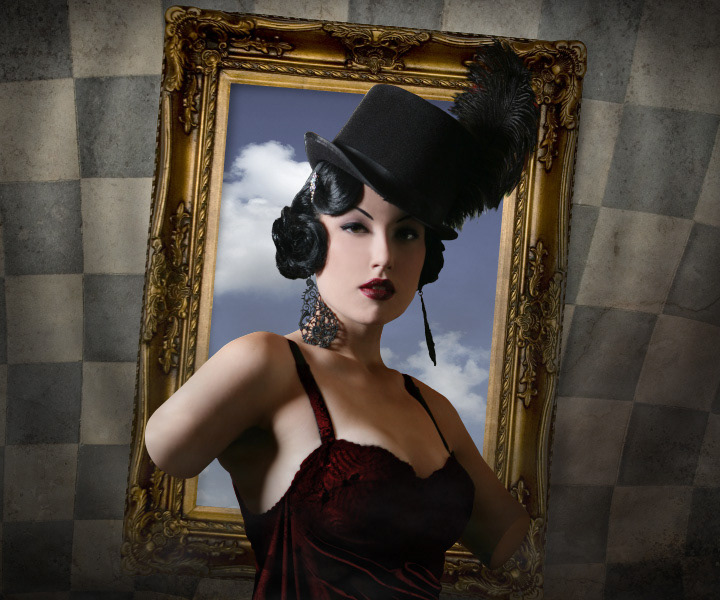
You should now have a completed photomanipulation that looks something like this!
You should now have a completed photomanipulation that looks something like this!
If you’ve enjoyed following this tutorial, or have suggestions of any areas I may need to elaborate, please do leave me a comment or get in touch.
Ish

