My Experience with 3D Modelling and Blender
Blender is a free 3D modelling program that can be used to make 3D assets, characters, scenes, animations and more. For this project I wanted to make a spooky abandoned house with Jack'o'Lanterns.
I haven't had much experience with 3D modelling, the only work I'd done previously to this project was a beginner tutorial series where you learn to 3D render a doughnut from BlenderGuru on Youtube. Below I have linked the beginning video for the series as I found it a very new and exciting experience, as well as some renders of the doughnut I made.

The doughnut with no texture, completley smooth.

The doughnut without the icing, to show the heart-shaped sprinkles and the texture and colour I hand-painted on.

The final doughnut product. While the sprinkles look like they're floating a little bit, and aren't quite sitting flat on the doughnut, I'm still really proud of the final product I created.
This is the specific tutorial I followed for this project, which is an indermediate-to-expert level tutorial. The project in total has taken me roughly 50 hours (or more) total to 3D model the house, add materials and texture, colour, add lighting and animate the candle flickering.
Before showing my final piece, here are some links that I found tremendously helpful for this project, as well as the rough work-flow I followed.
Links
The Secret Ingredient to Photorealism - https://www.youtube.com/watch?v=m9AT7H4GGrA&t=268s
Navigating the 3D Viewport - https://www.youtube.com/watch?v=8D9XXYikauc&t=553ss
Texture Painting - https://www.youtube.com/watch?v=nht2RoYBUfA&t=591s
Texture and Displacement - https://www.youtube.com/watch?v=rKPSB8tcXhQ&t=268s
Using the Knife Tool - https://www.youtube.com/watch?v=0I-4a1q0YLE&t=50s
Making a 3D Pumpkin - https://www.youtube.com/watch?v=ktYNcyKLUZw
Using the Ivy Generator - https://www.youtube.com/watch?v=OpBrg1iZEY0&t=131s
How to Animate 3D Candles - https://www.youtube.com/watch?v=Ogx72yZgPqA
How to Animate 3D Candles - https://www.youtube.com/watch?v=Ogx72yZgPqA
Adding A Light Flicker - https://www.youtube.com/watch?v=Yn5UzxWUVzo&t=224s
Simple Animation in Blender - https://www.youtube.com/watch?v=YBAEW6GPjX4&t=73s
Blender – Rendering an Animation - https://www.youtube.com/watch?v=LPbUuMs2i20
How to Save an Animation in Blender - https://www.wikihow.com/Save-an-Animation-in-Blender
Steps
Modelling The House
As this tutorial video was intermediate/advance level, only the first 4 minutes are about modelling the actual house structure. Because of this, I spent a lot of time playing the video in 0.25x speed so I could see what steps Andrew (BlenderGuru) was taking, including what keyboard shortcuts he was using, what tools, and what modifiers and settings he was using. The first four minutes took me roughly 10-15 hours to complete, both because I am new to 3D modelling and because I am very particular about how things look, I had to redo the same part until it looked just right. Adding the windows and doors alone took me two or more hours.
Roughing The House
The next two minutes of the video were about making the house look more abandoned. This meant warping and separating the siding on the house, making the windows look broken and boarding them up, and making the house look generally wonky and decrepit. This took me probably another 5 hours, as I found making the sideboard and roof lumpy particularly difficult.
Texture Mapping
The rest of the video was about adding texture, colour and detail to the house. This was by far the most difficult task and the task that took the longest, especially as it required prior knowledge I didn't have and was learning on the fly. I had to add materials to everything I had created, and then add texture masks and texture paint. It was interesting to see how many changes and adjustments and links you have to make between all the settings to get them all to run into each other to create the look of peeling paint, moss growing and water dripping. The sideboard was easier than the rest as he went more in depth with that area, the rest I had to figure out on my own. I struggled most with the foundation as I found at some point I had subdivided (adding more verticies and separating the sections), meaning the texture didn't apply well, it faced different directions and was different sizes.
Decorations
At this point the house and textures were done (I made a floor and walls to create an environment around my house using planes with textures), but I still needed to make pumpkins, carve them, and stick candles in them. I made the base shape of the pumpkin and then used the video to figure out how to carve them (you use a knife, just like real life!). Then I created some candles and base flame designs, and put the candles inside the pumpkins.
Lighting
Before doing anything else, I switched to the rendered view to add some lighting to my environment. I used an area light to work as the moon and stars with a dim, pale blue effect. I also wanted to create the illusion that something was happening behind the house, so I used a bright, bluer light to create a glow behind the corners of the house. I added some ambient lighting inside the pumpkins because even though they would have candles lighting them, I wanted some spookier, coloured lighting. I also added a light inside the house just to help illuminate the inside enough to really get the effect of the boarded-up windows.
Animation
Finally I was able to move onto animating the candles. I wanted to give the candle light a flickering effect because even though they were tiny and hidden inside the pumpkins, having them flicker would really sell the 3D animation effect. This was a lot easier than I thought, I simply had to add a modifier and a few key frames.
The Finals


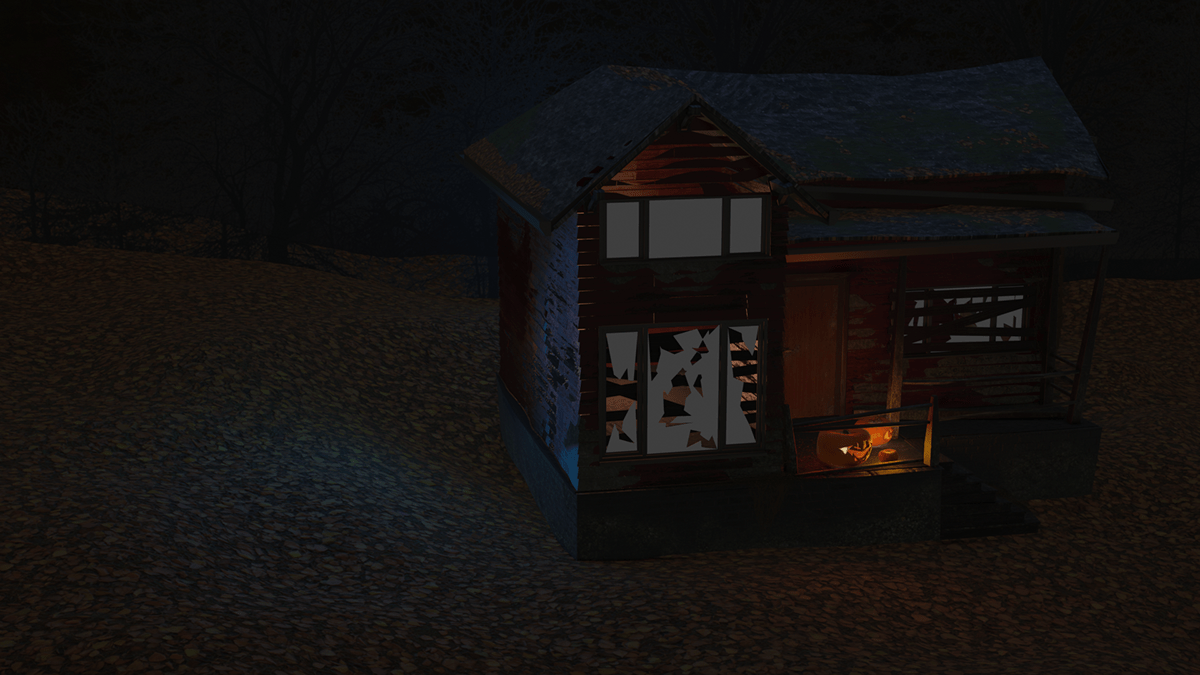


I'm very proud of how this project has turned out, especially considering I didn't have any previous experience and was learning on the go.
Some things I am immensly proud of;
The Pumpkins - They all have their own personality.
The candles - I like how while being very simple, they're still quite realistic in their waxy-reflective nature. The flames and their flickering are also very exciting for me as I hadn't originally planned on making them actually move and flicker.
The Porch - I like the way I did the railings and posts, and tried to make them look like mossy wood.
Something else I was told was that it looks like an asset from Dead by Daylight, a horror video game, which made me swell with pride as this was the vibe I was going for as it's one of my favourite video games.
Some things I struggled with in particular;
Applying array modifier on the house to create the siding - it would apply normally until it reached the top of the wall, where it would meet the roof. After restarting the project 6 times in case I was doing something wrong, I decided to move on and do my best to fix it later down the line - while I managed to make it look like the wood has been damaged and it suits the vibe, I want to continue working on this to see if I can fix this with more experience. Along with this came some strange texture stretching where it doesn't have the texture 'pattern' and instead has a strange streched line look.
The windows - I didn't know how to make the windows of the render reflect anything, instead they simply show grey. I tried putting walls with texture in front of them to see if it would reflect this, alas it did not. This means the final renders have the glass windows simply grey instead of reflective. This can be improved with further research, exerimenting, time and experience.
The vines - they look like squiggles, and they could look more like ivy vines in the future.
The environment - this stuggle came more from me wanting to expand the little world I was creating, and my desire to make everything perfect. I had to find a stopping point somewhere, and decided a vague background would do for now. My problem here is that it looks quite empty and the ground, made of piles of fallen leaves, look very flat. Displacement and bump could help in the future, but as a beginner I am allowing myself this fault.
A special thanks to those on Poliigon that upload textures for others to use, you legends shortened this projects creation time by hours, days, maybe even weeks.

