

UI Series
Quick Reference Guide
Version 2.0, Updated Feb 2024 using Octane 2023.1.2 and Cinema 4D 2024.2
About This Guide
This is a complete rewrite of the previous quick reference guide.
Now that there are 30+ other guides that cover topics in detail, this one has been drastically condensed to become a true quick reference. Each topic is confined to a single page of the PDF to make sure only the most important information that we’d want to access quickly is there and easy to find.
Links to relevant deeper dive guides are found on each page.
PDF
The Live Viewer
The Live Viewer is where we interact with Octane 95+% of the time. It can (and probably should) be docked in the interface somewhere.

The render area is similar to a C4D viewport - we can navigate around, drop materials on objects, pick focus, and a few other things. We can right click in the render area and get even more options.
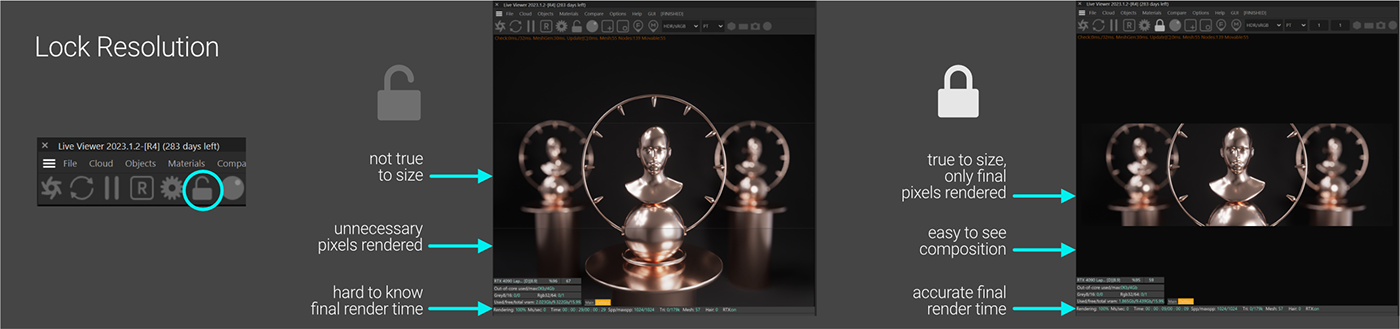
The command bar has some controls that start and stop the render, get us to the Octane Settings, and lets us pick focus and materials. The Lock Resolution button should pretty much always be on - this shows the render at 1:1 size and blacks out the area that doesn’t render in the final frame, allowing us to get a good sense of the composition and estimate our render times better.

The menu is where we find all the lights, cameras, materials and other objects, as well as A/B comparison controls and a few other nifty things. Using the File menu, we can directly save renders or sequences without having to use C4D’s Picture Viewer (make sure Lock Resolution is ON before doing this). This is incredibly useful and often gives better results if we’re working with non-standard color management settings. The settings here should be fairly self explanatory. There are also options to save render passes as EXR or PSD after we set up AOVs in the C4D Settings.
Environments
Environments create both overall scene lighting and things to reflect in our shiny materials. Octane needs an Environment to render anything. If no Environment has been added to the scene, it will revert to the Default Environment which is 90% white.
The Octane Environment object is a C4D Sky object with an Octane Environment tag on it. It currently comes in three configurations: Texture, HDRI, and UVW. These can be swapped between by clicking the little blue and green half circle icons in the Octane Environment tag’s Main tab.
Rotating the C4D sky object has no effect. Any rotation must be done within the Environment tag (using the Rot.X and Rot.Y controls). The Power control changes the intensity of the light the environment casts.

The Texture Environment has an RGB Spectrum node attached to it which produces a single color. We can change that color by clicking the little square preview.

The HDRI environment has an Image Texture node attached to it with the proper settings for an HDRI image. Good, free HDRI images can be found at Poly Haven).
Important: the HDRI image needs to go in the Image Texture node. Click the long bar that says ImageTexture to get into this node and drop the image in the File field. Do NOT replace the Image Texture node with an image file or anything else.
The UVW Environment is for textures like gradients or patterns. It allows the environment tag’s Rot.X and Rot.Y controls to work properly with these textures.
We can have one environment affecting the lighting and reflections, and another as a visible background by changing the type (Primary is lighting/reflections, Visible is the background).
The Octane Daylight rig creates an outdoor sun and sky simulation.
Physical Lights
Physical lights are directional light panels that we can move around to get better control over the lighting in a scene. The size, shape, and coordinates of the light is controlled in the C4D Light Object itself. The color, intensity, and other illumination properties are controlled in the Octane Light Tag.

Again, Octane needs an environment to render anything. If one isn’t added, it will use the default environment in the Octane Settings>Settings Tab>Env. Subtab. This is set to 90% white by default, so it affects the scene quite a bit. If we want absolute control of our lighting, we want to set this to black to turn it off so our physical lights are the only thing illuminating the scene, otherwise everything washes out.

An Area Light is an illuminated panel. Most of the light “types” in Octane are just a C4D Area Light object with an Octane Light tag set to different settings.
Temperature is the Kelvin number found on lights in hardware stores. Lower temps (2000-5000) go more yellowish and reddish, higher temps (7000+) go more blueish. 6500K is neutral white.
Texture affects the color and pattern on the light - similar to putting a gel or gobo over it. If we put an RGBSpectrum color in here, it colors the light in ways we can’t get with the Temperature controls. If we check “Use Color”, the light will take on the color in the C4D Light Object’s General tab. This will blend with the Temperature color, so if we do this, we always want the temperature at 6500K, or neutral white).
Distribution affects which portion of the panel is actually emitting light. Linear grayscale images or IES data files go in the distribution field to simulate realistic lights with different shaped glass lenses. An IES light is an area light that has the ImageTexture node already set up properly for IES textures which are based on real-world light fixtures. Leomoon Studios has some free IES textures to try.
The Volumetric Spotlight uses the C4D Spotlight object and adds a scattering environment in the cone to simulate fog in it. This takes a lot longer to render cleanly, but can produce some nice effects.
Materials
Materials control how light interacts with objects. Octane’s material system is a complete replacement for the C4D one, and therefore doesn’t build on standard C4D objects the way environments and lights do.

Materials are located in their own menu in the Live Viewer. There are a ton of different types, but currently the Universal Material is the best and most versatile one, and it replaces the legacy Diffuse, Glossy, Specular and Metallic materials. Layered and Composite materials are good for very complex situations, though the Universal Material can actually handle material layers if the material isn’t that complex.
The Autodesk Standard Surface material type was just introduced, and may overtake the Universal Material at some point, but for now Universal is still the way to go.
Materials can be edited in either C4D’s Material Editor (double-click the material or single-click and look in the Attributes Manager), or by going into Octane’s Node editor. Using the Material Editor is fine for easy edits like tweaking a color or specular value, but anything more complex is infinitely easier and just better using the Node Editor.

All materials are made up of channels which control specific properties of the material. Different material types support different channels, but the Universal Material has all of them (hence “universal”). Some channels override others (Metallic>Specular, for example), and some work in conjunction (IOR+Transmission).
Most channels have a 0-1 linear Float slider that determines how strong that channel’s effects are. The float slider is overridden by the Color Picker - ANYTHING other than 0/0/0 (black) in the color picker will override whatever float value is there. The Color Picker is overridden by the Texture field (drives the channel with an image or procedural texture), though there is a Mix slider that blends these two.
Camera
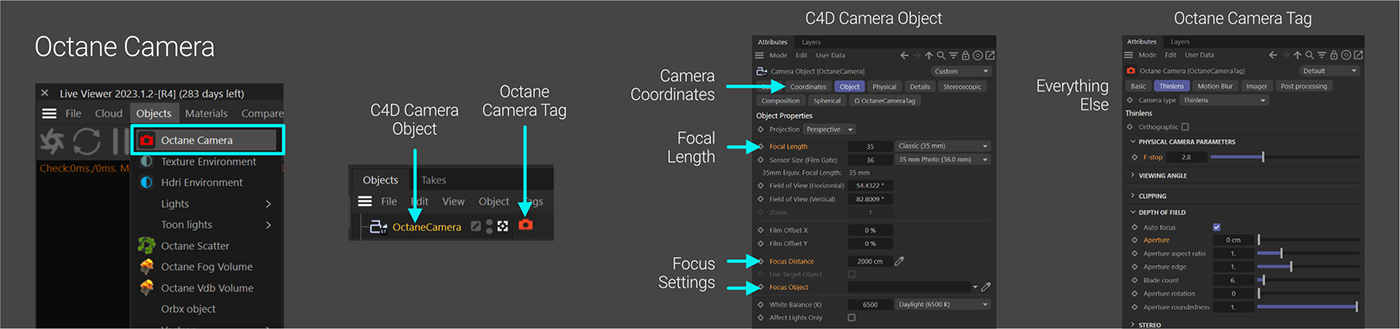
The Octane camera is a standard Cinema 4D Camera object with an Octane Camera tag on it. The C4D Camera object controls the position/scale/rotation in the Coordinates tab, and the focal length, focus distance, and focus object in the Object tab. Pretty much everything else of importance is in the Octane Camera Tag (DoF, motion blur, perspective settings, overrides for the Imager and Post Processing).
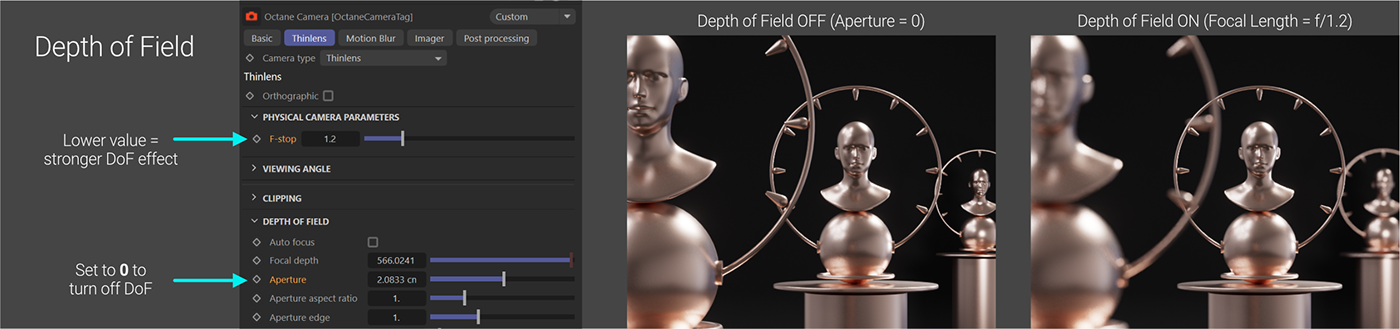
Depth of Field (DoF) is a pretty tricky concept, and Octane’s UI for it in C4D is a little quirky. The aperture value ultimately controls the Depth of Field effect (how blurry things are both in front of and behind the focal point). When this is set to 0, there is no blur. The larger this number, the more blur. This relates to the F-stop number which is more common in real world cameras where lower f-stop values mean more blur. The quirky part is that a new Octane camera defaults to f/2.8, but there’s no depth of field effect in the render. The f-stop should default to inf, which is what happens when we set the aperture to 0 manually. f/2.8 would normally give us an aperture value of 0.8929 cm, which is a fairly shallow depth of field. Once we mess with either the aperture or f-stop value, it works properly, it’s just confusing at first.

Once DoF is set up, we can set the focus either by going into Focus Picker mode (F icon in the Live Viewer) and clicking somewhere in the window, or going into the C4D Camera object’s attributes and either manually setting it or picking a focus object to track.
Other Octane Objects

Octane Scatter
Scatter is Octane’s native instancing system. It’s similar to the Cloner, and even uses C4D’s built-in effectors and fields, but has some advantages with larger systems. The Instances Deep Dive guide explains how and when to use Scatter over cloners and what kind of toll all of it takes on our hardware.
Octane Volume Object
Octane’s Volume Object either can import external volume data (VDBs), or generate simple fog and clouds. The VDB Volume, Fog Volume, and SDF are all the same object, just with different settings applied. Volumes appear in several places across Octane, including within materials and environments. It all works in similar ways, and takes some effort to get right. The Deep Dive guide does what it says and goes into how volumetrics in Octane work.
Vectron
Vectron is a way to create complex procedural geometry directly on the GPU using GLSL and OSL scripts. This tutorial has more on that

Octane Object Tag
This is the only Octane item not found in the Live Viewer. It’s in the Object Manager’s Tags menu under Extensions>C4Doctane Tags. This tag goes on an object and gives us controls for motion blur, compositing, subdivisions, and rendering particles or splines.
Settings
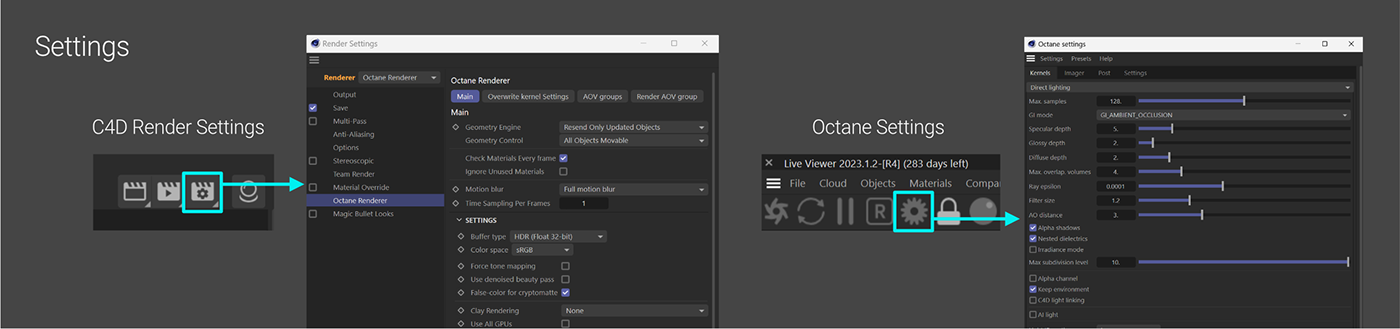
Settings for Octane are found both in C4D’s Render Settings (Ctl-B or Cmd-B), and in Octane’s Settings (Gear icon in the Live Viewer).
Octane Settings
This is mostly about things that affect the render engine itself - optimizing speed/quality for a scene (Kernels tab), color management and other image controls (Imager tab), Bloom/Glare/other post stuff (Post tab), and other odds and ends like UI controls, account settings, default environment, etc. (Settings tab). We can save our own Octane settings presets here using the Presets menu at the top. This can’t be summed up in a one-pager, so check the Kernel and Settings guide for more info.
C4D’s Render Settings
This is the area where we set our Output Settings (pixel dimensions, frame range, frame rate, stuff like that). These settings need to be set here regardless of how we’re saving our files (either directly out of Octane via the Live Viewer or via C4D’s Picture Viewer).
The Save section is where we’d set our path if we’re using the C4D Picture Viewer to render images. We don’t need it if we’re saving from the Live Viewer instead. Multi-pass will turn on if we enable AOVs.
Anti Aliasing, Options, Stereoscopic, Team Render, and Material Override are all for C4D’s built-in engines and are ignored here in Octaneland.
There’s also a section here called Octane Renderer on the left side below Material Override. This section has four tabs. The first two mainly deal with how Octane interacts with C4D when saving to the Picture Viewer. Main covers settings like network rendering, color management, motion blur, GPU usage, etc. Overwrite kernel settings does what it says. When this is enabled, it shows us all the kernel settings we see in the Octane Settings and uses those instead of the ones in the Octane Settings. This is useful if we want to build C4D presets with specific Octane settings. It doesn’t override Post and Imager settings, but those can be overridden in a Camera if we want.
The last two tabs handle AOVs (multi-pass rendering), both for exporting in the Picture Viewer and directly out of the Live Viewer.
Wrap Up
If you’re new to Octane and found this guide prior to the newly updated Getting Started with Octane in C4D guide, that would be a good place to go from here. Otherwise, there are 30+ other guides that are in the process of being updated for more recent versions of Octane that you can check out here.
Author Notes
OG012 Quick Reference Guide Version 2.0, Updated Feb 2024 using Octane 2023.1.2 and Cinema 4D 2024.2
Changes from 1.0: Full rewrite
This guide originally appeared on https://be.net/scottbenson and https://help.otoy.com/hc/en-us/articles/212549326-OctaneRender-for-CINEMA-4D-Cheatsheet
All rights reserved.
The written guide may be distributed freely and can be used for personal or professional training, but not modified or sold. The assets distributed within this guide are either generated specifically for this guide and released as cc0, or sourced from cc0 sites, so they may be used for any reason, personal or commercial.


