
The View from the Screen.
Software Used: Maya and Photoshop.
Size: 1920 x 1080 pixels
Size: 1920 x 1080 pixels
Date of Completion: Saturday, June 8, 2013.
Description: Another "lighting" work that I did in Maya 2013. I wanted to light this lovely, amazing and grand theatre set that was available for personal use at my academy, MAAC. It is a stock model and I don't know the person(s) who modelled it, but a huge credit to the one(s) for this brilliant model.
I am a movie-buff and I just love watching animation movies especially, and therefore why not light up this theatre set as a tribute to the global film industry and my favourite Pixar Animation Studio, my greatest inspiration!
I had to do some major adjustments with the shaders used in the set. So I changed the shaders and colours for the objects in the set and fine tuned them to match the "mood" of my lighting. All the shaders used are from within maya and only one texture was used which was for the screen, courtesy of Google Images and copyrighted to Pixar Animation Studios. I'm sorry Pixar, for using your logo, I just couldn't resist.
Well now lets talk about the lighting of this set. I used one area light for the light coming from the screen, one spot light for the light coming from the projector, one area light for the fill light, another area light for the bounce light, four point lights for each of the "exit" signs in the set, and two more area lights for a subtle "rim" on the staircase leading up to the upper level of rows. I also used a volume primitive(cone) to emulate the fog and rays coming from the projector.

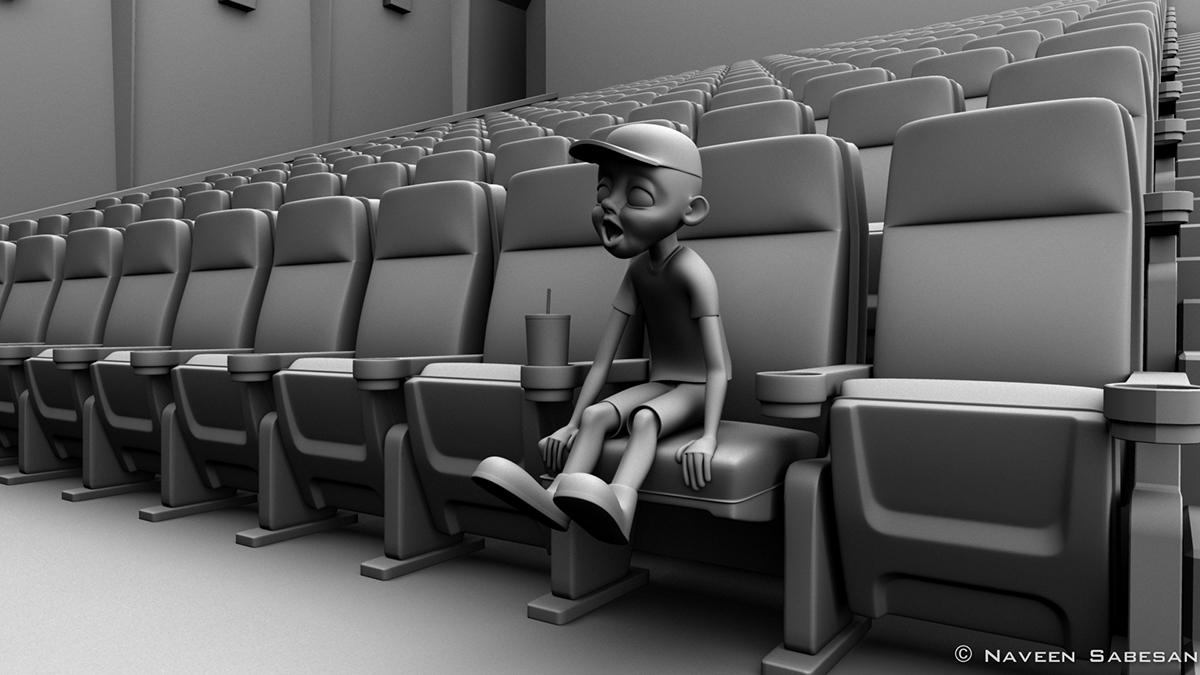
The Lone Movie Buff.
And for the character, I used one spot light for the key light to emulate light coming from the screen and one tiny area light for the hotspot/specular on his eyes. I "light-linked" these two lights only for the character and the soda can next to him.

The View from the Projector.
For the screen, I used a lambert shader with a texture of Pixar's Logo, gave it some ambience, plugged the texture file back into the incandescence node and I also added some glow to the shader. The shaders for the exit signs were given subtle incandescence and glow too.
Finally for the render, I once again used passes for each light(diffuseNoShadow, specularNoShadow, shadow), the screen(incandescence) and the volume primitive by creating contribution maps in the masterLayer. I created another layer for the ambient occlusion pass. It took almost an hour to render each of the images. No "finalGather" or "Global Illumination" was used.
I composited the passes for each camera angle in Adobe Photoshop. Added a fake depth of field in two of the renders. I also enhanced the fog from the projector, added a lens flare for the first image as I was unable to do them in Maya for some reason. I did some colour correction and then arrived at these results.
Here are the screenshots of the light setup for the renders.

Light Setup: The View from the Screen.

Light Setup: The Lone Movie Buff.

Light Setup: The View from the Projector.
And finally here are the ambient occlusion passes.

Ambient Occlusion Pass: The View from the Screen.
Ambient Occlusion Pass: The Lone Movie Buff.

Ambient Occlusion Pass: The View from the projector.
Your feedback and suggestions are always welcome :)
PS: I really hope Pixar doesn't sue me!
PS: I really hope Pixar doesn't sue me!


