
Всем привет. Меня зовут Рябов Алексей. В этой статье расскажу о процессе создания работы “Audi R18”. Как вы, возможно, знаете, эта модель болида для моего более крупного проекта “6 HOURS OF BAHRAIN”. Это первый по счету Making of из этой серии. Думаю, позже я сделаю еще несколько. Ну а пока Audi.
Hello everyone. My name is Alexey Ryabov. In this article, I will walk you through the process of creating an “Audi R18” project. As you may know, this car is for my larger project “6 HOURS OF BAHRAIN”. This is the first Making of in this series. I think I'll do a few more later. Until then, Audi.


00 History

Всё началось в 2016 году, с человека по имени Марек, который увидел мою модель Mercedes-Benz g63 amg 6x6 и предложил её купить. Я согласился. К тому же, на тот момент я был без работы. После этого, он предложил сделать для него еще авто на выбор.
It all started in 2016 with a man named Marek who saw my Mercedes-Benz g63 amg 6x6 model and offered to buy it. I agreed. Besides, at that time I was out of work. After that, he offered to make another car for him to choose from.

Вот эти машины:
These cars:

Естественно, я выбрал самую сложную. Но, к сожалению, тогда я ее не закончил, потому что, к счастью, нашел работу. И отложил машину долгий ящик. Но, спустя 3 года, в 2019 возобновил.
Of course, I chose the hardest one. But, unfortunately, I didn't finish it then, because, fortunately, I found a job. And I put the car aside. I renewed this project 3 years later, in 2019.
01 Modeling
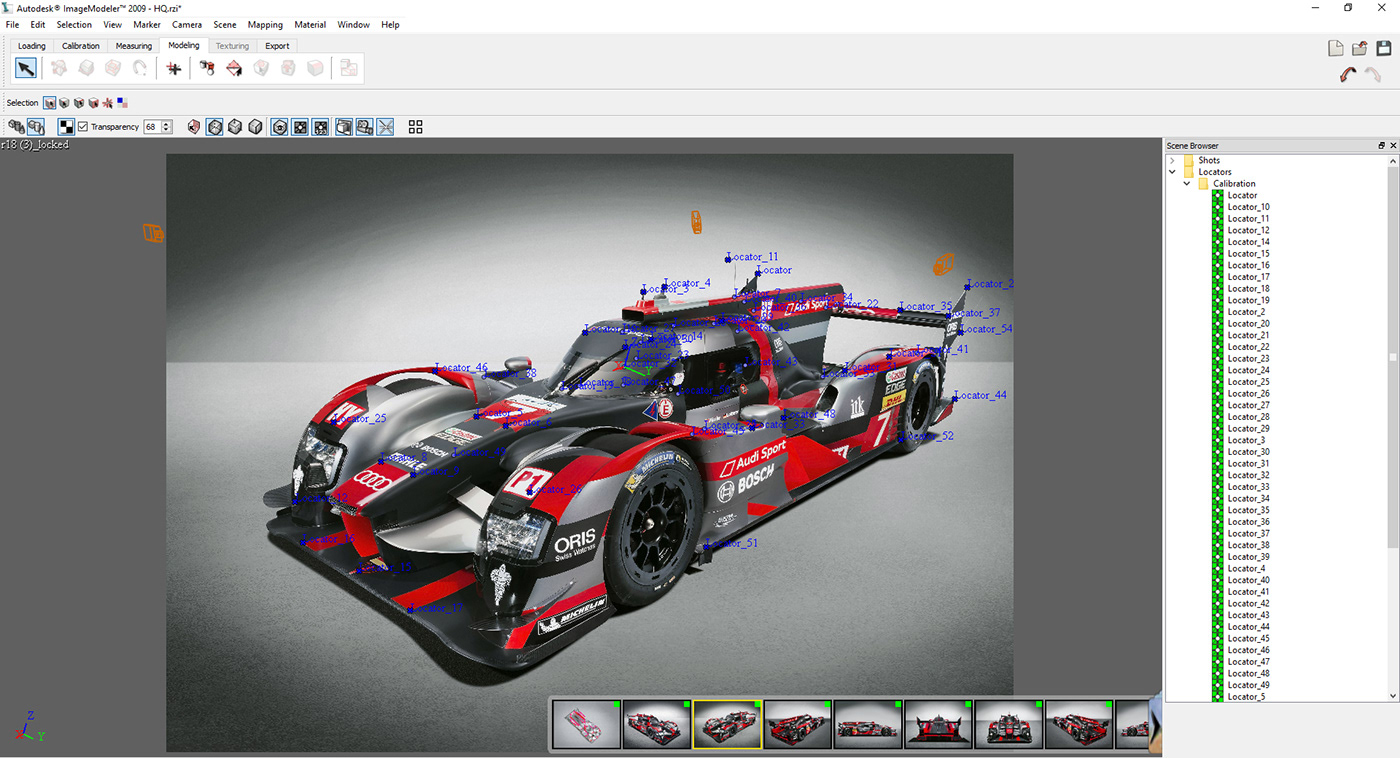
Суть программы Imagemodeler состоит в том, что она определяет расположение точек в трехмерном пространстве (в программе называются локаторами), путем нахождения пересечения проекций этих точек с разных ракурсов. Соответственно, для получения одного пересечения, необходимо как минимум две разных проекции/фото. Чем больше, тем, естественно, точнее будет результат.
Благо на машине множество всяческих наклеек, полосок и острых углов, куда можно поставить локаторы. Я загрузил 10 картинок, прошелся по всем, и поставил 55 локаторов. После некоторого количества локаторов, программа выдаст сообщение, что калибровка успешна, и создаст камеры. Дальнейшая установка локаторов только делает более точной калибровку.
I am starting modeling with Imagemodeler. You can see more details about this program here and here.
The essence of the Imagemodeler is that it determines the location of points in three-dimensional space (called locators in the program) by finding the intersection of the projections of these points from different angles. Accordingly, to get one intersection, you need at least two different projections/photos. The more photos you have, the more accurate the result will naturally be.
Fortunately, the car has a lot of all kinds of stickers, stripes, and sharp corners where you can put locators. I have uploaded 10 images and created 55 locators. After a certain number of locators, the program will display a message that the calibration was successful and create cameras. Further creation of locators only makes the calibration more accurate.
Далее экспортирую как .fbx и импортирую в 3ds Max. Масштабирую и поворачиваю как нужно.
В Imagemodeler есть настройка масштаба и осей, но она как-то кривовато работает, к тому же, идеально сделать не получится, поэтому проще в максе.
Then I export the scene as .fbx and import it into 3ds Max. Scale it and rotate it as needed.
Imagemodeler has a scale and axes setting, but it somehow works awkwardly, moreover, it can't be done ideally, so it's easier to do this in 3ds Max.
Imagemodeler has a scale and axes setting, but it somehow works awkwardly, moreover, it can't be done ideally, so it's easier to do this in 3ds Max.

Я использовал скрипт Camera Swapner от парня Anri_Ford.
Если коротко, скрипт переключает ваши камеры, одновременно меняя background во вьюпорте (вкладка Alt+B).
Это намного удобнее, нежели ставить plane с фотографией для каждой камеры, чтобы моделировать. Например, если вы перейдете в режим Wireframe, то фото на plane, естественно, пропадет. Я часто использую сочетание клавиш Shift+G (скрыть геометрию). А т.к. plane - геометрия, она тоже скроется.
I used the Camera Swapner script from this guy Anri_Ford.
In short, the script switches your cameras while changing the background in the viewport (Alt + B tab).
This is much more convenient than creating a plane with a photo for each camera for modeling. For example, if you switch to Wireframe mode, the photo on the plane will be invisible. I often use the Shift+G (hide geometry) keyboard shortcut. Because the plane is geometry, it will be hidden too.

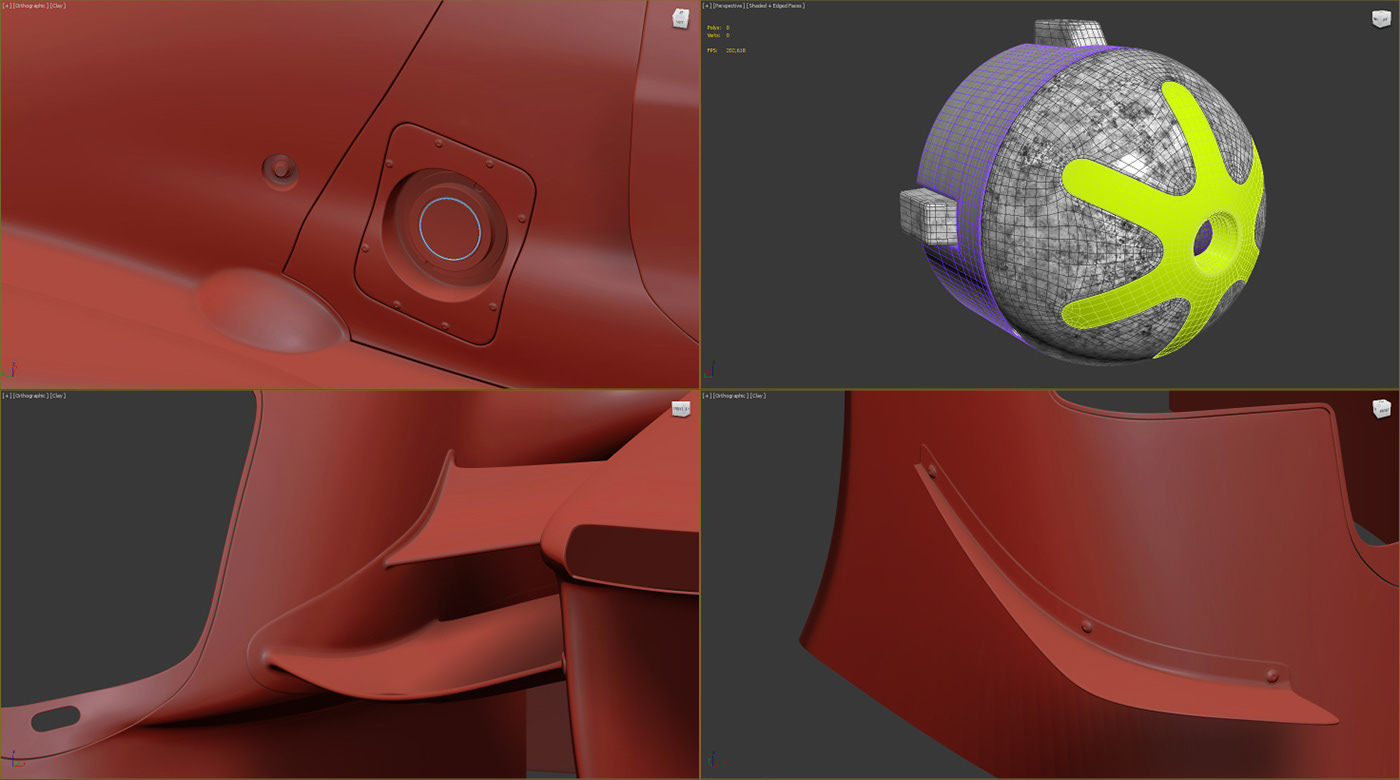
Дальше я обвел сплайнами некоторые линии машины. Можно обойтись и без них, и сразу начать с полигонального моделирования, или вообще сделать весь кузов из сплайнов и накинуть модификатор Surface, но здесь это было бы гипер сложно. Поэтому я выбрал гибридный метод. (Вообще, лучше выучить Autodesk Alias и делать там).
I draw some lines on the car with splines. You can do without them, and immediately start with polygonal modeling, or even make the body from splines and apply the Surface modifier, but here it would be hyper difficult. Therefore I chose the hybrid method. (In general, it's better to learn Autodesk Alias and do it there).

Ориентируясь на сплайны и фотографии, сделал болванку для кузова. Без фар, щелей и прочих дыр. На этом этапе очень важно сделать всё гладко, ровно и красиво, поэтому нужно использовать минимум полигонов. Эта болванка создается для проецирования на неё всего и вся. Здесь просто долгое и мучительное полигональное моделирование, ничего особенного. Накидываю 3 итерации TurboSmooth, ставлю галку See-Through, чтобы не мешала.
Focusing on splines and photos, I made a blank for the body. No headlights, gaps, or other holes. At this stage, it is very important to do everything smoothly, purely, and beautifully, so you need to use a minimum of polygons. This blank is created to project anything and everything onto it. It's just long and painful polygon modeling, nothing special. I apply 3 TurboSmooth iterations on it, check the See-Through checkbox so that it doesn't interfere.

Далее делаю копию болванки (из нее я буду делать кузов), коллапсирую 2 итерации TurboSmooth для более плотной сетки. Это необходимое зло. Иначе, при добавлении деталей, из-за неравномерности поверхности, она будет выглядеть очень криво. Пока прячу.
Начал с фар. Захожу в панель Ribbon (Если её у вас нет, тыкаем правой кнопкой мыши в пустое место на главной панели)
Next, I make a copy of the blank (I will make a body from it), collapse 2 TurboSmooth iterations for a denser mesh. This is a necessary evil. Otherwise, when adding details, due to the unevenness of the surface, it will look very crooked. I hide it for now.
I started with the headlights. I go to the Ribbon panel (If you don't have it, right-click in an empty space on the main panel)
I started with the headlights. I go to the Ribbon panel (If you don't have it, right-click in an empty space on the main panel)

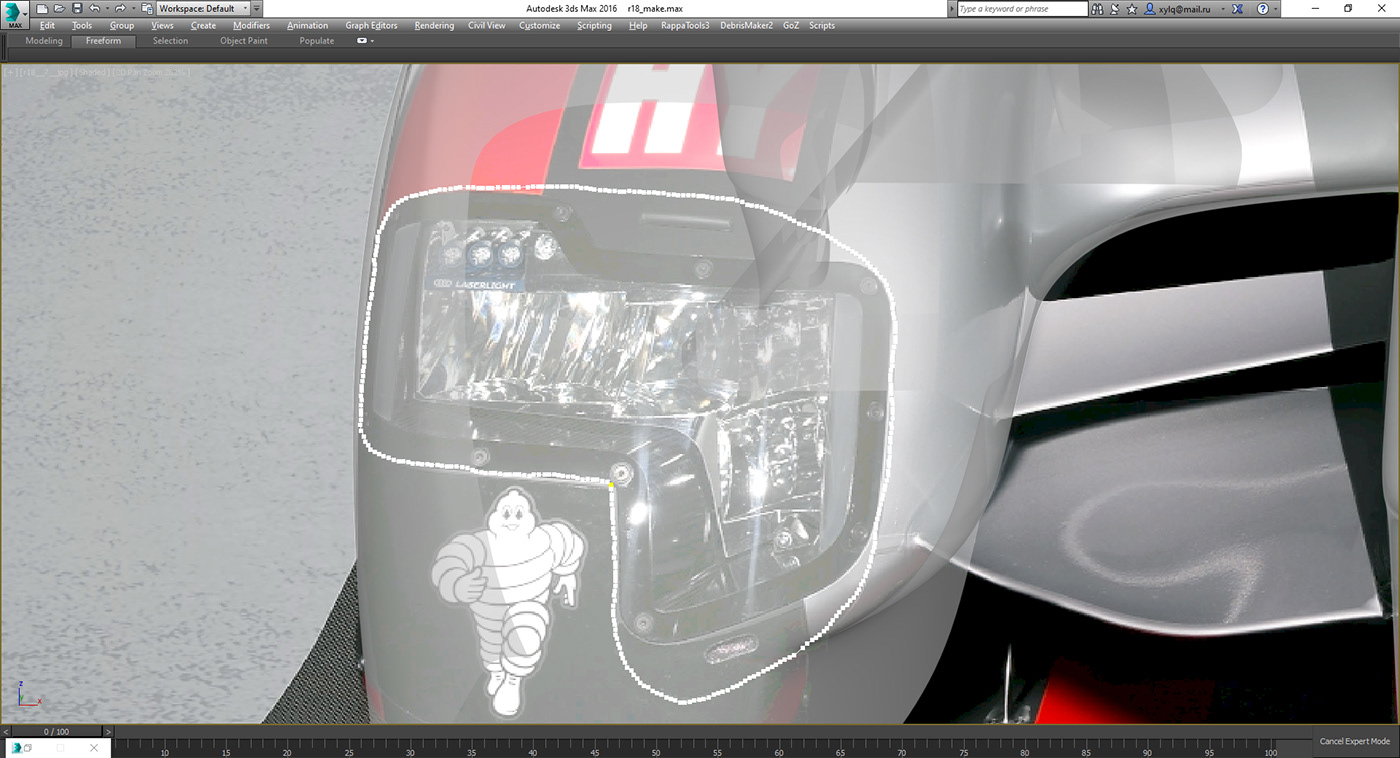
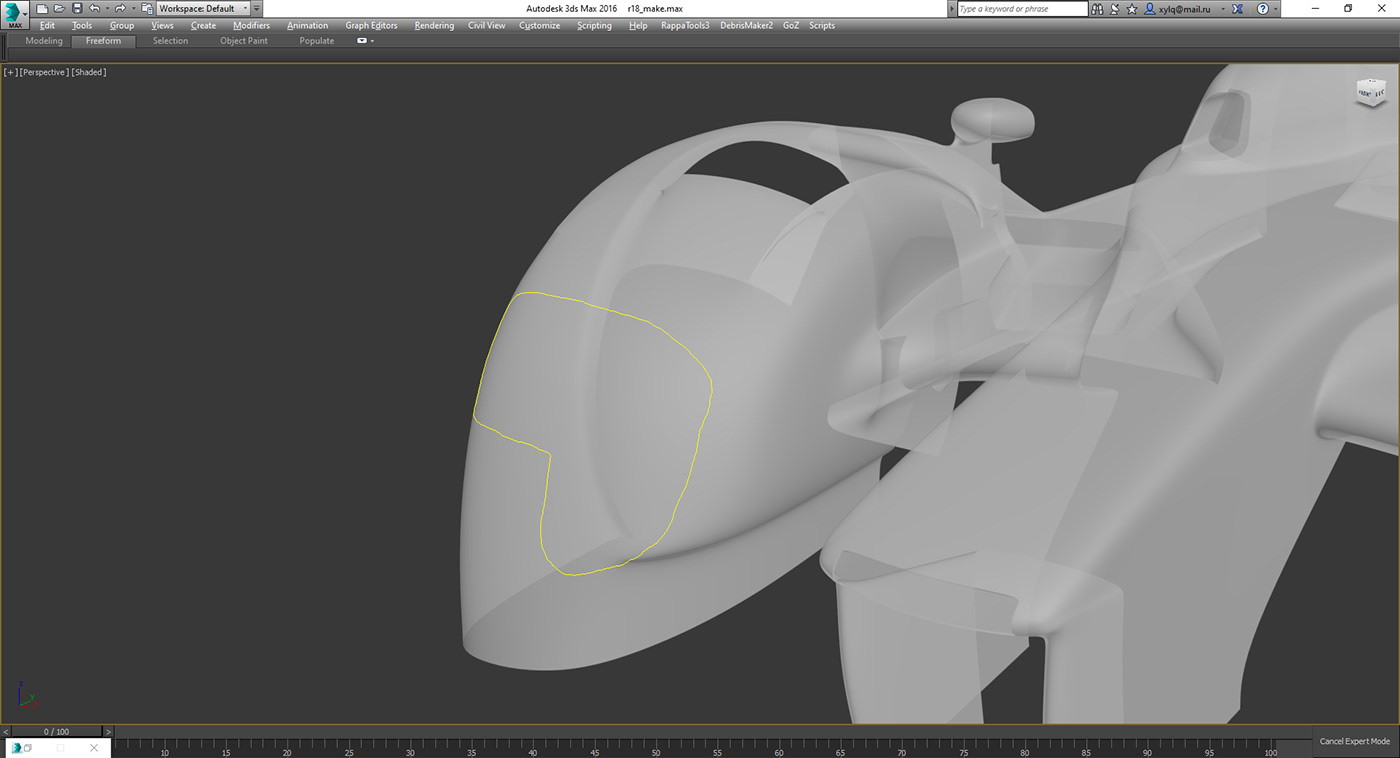
Далее вкладка Freeform > PolyDraw
Выбираю Draw on:Surface, жму Pick, и выбираю свою болванку, на которую нужно проецировать. Далее выбираю Splines и обвожу нужные линии.
Freeform tab> PolyDraw
Select Draw on: Surface, press Pick, and choose the blank to project onto. Select Splines and draw the lines you need.
Select Draw on: Surface, press Pick, and choose the blank to project onto. Select Splines and draw the lines you need.

Немного оптимизирую сплайн, и булеаном вырезаю щели.
I optimize the spline a bit and cut out the gaps with ProBoolean.


Далее вручную дорабатываю сетку.
Next, I manually modify the mesh.

После этого опять иду в панель Ribbon > Draw on:Surface. И проецирую кнопкой Conform свой кузов (уже с фарой). Чтобы после моей ретопологии, все вертексы были на поверхности болванки.
After that, I go back to the Ribbon panel> Draw: Surface. And I project my body (already with the headlights) with the Conform button. So that after my retopology, all the vertices are on the surface of the workpiece.
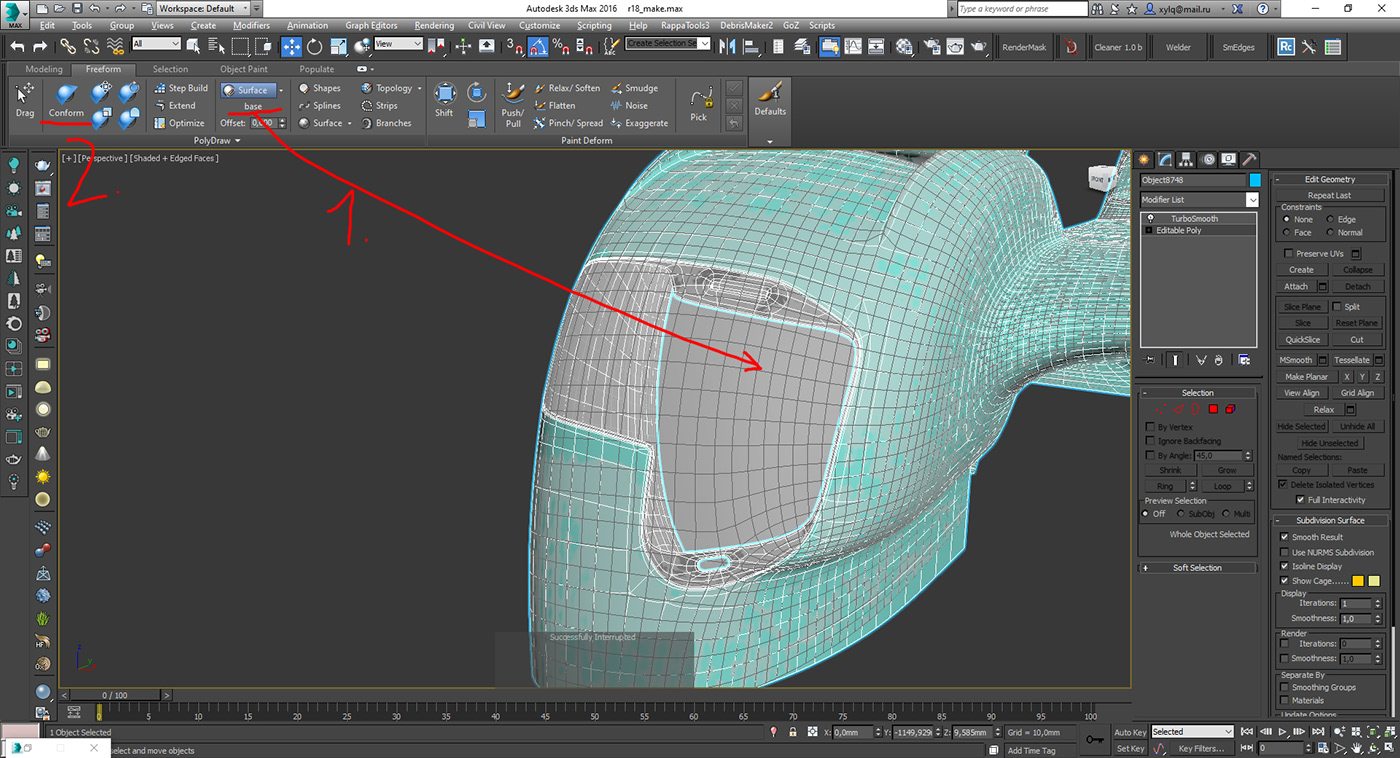
Получается довольно гладко и ровно.
Looks pretty smooth and clean.

Таким же образом сделал стекло для фар.
I made the glass for the headlights in the same way.

Также, не забываем про кисть Relax. Она помогает распределить вертексы равномерно по поверхности.
Also, don't forget about the Relax brush. It helps distribute the vertices evenly over the surface.


Обведи. Вырежи. Сделай ретопологию. Спроецируй. Зарелакси. Живи. Умри. Повтори.
Вот, в принципе, и есть основной метод, по которому я делал эту машину.
Проецирование я делал везде, где нужно ровное примыкание одной детали к другой.
Draw. Cut out. Make a retopology. Project. Relax. Live. Die. Repeat.
This is the main method I used to make this car.
I did projection wherever it is necessary to accurately adjoin one part to another.
This is the main method I used to make this car.
I did projection wherever it is necessary to accurately adjoin one part to another.
02 Unwrapping
Развертку я делал в UVLayout. Весь кузов у меня вышел в 54k полигонов. Не то, чтобы много, но 3ds Max уже с таким количеством тормозил бы. К тому же, в UVLayout есть режим симметрии. Но, к сожалению, упаковать развертку в квадрат, с сохранением симметрии, и без потери полезного пространства, у меня не вышло. Более-менее получилось в прямоугольник с соотношением сторон 2:1.
I did the unwrapping in UVLayout. The whole body contains 54k polygons. Not so much, but 3ds Max would have slowed down with that amount. Plus, UVLayout has a symmetry mode. But, unfortunately, I could not pack the shells into a square, preserving symmetry, and without losing useful space. More or less, I packed it in a rectangle with an aspect ratio of 2:1.

03 Textures
Текстурировал я в 3d-Coat. Я выбрал именно 3d-Coat, а не, например, Substance Painter, по нескольким причинам.
1. В 3d-Coat можно делать свое кастомное разрешение и с любым соотношением сторон. Я сделал 16k x 8k. В Substance Painter же, максимально возможное это 8k, и только квадрат. К тому же, 8k не все видеокарты поддерживают. На тот момент, моя GeForce GTX 660 Ti поддерживала только 4k.
2. В Substance Painter нет такого инструмента, как прямоугольник или полигональное лассо, Карл! Только кисть с альфами. А на этой машине нужно рисовать очень много прямых линий.
3. В Substance Painter нельзя прятать полигоны геометрии, в лучшем случае, это замазать их ластиком, но они никуда не исчезнут, и будут мешать.
Это не значит, что она плохая программа, там много своих плюсов, но, в этой ситуации, она мне не подходила.
Перед импортом в 3d-Coat, я обвел все линии и логотипы методом рисования сплайнов по поверхности. (Freeform > PolyDraw > Draw on:Surface > Splines). Дал им толщину, и конвертировал в poly.
I textured it in 3d-Coat. I chose 3d-Coat, and not, for example, Substance Painter, for several reasons.
1. In 3d-Coat you can make your custom resolution with any aspect ratio. I did 16k x 8k. In Substance Painter, the maximum possible is 8k and only a square. Besides, not all video cards support 8k. At the time, my GeForce GTX 660 Ti only supported 4k resolution.
2. Substance Painter doesn't have a tool like a rectangle or polygonal lasso. Only brush with alphas. I need to paint many straight lines on this car.
3. In Substance Painter, you can't hide geometry polygons, at best, it is to cover them with an eraser, but they will not disappear anywhere and will interfere.
This does not mean that it is a bad program, there are many advantages, but, in this situation, it did not suit me.
Before importing into 3d-Coat, I drew all lines and logos by drawing splines on the surface. (Freeform> PolyDraw> Draw on: Surface> Splines). I gave them thickness and converted to poly.

Чтобы линии были идеально прямыми, я в видовых окнах 3ds Max поворачивал вид под каждую линию, и инструментом Scale, используя Use Selection Center, в режиме Screen делал нулевой масштаб.
To keep the lines perfectly straight, I rotate the view for each line in the 3ds Max viewports, and with the Scale tool, using the Selection Center, in Screen mode, I reset the scale to zero.


В 3d-Coat я разукрасил всё по цветам, но это просто для наглядности. Я не собирался сразу делать финальные материалы:
1. 16k всё еще не достаточно для мелких деталей, вроде царапин, микронеровностей, капель и фактуры карбона, которые можно тайлить.
2. Только текстурами невозможно сделать многослойный материал с полупрозрачным лаком, поверх основной краски.
3. Только текстурами невозможно сделать эффект Falloff.
Так что 3d-Coat я использовал для создания масок, для последующего экспорта в 3ds Max.
In 3d-Coat, I colorized everything, but this is just for clarity. I was not going to do the final materials right away:
1.16k is still not enough for small details like scratches, irregularities, drops, and carbon texture, but they can be tiled.
2. Only textures cannot be used to make a multi-layer material with a translucent coat over the base paint.
3. Only textures cannot make the Falloff effect.
So I used 3d-Coat to create masks for exporting it into 3ds Max.

04 Materials
Материал кузова состоит из 5 слоев. И для каждого нужна своя маска. Я отдельно экспортировал слои из 3d-Coat в Photoshop. И наложил на каждого свой цвет.
Красный, зеленый, синий (для основных цветов), и белый (отдельный файл с логотипами).
The body material consists of 5 layers. And every layer needs a mask. I exported these layers separately from 3d-Coat to Photoshop. And assigned on each layer its color.
Red, green, blue (for primary colors), and white (for logos).
Red, green, blue (for primary colors), and white (for logos).

1. Черный матовый (Базовый. Маска не нужна).
1. The Black matte (Basic. No mask needed).

2. Красный (В маске красный RGB 255,0,0)
2. The Red (Red - RGB 255,0,0 in the mask)

3. Серый (В маске зеленый RGB 0,255,0)
3. The Grey (Green - RGB 0,255,0 in the mask)

4. Глянец (В маске синий RGB 0,0,255)
4. The Glossy (Blue - RGB 0,0,255 in the mask)

5. Логотипы (Ч/Б маска)
5. The Logos (B/W mask)

В 3ds Max материал, в итоге, выглядит так:
In 3ds Max, the resulting material looks like this:

Все материалы довольно простые, могу подробнее показать некоторые:
Серый
All materials are quite simple, here are some of them:
The Grey
The Grey

Он состоит из двух слоев: Серого металлика (хочу обратить ваше внимание на карты Falloff в Diffuse и в Reflection, а также, на карту нормалей, для имитации алюминиевой пыльцы).
И лака (по сути, это зеркало с бампом карбона и Noise)
На рендере выглядит так:
It consists of two layers: The Metallic gray (I would like to draw your attention to the Falloff map in the Diffuse slot and the Reflection slot, and to the normal map to simulate aluminum flakes).
And the Coat (in fact, this is a mirror with a bump of carbon texture and Noise)
The render looks like this:
And the Coat (in fact, this is a mirror with a bump of carbon texture and Noise)
The render looks like this:

Настройки:
Settings:

Капли на машине:
Drops on the car:

Настройки:
Settings:

В Diffuse слоте стоят цвета краски машины, каждый цвет через свою маску.
В Bump слоте стоит карта нормалей капель.
На остальное можно не обращать внимание. С помощью остальных текстур я настраивал имитацию клейкой ленты на стыках кузова. Там этот же материал, но свои маски.
Чтобы мне всё не объяснять, можете его СКАЧАТЬ. Краска + логотипы + водяные разводы + капли + грязь.
The Diffuse slot contains the colors of the car paint, each color through its mask.
In the Bump slot, there is the normal map of drops.
The rest of the screenshot can be ignored. With the rest of the textures, I imitated Scotch tape. There is the same material, but it has its masks.
So that I don't explain everything to you, you can DOWNLOAD it. Paint + logos + water stains + drops + dirt.
05 Rendering
Здесь простая студия с 2 источниками света и HDRI сверху:
Here's a simple studio with 2 lights and an HDRI on top:
06 Post-processing
Постобработку почти не делал, только высветлил задний план и поработал с бликами на машине.
I almost didn't do post-processing, I just brightened the background and worked with highlights on the car.


