Octane Camera Guide
Terminology
Before we get started, there are a few terms that will be thrown around here that we should define upfront.
DCC: Octane Render comes in many forms. There is a Standalone version, as well as several plugins for different apps/programs.These programs are often known as DCCs (Digital Content Creation apps), so when you see “DCC”, just substitute it for “Maya” or “Cinema 4D” or whatever you’re using.
Render Viewport: This is the window where you see a preview of your render. In Octane Standalone, it’s your main view. In a DCC, it’s often a second window that sits next to the perspective viewport. This may be called the Render Viewport, IPR, Render View, or something else. We’re going to refer to it as the Render Viewport in this guide
Settings: Most of the time a group of settings are located wherever the Octane camera options are, but in some DCCs some settings are integrated into the native objects. In C4D, for instance, the Focal Length and Distance is taken from the native camera, but most other Octane settings are located in the Octane Tag applied to the camera object. The principles in this guide apply to every incarnation of Octane, but you may have to check the documentation for your DCC to see how it’s implemented.
Introduction
The camera is one of the main components of any 3D software. Octane uses a simplified realistic camera model. Settings like focal length and F-stop line up with their real-world counterparts, but because this is a CG camera, certain limitations of a real-world camera can be overcome or tweaked. For example, exposure is directly controlled in a single setting rather than a combination of settings like you may be used to on your DSLR. This makes it more accessible to an artist who does not have a photographic background. In this guide, we’re going to stick to the important settings and how to adjust them to achieve certain looks.
This guide will focus on the common camera settings that affect the render itself. Post production settings like bloom, glare, and LUTs, as well as special camera types like OSL, baking and panoramic/cube map won’t be addressed here except in passing.
Before we start, the #1 troubleshooting step that applies to beginners and advanced users alike is this: If your changes don’t seem to be having any effect, make sure you have the right camera active in the Render Viewport. It seems pretty obvious, but when you’re dealing with a scene with multiple cameras, this is really easy to forget and leads to a lot of frustration.
Common Camera Setups
We’ll do a deep-dive into the settings next, but if you already know this stuff and just need a quick refresher, here are some quick step-throughs

Depth of Field (DoF)
This controls how much of your scene is in or out of focus.
1. First, make sure the correct camera is active and showing in the Render Viewport. If you’re furiously changing settings and not seeing any results, this is likely why.
2. Next, set the focal length (sometimes controlled by the DCC’s native camera object). This affects how much DoF effect you’re going to see. If you want a lot of blur, use a longer focal length (try 85mm or higher) and back the camera up.
3. Think about your camera placement in the scene. The strongest effect is had when the camera is close to your subject (and focused on it) and background and foreground objects are far away from your subject. As the background objects get closer to your subject, they come more into focus. As the camera gets further from the subject, the more everything comes into focus.
4. To speed up render performance, Octane defaults to having the DoF effect off. The way this is achieved is by setting the aperture to zero. The aperture links to the F-stop, and a zero aperture should correspond to an infinite F-Stop, but in some DCCs, the default F-stop is something else. All you need to do is move the F-stop one way or the other and the aperture will sync up and you’ll start to see the DoF effect. To turn DoF back off, simply set the aperture to zero again.
5. Play with Octane’s F-stop setting to fine-tune the effect (in some DCCs, this overrides the native camera’s F-stop setting). The lower the F-stop, the larger the aperture becomes, and the more DoF effect you get. If your scene is real-world scale, try real camera settings like 0.9, 1.2 & 2.4 for more DoF, or 11, 16 & 22 for less.
6. Make sure you have enough samples and/or use the denoiser - depth of field effects take more processing power, so make sure you change the settings accordingly to get a clean render.
7. Finally, if you’d like, you can adjust the shape of the bokeh (what the out of focus area looks like). In the Thin Lens camera type, there are settings located in the Depth of Field section (Aperture edge, Blade count, Aperture rotation, Aperture roundness). In the Universal Camera type, these settings also exist, plus a few more, and there’s also a new Distortion and Aberration section that simulates unique effects from certain real lenses.
Camera Motion Blur
This controls how much blur occurs when the camera itself is moving in the scene. Camera motion blur blurs everything in a scene relative to the camera (except in the case of Panning, discussed later).
1. First, make sure the correct camera is active and showing in the Render Viewport/Render Viewport. If you’re banging on the settings in frustration and nothing is updating, this is mostly likely why.
2. Next, make sure the camera is animated in your scene. If you have a static camera and just want object motion blur, check out the next section.
3. Make sure motion blur is activated for the camera you want to use.
4. Change the shutter speed. In order to speed things up, Octane defaults to 0, which means no motion blur. Shutter speeds are measured in fractions of a second, so use small values like 0.03 (~1/30 sec) or 0.016 (~1/60 sec) for a less obvious effect, or .5 (half second) or even 1 or 2 seconds (long exposure) to really crank those streaks. In some DCCs, you can just type “1/60” in the field and it will convert it to a decimal for you (0.016 in this case).
5. Adjust Time shift and shutter alignment if needed (check out the manual for more about this - most of the time you’ll be leaving these alone).
6. If you are having trouble seeing your settings change, first try refreshing the scene. Then try advancing the animation a single frame at a time rather than scrubbing or jumping from frame to frame. Your DCC may use a motion blur cache, so it needs to rebuild that cache to get correct results. Jumping around in the timeline will often mess this up until the scene is refreshed.
7. When it comes time to do the final render, make sure Motion Blur is turned on in your Octane settings in whatever DCC you’re using. Some DCCs have additional parameters (like “Use GUIDs” in C4D) that you might need to play with to see the result properly in either the Render View or the final render.
Object Motion Blur
This controls how much blur occurs on a particular object that is moving at a different speed than the camera .
1. Follow the Camera Motion Blur steps above to make sure motion blur is on and the shutter speed is set accordingly.
2. For object motion blur, you will need to adjust settings for each object. In some DCCs, this means applying a special tag to the object to get these options.
3. Different DCCs handle motion blur in different ways, so be sure to check the manual for your specific DCC to learn more about the options available.
Panning
This is a photographic effect where the camera is moving at the same speed as the object and “freezes” the object in place (so it’s sharp) while everything around it is blurred.
1. Follow both the Camera and Object Motion Blur steps above.
2. Parent the camera to the object so that it tracks perfectly as the object moves. Any change between the camera’s position and the object’s position over time will result in blur on the object.
3. Scrubbing the timeline will often produce incorrect results in the Render Viewer. Hit the refresh button often and advance frame at a time to avoid this.
Isometric View
This will create a true isometric view, where all sides of a cube (length, width, depth) measure the same.
1. If you’re using the Thin Lens camera type, check the Orthographic checkbox. If you’re using the Universal Camera type, set the Camera mode to Orthographic.
2. Set the Camera rotation to H:45°, P:-35.264°, B:0° for a true isometric angle.
3. Pan your scene around using the camera’s position values. Use only two dimensions to move around in. If your DCC’s coordinate system is y-up (like C4D), use the X and Y position values. If it’s z-up (like Blender), use the X and Z values.
4. Zoom in or out using the Scale of View setting in some DCCs, or the camera objects’s focal distance in others. The focal length also affects this.
The Important Settings
The following correspond to the physical settings of a real-world camera/lens setup. They are relevant in any Octane camera type and are the core settings used in photography. These settings rely on the scene using real-world scale (always a good practice).
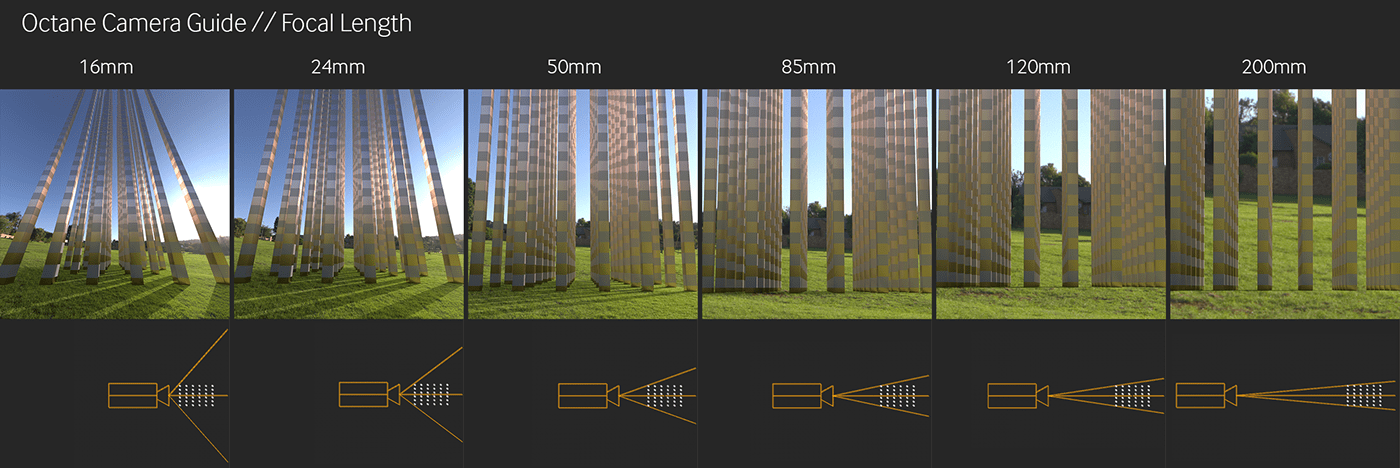
Focal length
Depending on the DCC, this is either found in the Octane Camera settings or in the DCC’s native camera object.
Once a camera is dropped into a scene, the first thing that should be considered is the focal length. This one setting controls a lot of important aspects of the camera and can make a large difference in how your scene comes out. In real world optics, the focal length is a specific distance (in mm) measured from the center of the lens to where the light converges once it passes through the lens. This number controls a few key things:
Field of view (FoV). This is how much stuff in the scene is visible in your final image from any given vantage point. The shorter the focal length (lower value in mm), the wider the field of view and the more of the scene is visible in the frame. Shorter (wider) lenses are usually used for landscapes and the like. Longer lenses (higher value in mm) have a narrower field of view and are better suited for framing individual subjects.
Distortion: All lenses have some amount of distortion to them. Distortion can be used creatively to evoke a mood in a scene if used right. Lenses in the 35-70mm range have the least amount of distortion and are closest to what the eye sees (50mm typically being the gold standard for lack of distortion). As the focal length drops below 35mm, the distortion becomes a lot more apparent (objects on the edges of the lens get a lot wider, parallel lines start converging, etc). This gets exponentially more difficult to work with as it gets down into the real ultrawide range like 16mm and below. The difference between lenses 1mm apart here is substantial. On the other end of the spectrum, as the focal length starts getting up over 120mm, a different kind of distortion happens. Lines become too parallel and start looking almost isometric, especially as the lens starts getting up over 400mm and it’s pulled back away from the subject. A longer lens also compresses the background, so objects behind your main subject can start to feel a bit too close and focusing becomes more difficult if there’s any depth of field effect going on. There are things that can be done to correct lens distortion in Octane that aren’t available in real-world lenses, but typically you should just choose a lens that gives you the distortion (or lack thereof) that you’re after.
Depth of Field (DoF): This describes how much of the shot is in focus. A very shallow depth of field means that only the subject tends to be in focus and the foreground and background is blurred, where a deep depth of field means that nearly everything is sharp. Turning off depth of field (in Octane this is done by setting the aperture to zero) means that everything is 100% pin sharp. The shorter the focal length of a lens, the less depth of field effect it naturally has. We’ll get into how to control Depth of Field in a bit, just keep in the back of your head that the focal length has a pretty big impact on how much of that effect you can get.

F-Stop
This value is found in Octane’s camera settings (thin lens or universal camera section) and will override the value in the host application’s camera settings.
This was mentioned before, but it trips up a lot of new users, so it’s worth stating again: To speed up render performance, Octane defaults to having the DoF effect off. The way this is achieved is by setting the aperture to zero. The aperture links to the F-stop, and a zero aperture should correspond to an infinite F-Stop, but in some DCCs, the default F-stop is something else. All you need to do is move the F-stop one way or the other and the aperture will sync up and you’ll start to see the DoF effect. To turn the DoF back off, simply set the aperture to zero again.
In a real camera, this controls how open or closed the aperture is, which in turn controls the amount of light that’s let into the sensor. In addition to allowing the camera to shoot in lower light conditions (not an issue in the 3D world), The F-stop value plays a crucial role in depth of field.
We learned earlier that the focal length affects the amount of depth of field is available. The F-stop allows you to fine-tune within that range. The lower the F-stop value, the thinner the focal plane is, and therefore less of your scene will be in focus. This is amplified by the focal length. The difference between an f-stop value of 2 and 4 (in photography terms this is denoted as f/2 or f/4) on a lens with a 24mm focal length is difficult to discern, where on a 600mm lens it means even the slightest movements will put objects in or out of focus.
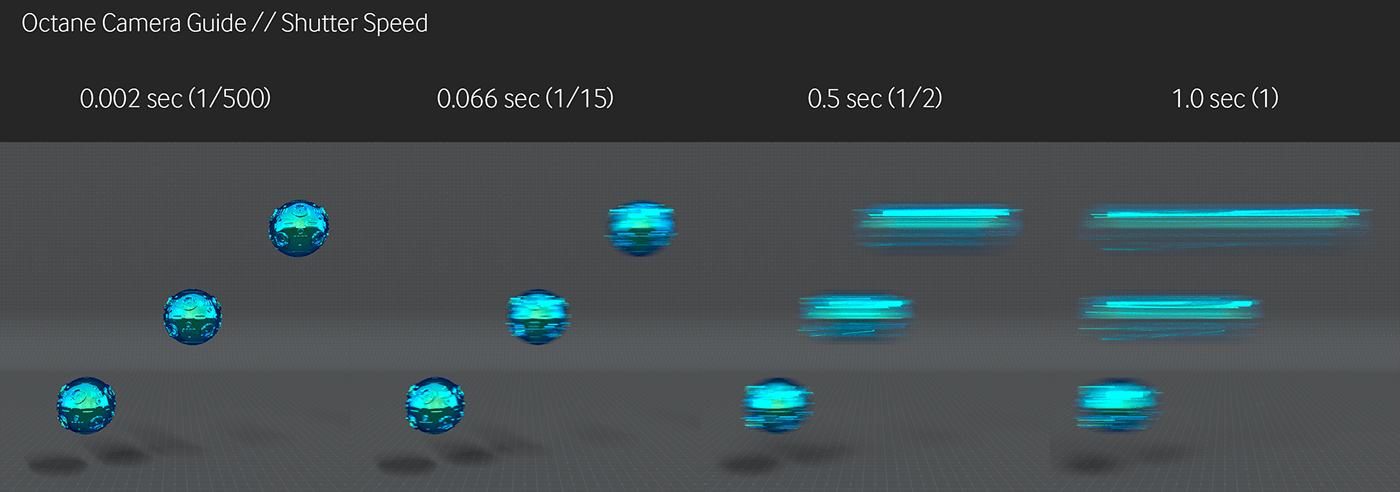
Shutter speed
This value is found in the Animation section in Octane Standalone, and in different places in different DCCs. Consult the manual for your specific DCC to see how it’s implemented.
The shutter speed on a real camera controls how long the shutter is open. This affects how much light enters the sensor while it’s recording an image. In Octane’s camera, this affects motion blur, but not the exposure like it would on a real camera (exposure is covered next).
Shutter speeds are measured in fractions of a second, so use small values like 0.03 (~1/30 sec) or 0.016 (~1/60 sec). In some DCCs, you can just type “1/60” in the field and it will convert the fraction to decimal for you. Generally, the larger the shutter speed value, the more motion blur there will be, but motion blur also depends on the speed of the object relative to the camera, so slower movements will require longer shutter speed times to show more blur than faster movements.
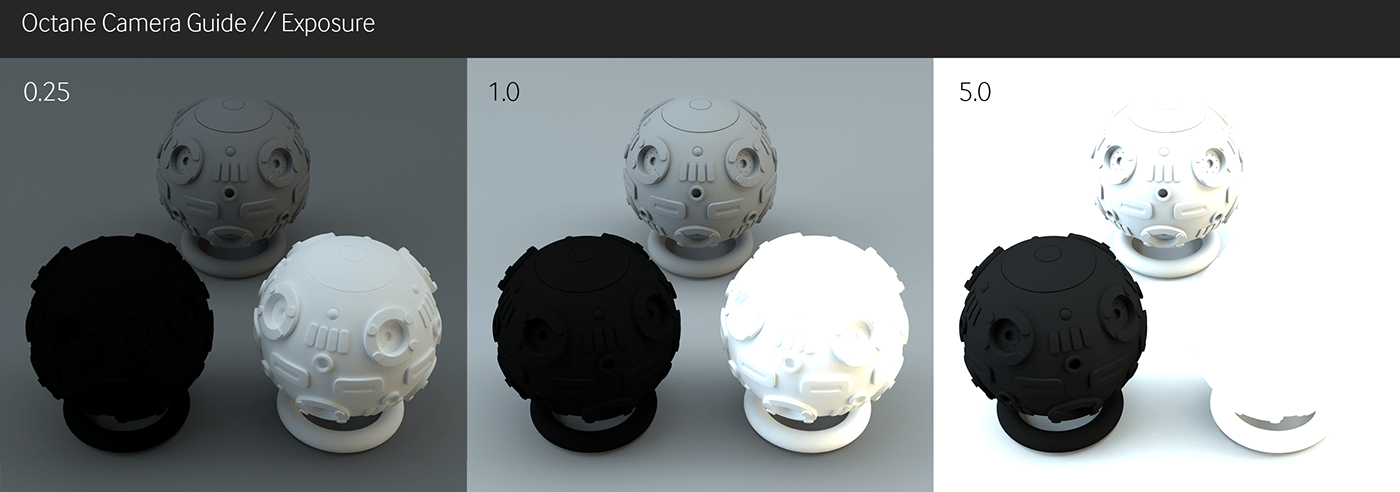
Exposure
This value is found in the Camera Imager settings and is treated more like a post effect. This is pretty analogous to the Exposure Compensation setting in a real world camera.
In a real camera, the aperture/F-stop, shutter speed, and another setting called ISO (film speed or sensor sensitivity) contribute to overall amount of light allowed to hit the film or sensor. This is referred to as exposure and controls how bright or dark the scene is.
In Octane, in an effort to keep things simple, ISO isn’t simulated, and the aperture and shutter speed does not affect exposure. Instead, there’s a single Exposure setting in the Camera Imager section. 1 is the default value. Higher makes everything brighter and brings out the details in the shadows, Lower makes everything darker and brings out details in the highlights.
Octane Camera Types and Modes
There are several Octane camera types that are set in the Camera Type dropdown. Some of these types have modes which are selected in a second-level dropdown. The chart below shows how the different camera types and modes relate to one another.
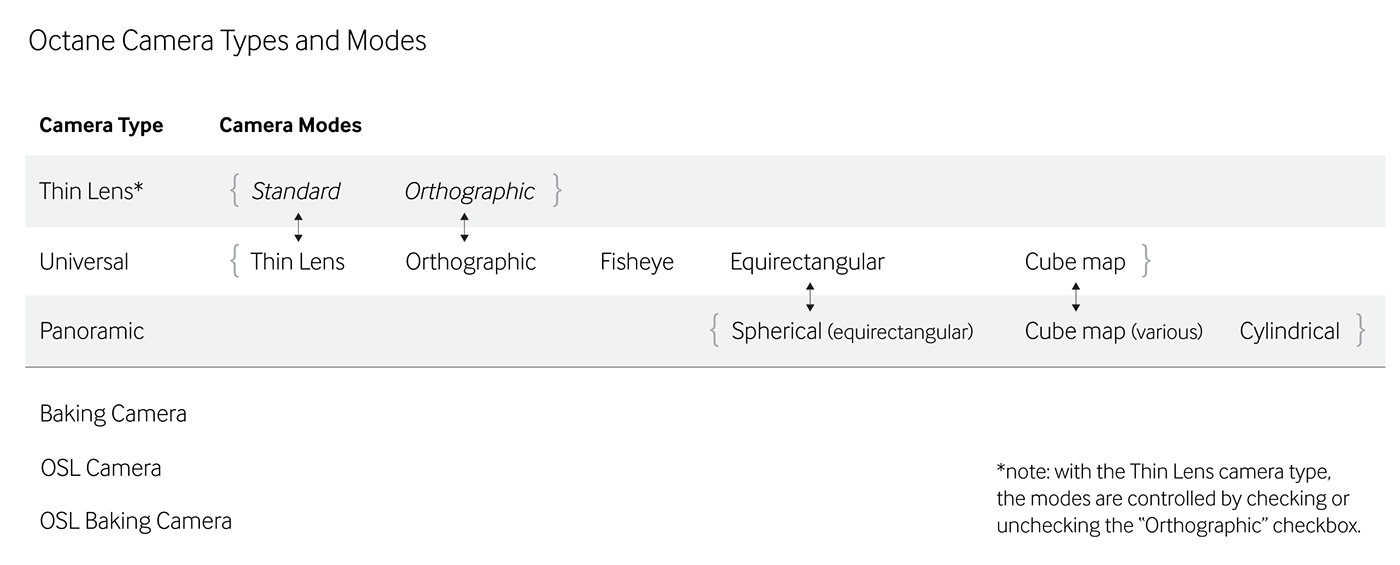
The Universal Camera’s Thin Lens mode is similar to the Thin Lens camera type, but it offers more options. At this point, unless you need Cylindrical projection, the Universal Camera covers everything the Thin Lens and Panoramic cameras do, and more.
We’ll be concentrating on the options in the Universal and Thin Lens cameras, and only focus on the Thin Lens, Orthographic and Fisheye modes since those are the most likely to be used.
The other three camera types (Baking Camera, OSL Camera and OSL Baking Camera), as well as the Equirectangular and Cube Map modes are more advanced, and are out of scope of this guide.
The Thin Lens Camera
This is the original Octane standard camera type. It’s still the default camera type and the simplest of the lot, so we’ll cover it first. It would be a good idea to get comfortable with the Universal Camera type, since it covers all the functionality of the Thin Lens camera and then some.
Why is it called “thin lens”? It’s a term in optics for a type of lens where the thickness of the lens itself doesn’t influence the image it produces (think of looking through a thin sheet of glass as opposed to the bottom of a bottle). This is much faster and easier for a processor to calculate, and lens distortion can always be added later as a feature if desired, so it’s the most common type of simulated lens currently found in computer graphics.
Most of the settings for the Thin Lens Camera type are discussed in the sections above. The other important ones are listed here:
The Orthographic Checkbox is for removing perspective from a scene. You can use this to render frontal, side, and top projections of your scene, or 3D orthographic views by freely rotating the camera. Once Orthographic is checked, to change the scale (zoom), either change the Scale of View parameter in Octane Standalone and some DCCs, or use the DCC’s Focal Distance in others. Check the manual of your DCC to find out which method you need.
To get an isometric view, check the Orthographic checkbox and then set the camera rotation to H:45°, P:-35.264°, B:0°. Some DCCs do not have an orthographic mode in their native camera, and others will not correspond to the Render Viewport, so always use the Octane Render Viewport to frame your shot.
Sensor width determines the size of the sensor, which then changes the effects of the focal length and several other things. You’d only really use this if you were trying to match a particular camera with a sensor that’s not Full Frame (APS-C or Micro 4/3 for example).
Field of view adjusts the Focal length, F-Stop and Scale of View. It’s recommended that you leave this alone and adjust the Focal length instead, then set the F-Stop and Scale of View manually. The field of view setting may not even show up in your DCC.
Distortion and Perspective Correction are used to correct the lens distortion on more extreme focal lengths. These are fairly limited - for more fine tune control, switch to the Universal Camera type.
Bokeh side count, Bokeh rotation and Bokeh roundness all control the shape and quality of the bokeh (out of focus areas) of the image. Again, for finer control of the bokeh, switch to the Universal Camera type.
The Universal Camera
The Universal Camera was added to Octane in 2019 - it’s more powerful and full featured than the standard Thin Lens camera type and replaces all the functionality of it.
Universal Camera Modes
As seen in the chart at the beginning of this section, the Universal camera’s modes correspond to other camera types. All the modes share some common settings, and then there are settings categories that only affect specific modes (Fisheye and Panoramic)
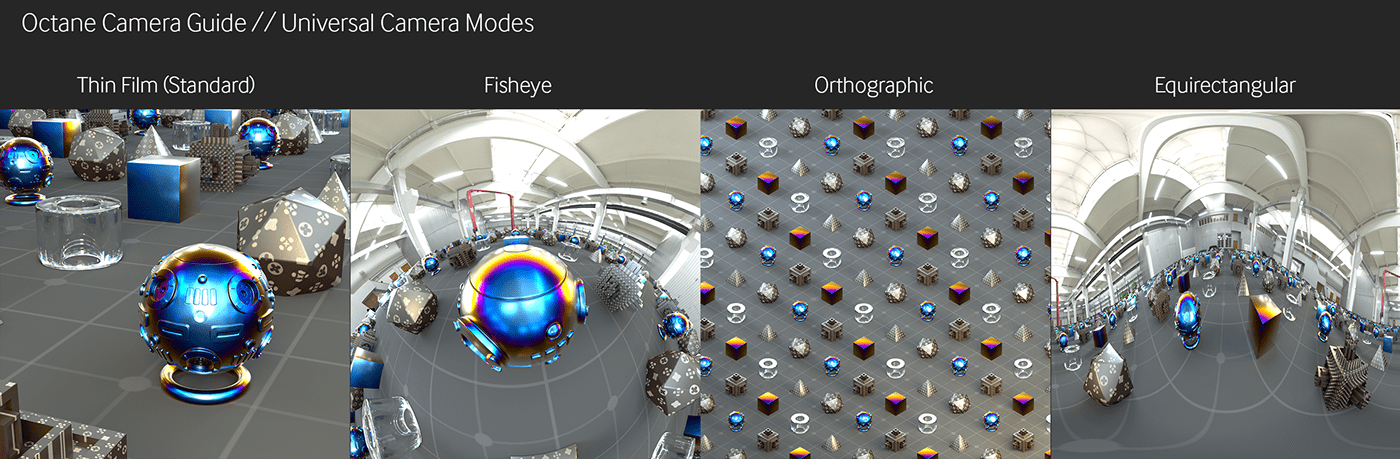
Thin Lens: The Universal Camera’s Thin Lens mode is similar to Octane’s Thin Lens Camera type, but with more options. This is close to a standard real-world camera setup, and what you’ll use for most scenes.
Orthographic: This is similar to the Orthographic mode in the Thin Lens camera type and removes all perspective from the scene. This is explained more in the Common Camera Setups section at the top of this guide (Isometric View).
Fisheye: This creates a fisheye lens effect (what you see on some action cameras or when you look out a peephole in a door. Some DCCs like Cinema 4D do not have a native fisheye camera, so all the framing will have to be done in the Octane Render Viewport.
Equirectangular & Cubemap modes: These are mostly used in generating environments, and are out of the scope of this guide.
Common Universal Camera Options
Split-focus diopter: This is for creating multiple focus planes. It’s a specific cinematic effect that can be used to make interesting compositions. Depth of field must be on for this. Here is a good explanation of the effect and how it’s used in films.
Optical vignetting:This simulates the effect in some real camera setups where the brightness and saturation decreases toward the edges of the frame. Depth of field must be on for this, and it’s impacted by the F-stop/aperture settings. There’s a vignetting option in the Camera Imager that does something similar for the Thin Lens camera, but as a post-production filter, where optical vignetting simulates a real camera vignette.
Distortion: This setting simulations distortion naturally found on lenses that are further away from the “normal” 50mm range (most apparent in ultrawide lenses where the focal length is in the 8-16mm range). You can either use these settings to correct spherical and barrel distortion on more extreme lenses, or you can add it to lenses that don’t typically have it for some fun effects. A distortion texture can be added in to just distort certain areas of the image as well.
Aberration: This simulates imperfections in lenses that cause the image to soften (defocus) or distort. It can be used to simulate more unique lenses where these imperfections are seen as giving the image character. This is different from chromatic aberration which splits colors on sharp edges. Chromatic aberration isn’t currently supported.
Special Universal Camera Options
Fisheye
These options only affect the view with the Fisheye Camera Mode is set, which in turn is only available in the Universal Camera type.
These options only affect the view with the Fisheye Camera Mode is set, which in turn is only available in the Universal Camera type.
Fisheye Type: Circular is the default type and produces a full image circle that captures everything the lens is capable of. In a real-world fisheye lens, the image stops at the bounds of a circle, which is simulated with the Hard Vignette. Luckily we’re not limited to optics, so you can uncheck Hard Vignette to remove the out-of-bounds circle and fill the frame. This is different than the Full Frame Fisheye type which crops into the circle the way a real camera would.
The Fisheye angle is similar to the field of view on a normal lens - it determines how much stuff in the scene is captured. This affects the distortion as well, so it’s good practice to set the distortion you want and then physically move the camera to re-frame the shot, rather than using the angle to zoom.
The Projection modes are for simulating different types of fisheye projections. Experiment with them and see if you like one more than the other. Most of the time you’ll probably end up sticking with Stereographic.
Panoramic
These options are specifically for the Equirectangular and Cubemap modes which are out of the scope of this guide.
Other Camera Types
The Panoramic Camera is usually used for creating environment maps (HDRIs and the like). You can get some fun distortion with it, but you probably won’t be using this much unless you’re generating custom HDRIs. Most of the functionality is set in the Panoramic options section.
The Baking Camera is used for baking procedural textures for use in game pipelines, or to speed up a scene with a lot of processor-heavy texture effects once the design of the model and textures have been finalized
The OSL and OSL Baking Cameras are used for specific OSL (Open Shader Language) effects. OSL is its own complex topic, and will likely need its own guide.
Real world lens reference
6-16mm Ultrawide/Fisheye: Because of the distortion that comes with such an extreme focal length, these are often only used to get a specific look, or for architectural shots where it’s impossible to physically move the camera back far enough to capture a whole building or interior. Fisheyes are sometimes seen on waterproof action cameras and security cameras where the distortion isn’t that big of a deal compared to getting as much in frame as possible. Fisheye lenses are sometimes measured in focal length, and sometimes in degrees (circular field of view)
24-35mm Wide-angle: These are commonly used for landscapes, cityscapes and street photography. Because they tend to have some amount of distortion, they’re not usually well suited for portraits. The 24mm is a popular choice for landscape photographers, and the 35mm is great for street photography.
35-75mm “Normal”. These are commonly accepted to be the closest to the human eye in terms of focal distance and distortion. The 50mm lens is the gold standard for “as the eye sees” and is a favorite all-arounder lens.
75-135mm Short Telephoto. These are great for portraiture since they distort the image in a way that’s flattering to the human form without getting into uncanny valley territory. The 85mm is often the lens of choice for portraits. Lenses in this range allow the photographer to stand reasonably close to the subject and they tend to have a thinner focal plane and compress the background a bit making it less distracting and putting the emphasis on the subject, but not so thin that you end up with just a nose in focus and everything else blurry.
135-300mm Telephoto lenses. These are great for car races, stadium events, safaris, and other scenarios where photographers want to get photos of individual subjects at a long distance. They very much compress the background and have a very thin focal plane, making them notoriously difficult to handle. Real world lenses in this range are larger and heavier than ones with a shorter focal length.
300+ Super Telephoto lenses: These are used in a similar manner to regular telephoto lenses, only for subjects that are much further away and/or very small. Birders and astrophotographers love these lenses for this reason. The background compression and lens distortion is severe on these, so you can almost get an isometric look with a long enough lens (try 1200mm) from a far enough distance.


