BATHROOM CHALLENGE
A project made in ESDi in the introduction to project class

_______________________________________________________________________
¿What does this challenge consist in?
The main purpose of this challenge is to introduce ourselves in the design thinking world knowing all the whole process it takes to create a prototype based on the current situation of that moment and the needs of the users.
Basically, what we have done is to create a prototype starting from the base of our own bathroom experiences. We explained our bathroom routine, and from this, using the SCAMPER technique we all have ended up creating a prototype with the purpose of enhancing our day to day routine.
So, at the end of this challenge, we all have learned the essential steps that we need to follow for developing and creating a prototype so it can be exposed in the “real world”.
_______________________________________________________________________
Design thinking methodology
1. Empathise
Collected the experiences and routines from many users about going to the bathroom, and from these, we detected pain points.
2. Define
Grouped problems for topics and all of us chose one of them to solve.
3. Ideation
Search and think of many different solutions using the “SCAMPER” methodology.
4. Prototyping
Made sketches of our prototype based on the information we have for the ideation process and we make our first prototype.
5. Test
Tested the prototype with some users and improved it according to the critiques.
______________________________________________________________________________________________________
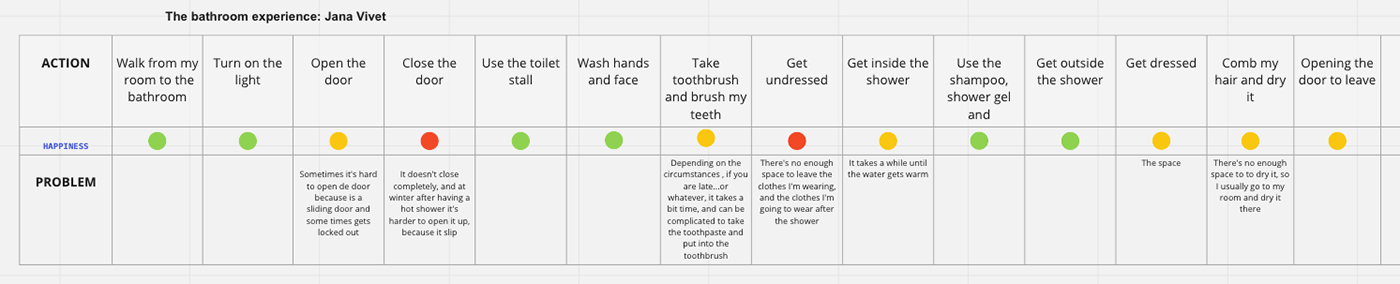
EMPHATISE
First of all, what we did was to create our bathroom routine. We explained it by completing a chart, so we could assess each action positively or negatively.
DEFINE
Once we had completed and valued each one, we discovered that all the problems that had arisen were related to different elements of the bathroom, so we compiled all these negative experiences and put them together.
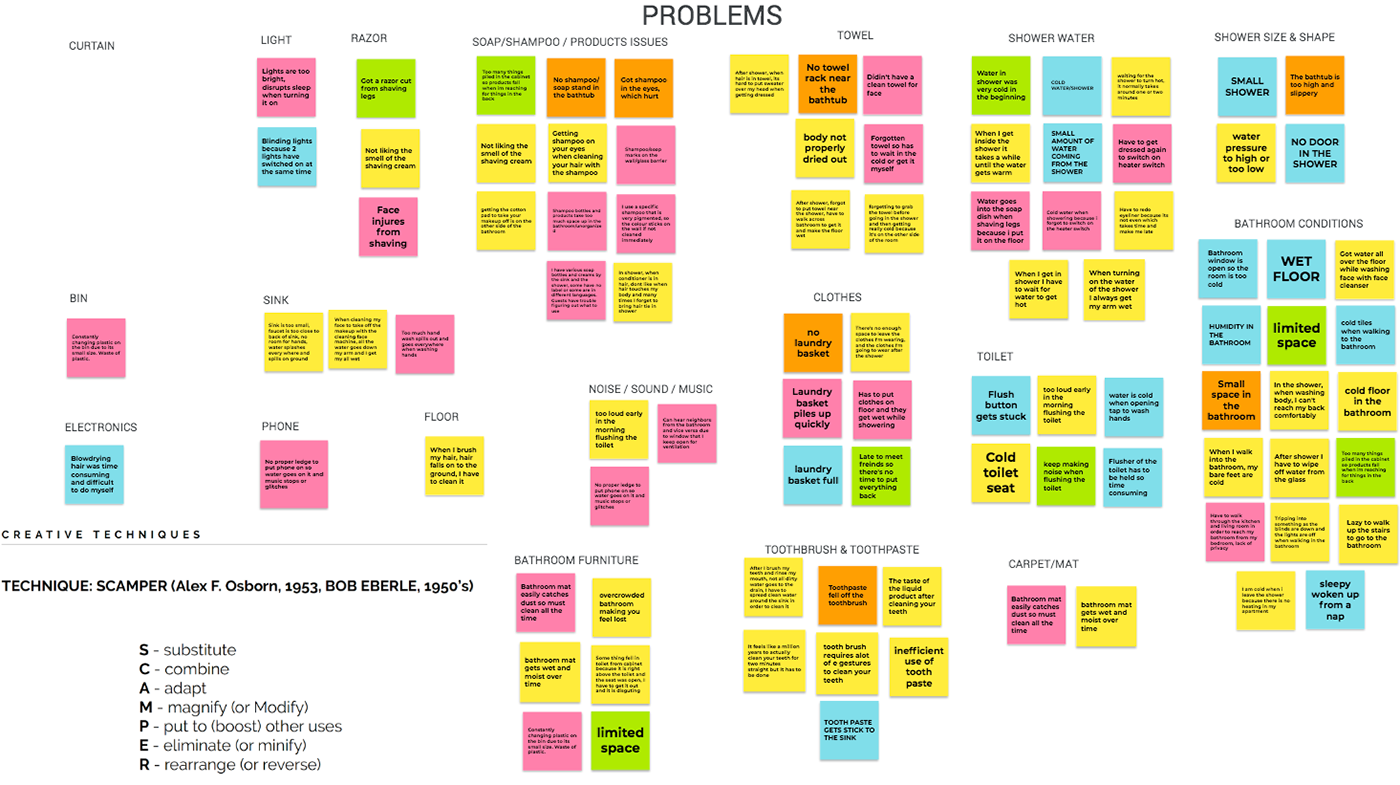
Then, we decided to sort out all these problems into topics, and we tried to search for a solution creating some prototypes, taking into account innovation and price.
Finally, after doing all this process, each one of us had to choose one issue, and pick one of the ideas that we had already thought of to solve the problem.
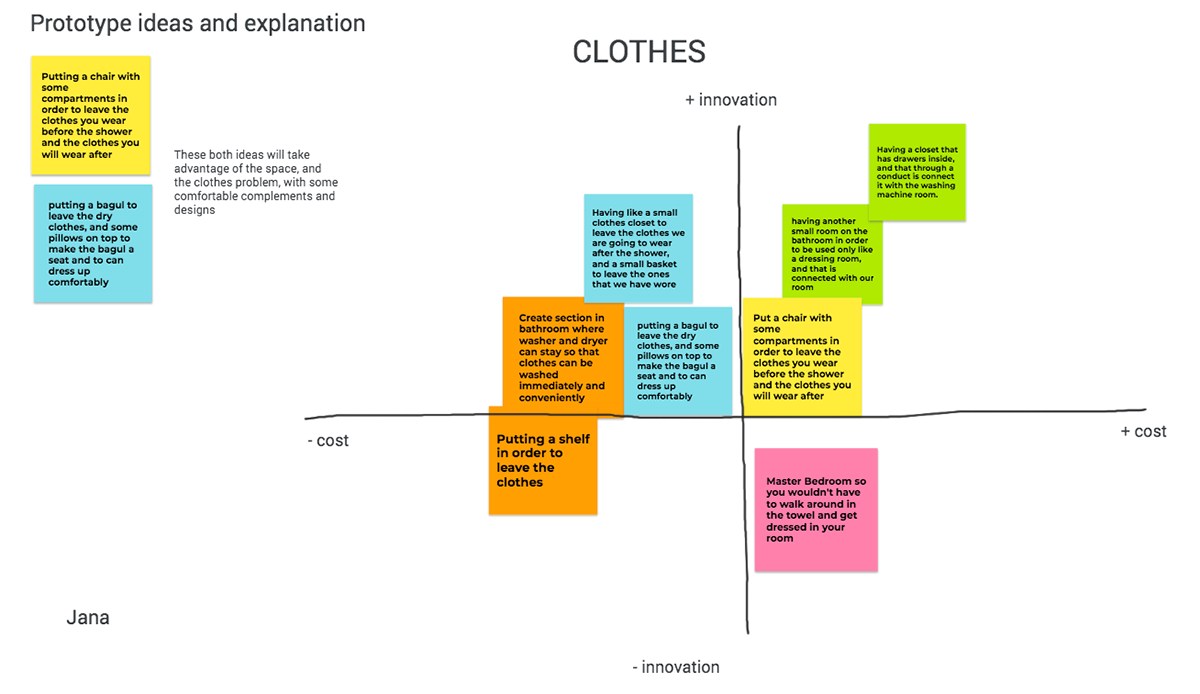
IDEATION
I chose the ones which were related to clothing.
With this topic, we realised whenever we take a shower and we get undressed in our bathrooms, we usually don’t have enough space to leave our dirty clothes, nor the ones we want to put on after it. So I had to think of a solution for that.
The methodology we used
s c a m p e r
Substitute Combine Adapt Modify Purpose Eliminate Rearrange Magnify Put to
Minify another use
The SCAMPER technique aims to provide seven different thinking approaches to find innovative ideas and solutions.
- Substitute technique focuses on the parts in the product, service or solution that can be replaced with another.
- Combine technique tends to analyze the possibility of merging two ideas, stages of the process or product in one single more efficient output.
- Adapt refers to a brainstorming discussion that aims to adjust or tweak product or service for a better output.
- Modify technique refers to changing the process in a way that unleashes more innovative capabilities or solves problems.
- Purpose technique concerns how to put the current product or process in another purpose or how to use the existing product to solve problems.
- Eliminate technique aims to identify the parts of the process that can be eliminated to improve the process product or service. It also helps to explore the unnecessary parts of the project.
- Reverse or rearrange technique aims to explore the innovative potential when changing the order of the process in the production line.
So, putting into practise and using this technique we started thinking about the prototype itself.
PROTOTYPING
For a week and a half, we had to work to get the final physical prototype. Firstly we had to design it making some sketches, then we had to create it with physical materials, and finally, after being reviewed, we had to improve it.
The first big challenge for me was to design and define it, and do it in a way that it could be created. Alongside this, this design had to follow an innovative approach, so for all of us was such a challenge to get over it.
First of all, I planned how to gain more space in a bathroom, so that everybody could leave their clothes there, and even to get dressed there too. So, the first prototype that came to my mind was like a kind of chest with a single drawer. But then, I thought that I could make the chest a comfortable seat too, for those people who wanted to get dressed there. So I changed my design a little bit, and finally, it turned out to be a kind of bench-closet.


The materials I used to create the physical prototype were:
- Pencil
- Ruler
- Rubber
- Paper
- 3 cardstock
- Scissors
- Tape
Firstly, when you see it, it looks like a basic drawer but then, when you open it, it converts into a bench-closet.
The first prototype was based on two drawers: one for the clothes, and another one for the shoes. In the clothes one, there were two small boxes in which you could leave the dirty clothes, and the ones you would wear after taking the shower.
This prototype also had a lid, that if you opened it, showed a pair of pillows (hence this the reason for the bench-closet term).


TEST
After having done the first prototype, we had to “sell the product” explaining to our classmates and professor our prototype idea.
Once we all exposed our project, we were told how to improve it through the reviews that our classmates, friends and family had given to us.
Hence, I asked my family and friends if they would use it and if they would change something, and most of them told me that they would use it but that they probably would change something; and surprisingly, all of them agreed with the same “problem”.
My main reviews were basically focused on the dirty clothes box which seemed to be too small. All the people with whom I discussed the functionality of my prototype said it would be better if I designed a removable bigger box for the laundry. So then, when we want to take a shower and take off our clothes, we can perfectly leave them there with no space problem; and when we finish, we can just take this box and leave it in the washing machine closet to be washed.
Postits
Furthermore, I thought about the possibility of having wet clothing, so I thought of a solution for it. I put some hangers on the left side of the prototype, to be used in case we have something wet or simply if we want to hang some clothes up there.
So basically, what I finally did to improve my prototype was to divide the drawers into two, being the bigger one for leaving the laundry and the other one to lay on the clothes and the shoes to be put on after taking the shower.
THE FINAL PROTOTYPE


