With the landscape of the diorama mostly done, I decided to work a little on the presentation of the diorama.
I planned the rim to be solid black, classic choice for dioramas, and since it still was, after the priming, I didn't have to do any additional painting.
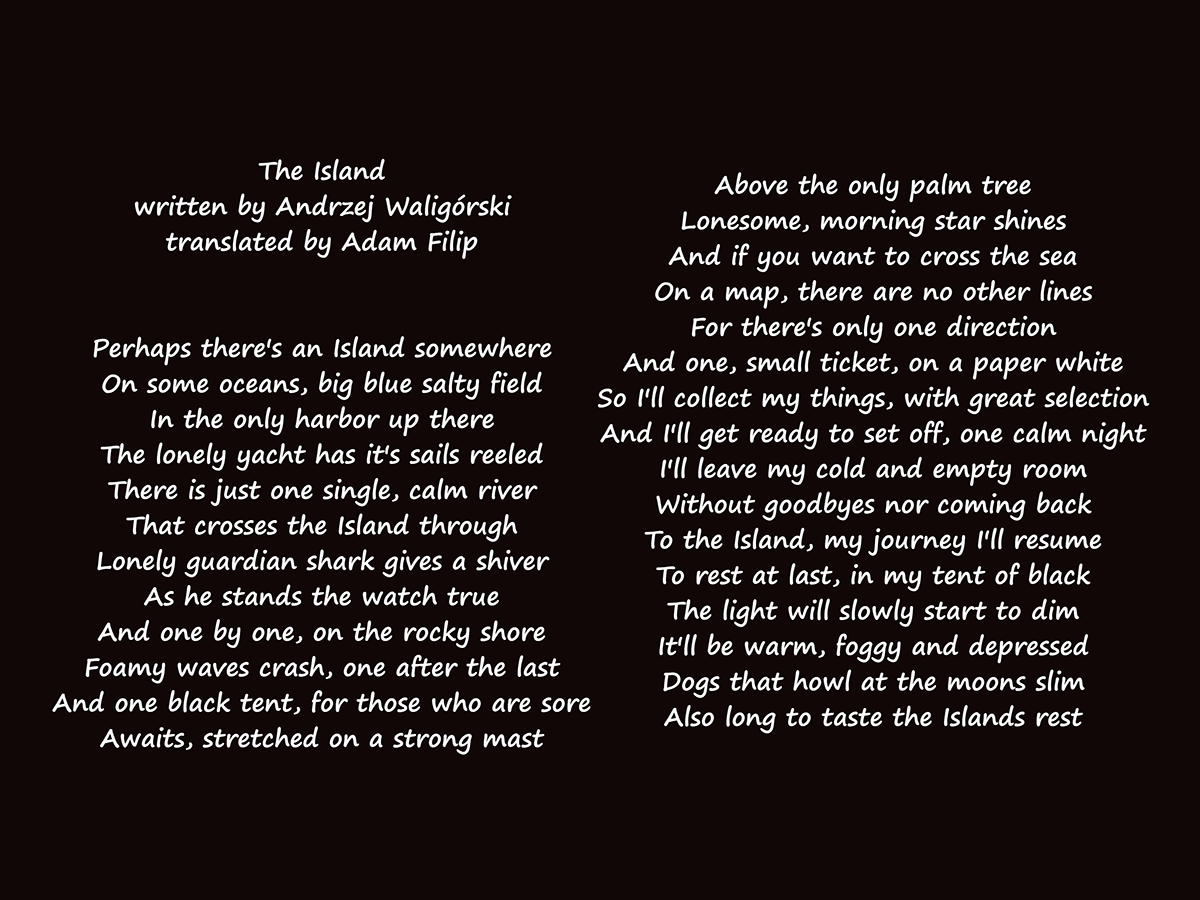
I printed the Waligórskis poem that I was basing the diorama on and glued it with PVA glue to the bottom.


To reference the occasion for which the diorama was being I made, I decided to paint the number "60" on the front of the rim.
I went for beautiful combination of roman numerals and gold color, which would look great on a black background.
After doing some measurements, I printed the letters in appropriate font and used them to cut out by hand a tape stencil.

I put the stencil on the diorama, being very precise with the positioning.
I also made sure to firmly glue down all of the edges, so the paint doesn't creep under the tape.

I put the paint on with a small brush, with a stippling motion.
When paint dried, I added two more layers of the paint, assuring a good coverage.

Then, it was time to make the black tent.
I settled on a simple, triangular, dual pole design.
With a normal size tent of this type, you just stick two poles to the ground at opposite ends of the tent and hang the canvas on them, fixing it with a series of lines.
To simplify the construction and make the finished tent a little more durable, I connected the opposite poles with a third one, acting as a tents spine and I supplemented the lines with a stiff wire that I could bend to match the ground.

The poles were made from some more bamboo skewer and connected with CA glue, making everything well connected.
I also left the skewers longer and sharpened, to stick them in to the foam ground.

I drilled two holes for the poles, having a huge problem, same time as with the palm tree, and I tested if the wire fits the ground well.

After some minor adjustments, I placed a square sheet of towel paper, soaked with water down PVA glue and red paint under the tent and glued the frame in place.
I also painted the pole section that will be visible from inside the tent brown.

Next step was to cover the frame with canvas, again, made from towel paper soaked in watered down glue, which lets you drape it naturally, before hardening and creating a rigid, light shell.
I measured the frame of the tent and cut out an appropriate shaped piece of paper.

The poem that dictates the final look of the island, specifies the color of the tent as black. This color is extremely important to the narrative of the poem as it has a metaphorical meaning to it, so changing it to something more visually interesting was out of the question.
However, to have it look just a little bit more interesting, I decided to make the lining of the tent red and have the waterproof tarp draped over the tent black.
Red is a lot warmer color than black, and they work together very well and the final look of the tent was still faithful to the source material but a little more colorful.

When the paper set, I glued some decorative lines to the front and back of the tent. With it standing rigidly on it's own, it was a lot easier.
For the lines, I used a nylon thread that I had left over after the very first project I made under the AFC banner- the Nazgul gauntlet replica.

The final detail to add to the tent was the black tarp.
I cut out a square of an appropriate size to cover the tent, But I added some relief arcs and angles, to simulate the tarp being stiffly stretched over the tent.

I painted the final canvas piece the poetic black and added some gray highlights with a drybrush.

Next, I covered the stream bed with hot glue, creating the stream itself.
I used the hot glue gun to put a lot of small drops of glue between all the pebbles, getting only a thin layer on top of them.
After that, I used the hot nozzle of the gun, to smooth the surface of the water, without putting any more glue on.

It was my first time using hot glue as running water and to the very last minute I didn't know what technique I'll use for it.
I think it turned out great, although it probably would be better to use for some fast and steep mountain stream than a gently running water like here.

Next, I had to make all the figurines that would be submerged in the ocean.
I started with the guardian shark.
I decided to 3D print it too, same as the palm tree. For the model, I chose Shark by Maxim Sachs.
There were some more scary or dramatic poses available, but I wanted this shark to be peaceful guardian that never attacks unless provoked.
After printing, cleaning, gluing and sanding the mini, I base-coated the shark with a gray, water based, acrylic spray-paint. A choice that I would later greatly regret.

Withe the base color dry, I painted the underbelly of the shark with light gray.

I also painted the eyes and gills and shaded the fins.
I'm not enough of a shark specialist to know if this particular species matches this skin pattern but when I found a reference picture of it, I really wanted to try replicate it.

I also coated the mini with a clear lacquer to protect the paintjob, but unlike all of the other things on this diorama, I used glossy lacquer, instead of matt, so the fin sticking out of the water of the ocean, would seem wet.

Next, I glued the shark in place. I put a big glob of hot glue under his belly, between the fins, which let me position him well.
The unattached tail was a little loose. I was worried that it would lift up in the resin. So I added a string of hot glue to connect it to the ground.
The glue is translucent and won't be visible in the tinted resin.

The other model that will be submerged in resin was the boat.
The poem specifies a yacht, but I decided to save a lot on dioramas size and use a sailing dinghy as a replacement.
I really liked the Rode Neusje by Christian Pomeroy, so I chose it a a model.
It waas printed in two halves, cleaned and glued together. All the gaps were filled with a putty and sanded smooth.

I printed the boat in a smaller scale than a one that it was modeled for, so the benches and the steer didn't print properly. It was OK though since I wanted to recreate them with balsa anyway.
Boat got primed black. The additional components were cut out of balsa and painted separately, to not obscure the bottom of the boat.

After the boat and the equipment were hand painted and lacquered, I glued them all together.

To better resemble a yacht, I had to add a reeled mast to the boat.
I made it out of sturdy bamboo skewers that got notched where they cross and where the mast would be attached to the boat. I used a CA glue to permanently connect them, being very careful to get a right angle between them.

As a sail, I used a glue soaked paper towel that I shaped into place, using some thread to create dips where the reels would eventually be.

When the paper set, I added reels to both sides of the sail, using the same kind of thread an the entire mast got painted and attached to the boat.


With the boat finished, I attached it to the side of the dock, using the same technique as for the shark.

The diorama was ready to be covered with the resin. Little did I know, a disaster would struck that I wasn't ready for and nearly ruined the whole project.
Continue to reading part 3


