Materiales necesarios/ Required materials:
-Chapa offset / Offset plate
-Varilla de madera / Wood stick
-Cinta de enmascarar (de papel) / Masking tape (paper ones)
-Tijeras / Scissors
-Bisturí / Scalpel
-Regla metálica / Metallic ruler
-Martillo / Hammer
-Piso con alfombra o alguna superficie blanda y firme / A carpeted floor or a soft-steady surface
-Alfiler rosado / Pink pin
-Pared de cemento / Concrete wall
-Manos (dos) / Hands (two)
-Tiempo para leer bien cada paso y paciencia / Time to read well each step & patience

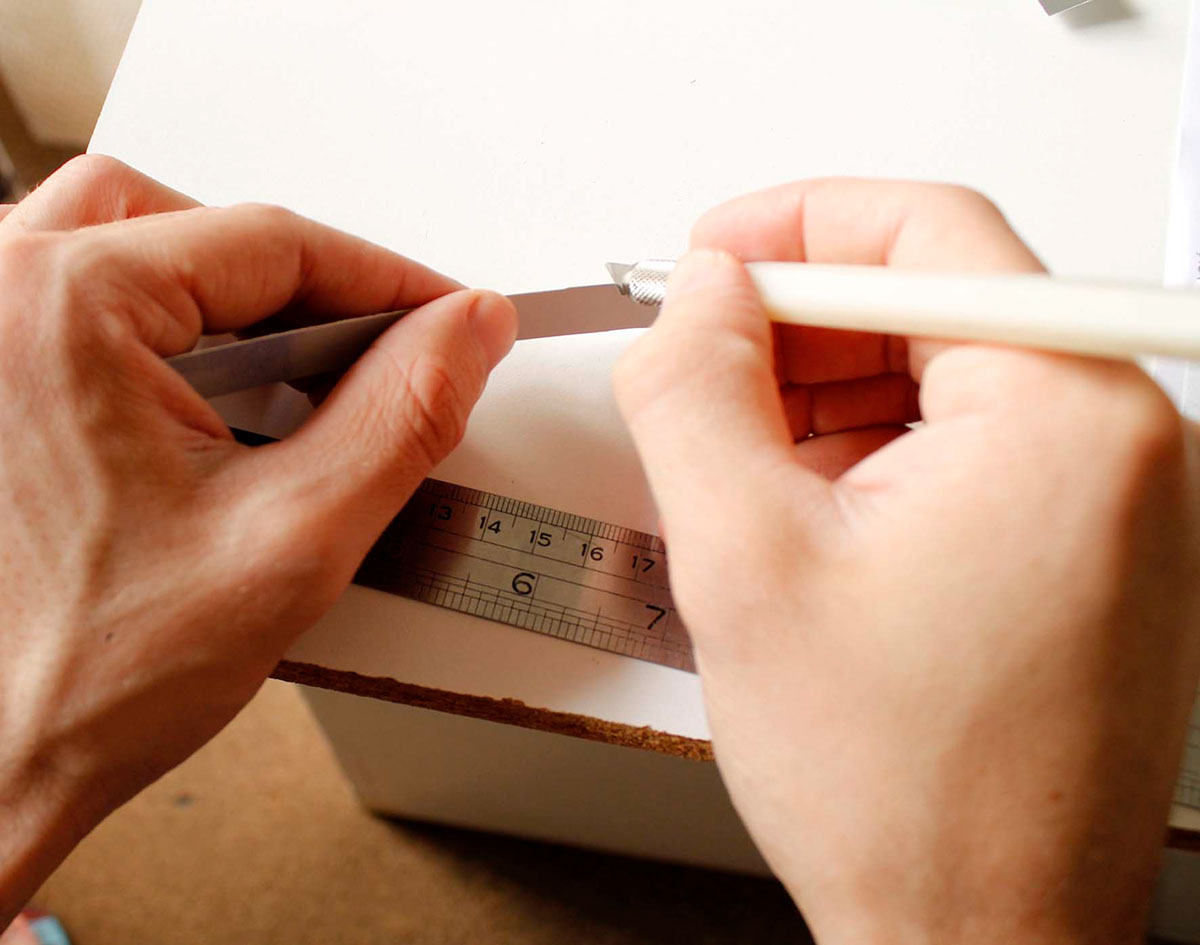
Paso 1: Con las tijeras, recortar un rectángulo de chapa offset, de un tamaño bastante más grande de lo necesario para hacer la pluma. Luego, con ayuda de una regla y un bisturí, trazar dos líneas paralelas, la separación entre estas líneas será del ancho del trazo que deseemos para nuestra pluma.
Step 1: With the scissors, cut a plate rectangle, in a bigger size than the necessary to make the pen. Later, with the ruler's help and the scalpel, trace two parallel lines, the space between the lines should be the desired stroke width our pen will have.
Step 1: With the scissors, cut a plate rectangle, in a bigger size than the necessary to make the pen. Later, with the ruler's help and the scalpel, trace two parallel lines, the space between the lines should be the desired stroke width our pen will have.

Paso 2: Utilizando ambas manos en la posición observada en la fotografía, doblamos la chapa por una de las marcas, y luego para el lado contrario, logrando de esta manera un corte perfecto. Luego repetimos la operación con la otra marca.
Step 2: Using both hands in the same position shown in the picture, bend the plate by one of the marks, and then bend to the other side, this way you will get a perfect cut. After that repeat the process with the other mark.
Step 2: Using both hands in the same position shown in the picture, bend the plate by one of the marks, and then bend to the other side, this way you will get a perfect cut. After that repeat the process with the other mark.
Paso 3: Con la ayuda del bisturí, o frotando suavemente contra una pared de cemento, desafilamos los bordes de la chapa. Esto evitará que boludos como yo se corten.
Step 3: With the scalpel, or gently rubbing againsta concrete wall, we blunt the plate edges. This will prevent stupid people like me from being cut.
Step 3: With the scalpel, or gently rubbing againsta concrete wall, we blunt the plate edges. This will prevent stupid people like me from being cut.

Paso 4: A la varilla de madera le haremos un corte en una de sus puntas, de unos dos o tres centímetros de profundidad. Este será el cuerpo de la pluma.
La varilla de la foto se vé así por que era de una pluma anterior que se rompió, por lo tanto está teñida con tinta y con pegotes de la cinta de enmascarar que tenía anteriormente.
Step 4: We will do a cut in one of the extremes of the wood stick, it will be about 2-3 centimeters deep.
This will be the pen's body.
The pictured stick looks like that because it belonged to an older pen that was broken, so its dyed with ink and sticky, due to earlier masking tape used on it.

Paso 5: Tomamos la tira de chapa e insertamos una de sus puntas en el corte realizado en la punta de la varilla de madera, y dejando unos dos centímetros, aproximadamente, raspamos suavemente con el bisturí. El lugar donde está la marca será la punta de la pluma, e indicará por donde debemos doblar mas tarde la chapa y donde perforarla.
Step 5: We take te plate and put it in the cut we done in the wood stick, and we do a little scratch, aproximately two centimeters away form the stick's end.
The place where the mark is placed will be the pen's nib end, and the scratch, later will indicate where to bend the plate and make the holes to it.
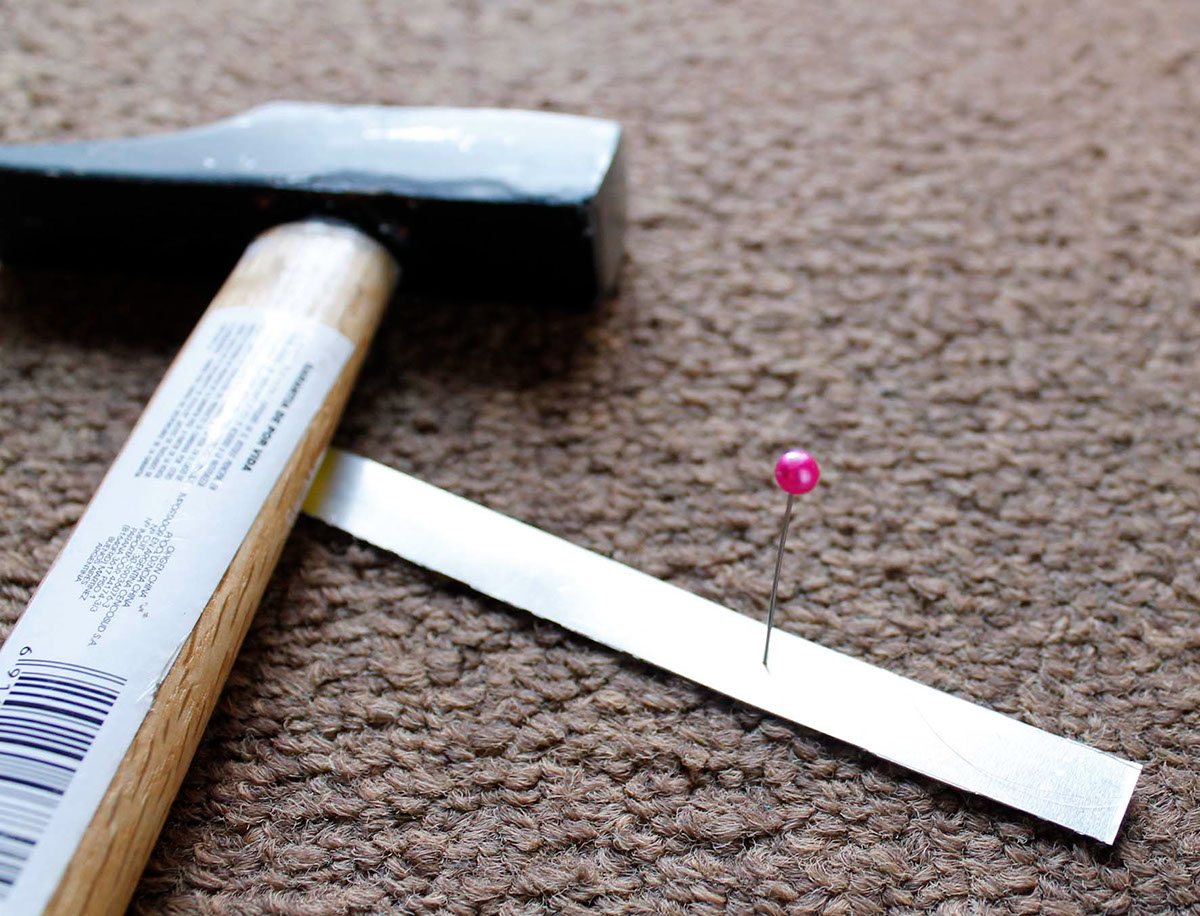
Paso 6: Con la ayuda de un alfiler rosado y un martillo (si algún hombre tiene problemas con los alfileres rosados pueden usar uno celeste, así se sienten mas machitos), practicaremos unas perforaciones. Es importante hacerlo sobre una superficie blanda para que el alfiler pueda pasar de lado a lado. También es muy importante ser prolijo y que las perforaciones queden perfectamente alineadas.
Step 6: Using the pink pin and the hammer, we will make some holes to the plate. It's very important to do it over a soft surface so the pin can pierce the plate and go across it.
It's also very important to be very prolix and make the holes perfectly aligned.
Step 6: Using the pink pin and the hammer, we will make some holes to the plate. It's very important to do it over a soft surface so the pin can pierce the plate and go across it.
It's also very important to be very prolix and make the holes perfectly aligned.

Paso 7: Al pasar el alfiler, del lado inferior de la chapa las perforaciones tienen que haber quedado con sus bordes levantados. Frótenlos suavemente contra la pared, y luego froten el lado opuesto, por que cuando froten la primera vez puede que parte de los bordes pasen hacia el otro lado, en vez de desprenderse. Pasamos un dedo y comprobamos que las perforaciones no tengan filo ni bordes sobresalientes para ningún lado. Si tuvieran alguno, repetir la operación.
Step 7: When the pin get trough the plate, it will rise sharp edges around the holes. Gently rub them against the wall, and then turn and rub the opposite side, because when you rub it the first time, the edges can turn to the other side instead of detaching. After doing this, using your fingertip check there's no edges left, if theres is something, repeat the operation.

Paso 8: Doblamos la chapa, con mucho cuidado y usando las manos, por la línea de perforaciones, haciendo que éstas queden justo en la punta de la pluma, por allí se producirá la descarga de tinta. Dependiendo del tipo de tinta que usen, diferente cantidad de perforaciones darán diferentes resultados, deberán experimentar para saber cuántas perforaciones son las ideales para una descarga apropiada.
Para la tinta Write 24-7 yo utilizo 4 perforaciones para una pluma de 1 cm.
La chapa debe quedar doblada pero no del todo, caso contrario la chapa se cortará por el doblés y habrá que comenzar nuevamente.
Una vez doblada, introducirla en la varilla de madera, y cortar el sobrante de chapa.
Step 8: Now, being very careful, bend the plate using your hands, and making the holes match the edge of the nib, the holes will drain the ink from the nib to the paper. Depending on the kind of ink you use, it can be more or less holes, you will have to make some experiments to find out how many holes you need.
To my homemade ink (my brand is Write 24-7), I make 4 holes in a 1cm wide nib.
The plate must be bended but not too much, if you press it too hard it will split in two and you will have to start again.
With the plate bended, introduce it in the stick, and cut the plate surplus.

Paso 9: Envolvemos el extremo de la varilla que sostiene la chapa con varias vueltas de cinta de pintor, esto le dará firmeza a la punta, así que no escatimen en cinta.
Step 9: Now wrap the pen and the plate togheter with masking tape. Put several rounds of tape around the nib, this will hold your nib tight, so dont spare tape here..
Step 9: Now wrap the pen and the plate togheter with masking tape. Put several rounds of tape around the nib, this will hold your nib tight, so dont spare tape here..

El resultado debería verse similar a esto.
The result should look like this.
The result should look like this.

Paso 10: Probar la pluma, y si funciona, a disfrutar, si no, a desafilar la punta, y si se rompe, a hacerla nuevamente, hasta yo que la sé hacer, muchas veces y sin razón aparente, fabrico alguna pluma que no funciona como esperaba. Lo único bueno es que el proceso entero lleva unos 15 minutos o menos.
Espero les sirva, saludos a todos!
Espero les sirva, saludos a todos!
Gracias por pasar!
Step 10: Test the pen, and if it works fine, enjoy it. If not, blunt the tip and test it, keep doing it until it works. If it gets broken before achieving a good result, make the pen again. Sometimes it just dont work correctly, but the good thing is the time it takes to do the entire process, about 15 minutes or less.
I hope this to be helpful, greetings!
Thanks for watching!!


