DVB102: Image Design and Production
A1 Portfolio of Images
Week 5
By Panaporn (Dinar) Kalpana N10374060


Topic: Colour Protraits
Image 16-20 Concept: Kabuki
Image 16-20 Concept: Kabuki
Date: 19/08/20
Image 16 Title: Painting Kabuki
Technique: Painting (Small round and bright paint brushes), 2B pencil, Watercolour (Red, white and black) and water
Process:
Image 16 Title: Painting Kabuki
Technique: Painting (Small round and bright paint brushes), 2B pencil, Watercolour (Red, white and black) and water
Process:
1. Searched the Kabuki image from internet
2. Sketched the image down in an A3 paper by drawing with a 2B pencil.
3. Painted the watercolours
Reflection: This image is called 'Kabuki Make-up', a Japanese traditional face make-up. The main colours are red, black and white. I think that these three colours are contrasting. It is my first time in several years that I did watercolour paint again. I think that the shade on the face is a little bit off compare to the original image. It would be better if I can control a paintbrush more freely. 


Topic: Colour Protraits
Image 16-20 Concept: Kabuki
Image 16-20 Concept: Kabuki
Date: 20/08/20
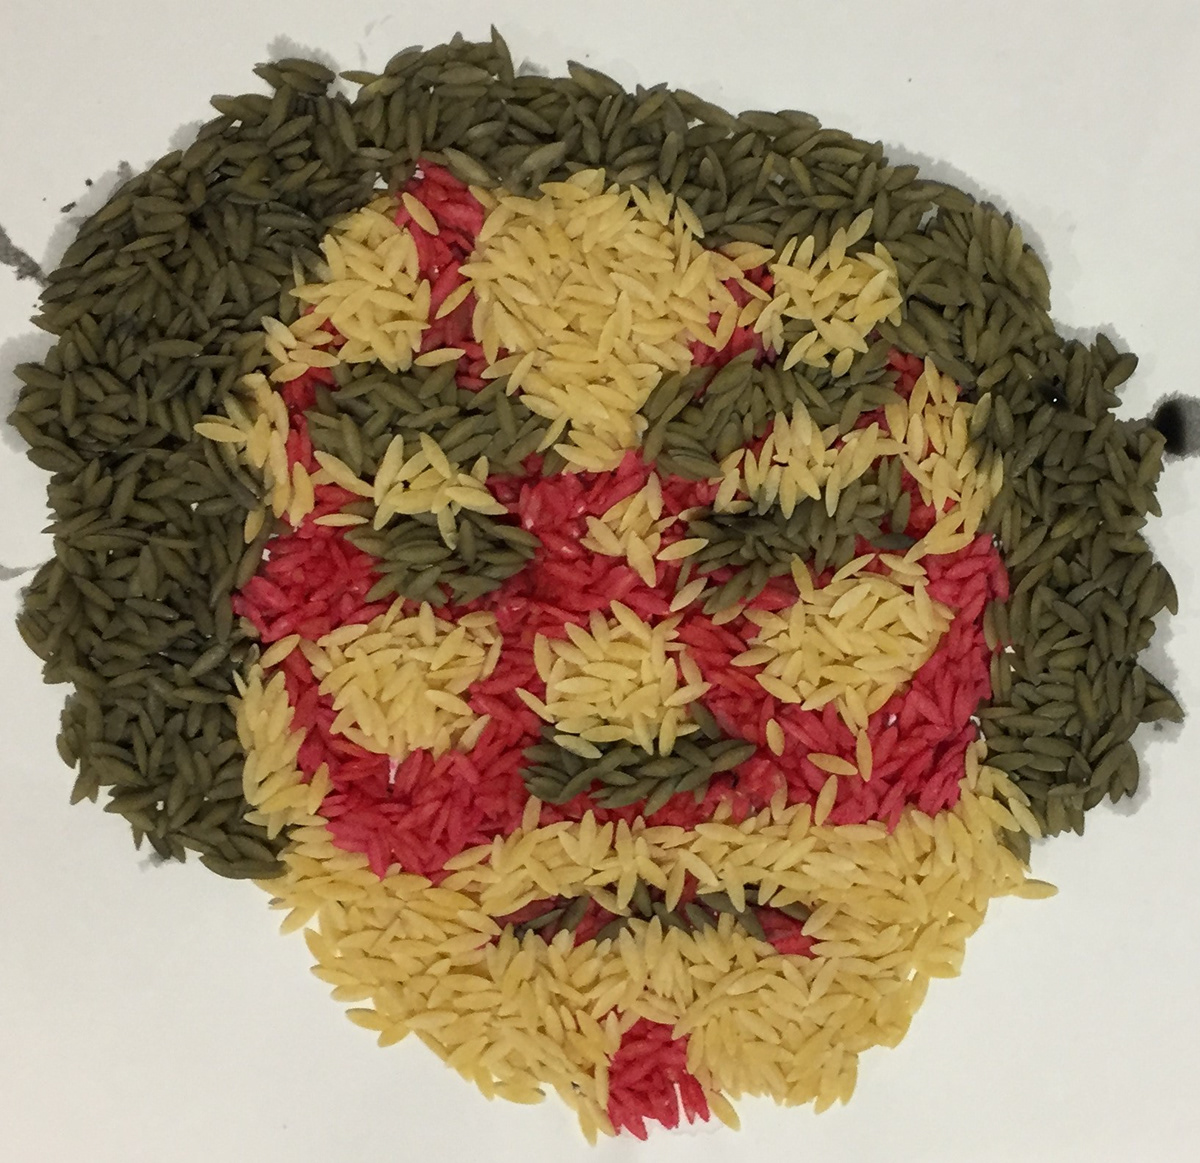
Image 17 Title: Risoni Pasta n.26 Kabuki
Technique: Risoni Pasta n.26, 2B pencil, Watercolour (Red and black) and water
Process:
Image 17 Title: Risoni Pasta n.26 Kabuki
Technique: Risoni Pasta n.26, 2B pencil, Watercolour (Red and black) and water
Process:
1. Copied the image down in an A3 paper by drawing with a 2B pencil.
2. Mixed water, watercolour and Risoni Pasta n.26 in a vessel.
3. Put coloured Risoni Pasta n.26 on the image in A3.
Reflection: I tried using Risoni pasta to create a Kabuki image. I think that it was a little bit hard to make the eye's detail. It would be better if I crush the pasta to make the eye parts.


Topic: Colour Protraits
Image 16-20 Concept: Kabuki
Image 16-20 Concept: Kabuki
Date: 21/08/20
Image 18 Title: Paper Kabuki
Technique: Tearing, A3 Paper, Pink Post-it note, Copic markers (Cool gray C3 and Black 100) and Glue
Process:
Image 18 Title: Paper Kabuki
Technique: Tearing, A3 Paper, Pink Post-it note, Copic markers (Cool gray C3 and Black 100) and Glue
Process:
1. Coloured a A3 paper and post-it notes with Copic markers.
2. Tore the paper and post-it notes.
3. Glued each piece of the papers to another A3 paper.
Reflection: I tried to use post-it notes and A3 paper to make a Kabuki image by tearing. I think that the shape of the Kabuki is wider than the original image. By using pink, grey and black colours, I think that they are contrasting although I did not use red paper. It would be better if I draw the Kabuki face layout with a pencil before glue pieces of paper.


Topic: Colour Protraits
Image 16-20 Concept: Kabuki
Image 16-20 Concept: Kabuki
Date: 22/08/20
Image 19 Title: Lotion Kabuki
Technique: Painting,2B pencil, A3 Paper, Body lotion and Watercolour (Red and black)
Process:
Image 19 Title: Lotion Kabuki
Technique: Painting,2B pencil, A3 Paper, Body lotion and Watercolour (Red and black)
Process:
1. Copied the image down in an A3 paper by drawing with a 2B pencil.
2. Mixed watercolour with lotion in a vessel.
3. Painted onto the paper.
Reflection: I tried using body lotion to paint a Kabuki image. I think that it is easier than using the Risoni pasta and tearing paper. However, the colours of the mixtures between watercolours and body lotion are very light as red turned to orange and black turned to grey. I think that It would be better if I can find a watercolour to mix with the lotion to make the colour red.


Topic: Colour Protraits
Image 16-20 Concept: Kabuki
Image 16-20 Concept: Kabuki
Date: 23/08/20
Image 20 Title: Copic Kabuki
Technique: Painting,2B pencil, A3 Paper, Copic markers
Process:
Image 20 Title: Copic Kabuki
Technique: Painting,2B pencil, A3 Paper, Copic markers
Process:
1. Copied the image down in an A3 paper by drawing with a 2B pencil.
2. Rendered onto the paper by using Copic markers.
Reflection: I tried using Copic markers to paint a Kabuki image. I think that it was the easiest technique in all five techniques. The image is as similar to a vector image. However, there was a problem which was the Copic markers leaking when rendering. There would be no leaking problem if I use a breed-proof paper.

